This is the second edition of a book aimed at engineers, scientists, and hobbyists who want to interface PCs with hardware projects using graphical user interfaces. Desktop and web-based applications are covered.
The programming language used is Python 3, which is one of the most popular languages around: speed of programming being a key feature. The book has been revised and updated with an emphasis on getting the user to produce practical designs with ease – a text editor is all that is required to produce Python programs.
Hardware interfacing is achieved using an Arduino Uno as a remote slave. A full description and source code of the communication interface is given in the book. The slave provides digital and analog input and outputs. Multiple Unos can be included in one project with all control code written in Python and running on a PC One project involves a PIC microcontroller with the code provided that can be loaded into the PIC using the Uno.
The web applications and server are all implemented in Python, allowing you to access your electronic hardware over the Internet. The Raspberry Pi computer can be used as your web server. An introductory chapter is provided to get you started with using Linux.
The book is written for use with Debian or variations including Mint or Ubuntu. All of the programs in the book are freely available, ready to use and experiment with by way of a download from Elektor.
Der QA403 ist QuantAsylum's Audio-Analyzer der vierten Generation. Der QA403 erweitert die Funktionalität des QA402 mit verbesserter Rausch- und Verzerrungsleistung sowie einem flacheren Frequenzgang an den Bandkanten. Die kompakte Größe des QA403 bedeutet, dass Sie ihn fast überall hin mitnehmen können.
Features
24-Bit-ADC/DAC
Bis zu 192 kS/s
Vollständig vom PC isoliert
Differenzielle Eingabe/Ausgabe
Stromversorgung über USB
Eingebauter Dämpfer
Schnelles Booten und treiberlos
Der QA403 ist ein treiberloses USB-Gerät, das heißt, er ist sofort nach dem Einstecken einsatzbereit. Die Software ist kostenlos und die Hardware lässt sich schnell und einfach von einem Gerät auf das nächste übertragen. Wenn Sie also ins Werk fahren müssen, um ein Problem zu beheben, oder den QA403 mit nach Hause nehmen möchten, um von zu Hause aus zu arbeiten, können Sie das ohne Probleme tun.
No-Cal Entwurf
Der QA403 wird mit einer Werkskalibrierung in seinem Flash-Speicher geliefert, die eine gleichbleibende Leistung von Gerät zu Gerät gewährleistet. In Ihrer Produktionslinie können Sie einen weiteren QA403 installieren und sicher sein, dass die Messwerte des einen Geräts mit denen des nächsten Geräts übereinstimmen werden. Es ist nicht zu erwarten, dass eine Neukalibrierung in regelmäßigen Abständen erforderlich sein wird.
Messungen
Die Durchführung grundlegender Messungen ist schnell und einfach. Mit wenigen Klicks können Sie den Frequenzgang, den THD(+N), die Verstärkung, den SNR und mehr Ihres zu prüfenden Geräts ermitteln.
Dynamischer Bereich
Der QA403 bietet 8 Verstärkungsbereiche am Eingang (0 bis +42 dBV in 6 Schritten) und 4 Verstärkungsbereiche am Ausgang (-12 bis +18 dBV in 10 dB-Schritten). Dies gewährleistet eine gleichbleibende Leistung über einen sehr großen Bereich von Eingangs- und Ausgangspegeln. Der maximale AC-Eingang des QA403 beträgt +32 dBV = 40 Vrms. Der maximale Gleichstrompegel beträgt ±40 V, und der maximale ACPEAK + DC = ±56 V.
Einfache Programmierbarkeit
Der QA403 unterstützt eine REST-Schnittstelle, die die Automatisierung von Messungen in nahezu jeder Sprache, die Sie sich vorstellen können, erleichtert. Von Python über C++ bis hin zu Visual Basic – wenn Sie wissen, wie man eine Webseite in Ihrer Lieblingssprache lädt, können Sie den QA403 fernsteuern. Die Messungen sind schnell und reaktionsschnell, wobei normalerweise Dutzende von Befehlen pro Sekunde verarbeitet werden.
Isoliert und USB-betrieben
Der QA403 ist vom PC isoliert, d. h. Sie messen Ihren Prüfling und sind nicht auf der Suche nach einer Phantom-Masseschleife. Der QA403 wird, wie fast alle unsere Geräte, über USB mit Strom versorgt. Wenn Sie das Gerät aus der Ferne einrichten, packen Sie einfach einen Hub mit Stromanschluss in Ihre Tasche, und Ihr gesamter Testaufbau kann mit einem Minimum an Kabeln ausgeführt werden.
Auf Wiedersehen Soundkarte, Hallo QA403
Haben Sie es satt, eine Soundkarte zum Laufen zu bringen? Der Kalibrierungs-Albtraum? Das Fehlen von Verstärkungsstufen? Der begrenzte Antrieb? Sind Sie es leid, sich mit den festen Eingangsbereichen herumzuschlagen? Die Sorge, dass Sie sie mit zu viel DC oder AC zerstören könnten? Genervt von den Masseschleifen? Aus diesem Grund hat QuantAsylum den QA403 entwickelt.
Technische Daten
Abmessungen
177 x 44 x 97 mm (B x H x T)
Gewicht
435 g
Gehäuse-Material
Pulverbeschichtetes Aluminium (2 mm dicke Frontplatte, 1,6 mm dicke Ober-/Unterseite)
Downloads
Datasheet
User Manual
GitHub
The EC200U-EU C4-P01 development board features the EC200U-EU LTE Cat 1 wireless communication module, offering a maximum data rate of up to 10 Mbps for downlink and 5 Mbps for uplink. It supports multi-mode and multi-band communication, making it a cost-effective solution.
The board is designed in a compact and unified form factor, compatible with the Quectel multi-mode LTE Standard EC20-CE. It includes an onboard USB-C port, allowing for easy development with just a USB-C cable.
Additionally, the board is equipped with a 40-pin GPIO header that is compatible with most Raspberry Pi HATs.
Features
Equipped with EC200U-EU LTE Cat 1 wireless communication module, multi-mode & multi-band support
Onboard 40-Pin GPIO header, compatible with most Raspberry Pi HATs
5 LEDs for indicating module operating status
Supports TCP, UDP, PPP, NITZ, PING, FILE, MQTT, NTP, HTTP, HTTPS, SSL, FTP, FTPS, CMUX, MMS protocols, etc.
Supports GNSS positioning (GPS, GLONASS, BDS, Galileo, QZSS)
Onboard Nano SIM card slot and eSIM card slot, dual card single standby
Onboard MIPI connector for connecting MIPI screen and is fully compatible with Raspberry Pi peripherals
Onboard camera connector, supports customized SPI cameras with a maximum of 300,000 pixels
Provides tools such as QPYcom, Thonny IDE plugin, and VSCode plugin, etc. for easy learning and development
Comes with online development resources and manual (example in QuecPython)
Technische Daten
Applicable Regions
Europe, Middle East, Africa, Australia, New Zealand, Brazil
LTE-FDD
B1, B3, B5, B7, B8, B20, B28
LTE-TDD
B38, B40, B41
GSM / GPRS / EDGE
GSM: B2, B3, B5, B8
GNSS
GPS, GLONASS, BDS, Galileo, QZSS
Bluetooth
Bluetooth 4.2 (BR/EDR)
Wi-Fi Scan
2.4 GHz 11b (Rx)
CAT 1
LTE-FDD: DL 10 Mbps; UL 5 Mbps
LTE-TDD: DL 8.96 Mbps; UL 3.1 Mbps
GSM / GPRS / EDGE
GSM: DL 85.6 Kbps; UL 85.6 Kbps
USB-C Port
Supports AT commands testing, GNSS positioning, firmware upgrading, etc.
Communication Protocol
TCP, UDP, PPP, NITZ, PING, FILE, MQTT, NTP, HTTP, HTTPS, SSL, FTP, FTPS, CMUX, MMS
SIM Card
Nano SIM and eSIM, dual card single standby
Indicator
P01: Module Pin 1, default as EC200A-XX PWM0
P05: Module Pin 5, NET_MODE indicator
SCK1: SIM1 detection indicator, lights up when SIM1 card is inserted
SCK2: SIM2 detection indicator, lights up when SIM2 card is inserted
PWR: Power indicator
Buttons
PWK: Power ON/OFF
RST: Reset
BOOT: Forcing into firmware burning mode
USB ON/OFF: USB power consumption detection switch
Antenna Connectors
LTE main antenna + DIV / WiFi (scanning only) / Bluetooth antenna + GNSS antenna
Operating Temperature
−30~+75°C
Storage Temperature
−45~+90°C
Downloads
Wiki
Quectel Resources
Radios selber bauen ist zwar ein altes, aber auch heute ein immer noch aktuelles Thema. Lange Zeit war das Radiobasteln der Einstieg in die Elektronik. Inzwischen gibt es zwar auch andere Wege, vor allem über Computer, Mikrocontroller und die Digitaltechnik. Allerdings kommen die analogen Wurzeln der Elektronik oft zu kurz. Die Radiotechnik eignet sich besonders gut als Lernfeld der Elektronik, weil man hier mit den einfachsten Grundlagen beginnen kann. Aber auch die Verbindung zur modernen Digitaltechnik liegt auf der Hand, wenn es z. B. um digitales Radio geht.Die Hochfrequenztechnik ist eines der Gebiete, auf denen man auch heute noch eigene Ideen relativ leicht in die Tat umsetzen kann. Unzählige Schaltungsvarianten mit besonderen Zielsetzungen geben Raum für sinnvolle Experimente und Projekte. Vieles kann man eben nicht einfach kaufen. Detektorradios ohne eigene Energiequelle, einfache Röhrenempfänger mit dem besonders angenehmen Klang, die ersten Empfangsversuche mit dem digitalen Rundfunk DRM oder Spezialempfänger für den Amateurfunk, all dies lässt sich mit wenig Aufwand realisieren.Neben dem alten Detektorempfänger sind vor allem Röhrengeräte und das moderne digitale Radio DRM interessante Themen; erst recht, wenn man einen leistungsfähigen Röhrenempfänger für DRM baut. Aber auch der Bau eines Audioempfängers oder einfacher Transistorradios für Mittel- und Kurzwelle ist unkompliziert und bringt eine Menge Spaß. Nicht zuletzt spielt auch hier der PC mit entsprechender Software bei der Abstimmung digital gesteuerter Oszillatoren eine entscheidende Rolle. Die Quelltexte der verwendeten Programme sind vollständig abgedruckt.
This book is about the Raspberry Pi 3 computer and its use in various control and monitoring applications. The book explains in simple terms and with tested and working example projects, how to configure the Raspberry Pi 3 computer, how to install and use the Linux operating system, and how to write hardware based applications programs using the Python programming language.
The nice feature of this book is that it covers many Raspberry Pi 3 based hardware projects using the latest hardware modules such as the Sense HAT, Swiss Pi, MotoPi, Camera module, and many other state of the art analog and digital sensors. An important feature of the Raspberry Pi 3 is that it contains on-board Bluetooth and Wi-Fi modules. Example projects are given in the book on using the Wi-Fi and the Bluetooth modules to show how real-data can be sent to the Cloud using the Wi-Fi module, and also how to communicate with an Android based mobile phone using the Bluetooth module.
The book is ideal for self-study, and is intended for electronic/electrical engineering students, practising engineers, research students, and for hobbyists. It is recommended that the book should be followed in the given Chapter order.
Over 30 projects are given in the book. All the projects in the book are based on the Python programming language and they have been fully tested. Full program listings of every project are given in the book with comments and full descriptions. Experienced programmers should find it easy to modify and update the programs to suit their needs.
The following sub-headings are given for each project to make it as easy as possible for the readers to follow the projects:
Project title
Description
Aim of the project
Raspberry Pi type
Block diagram
Circuit diagram
Program listing
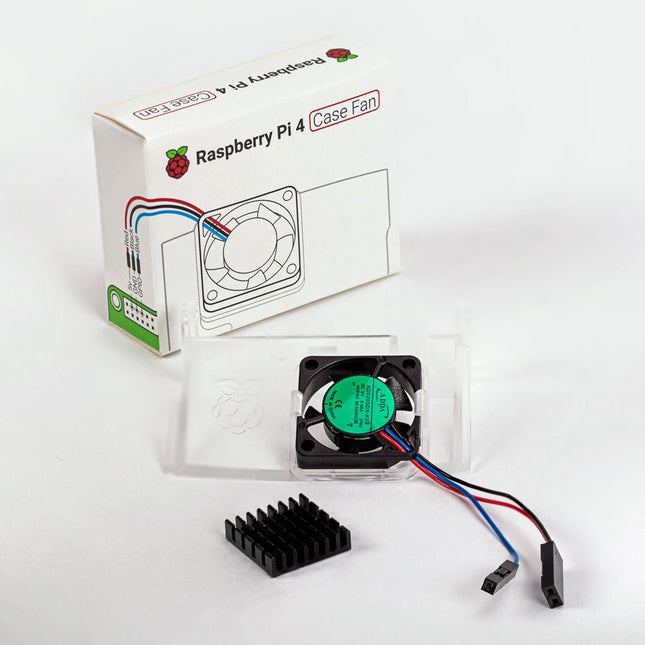
Dieser Lüfter wurde für Übertakter und andere Power-User entwickelt und hält Ihren Raspberry Pi 4 auch unter starker Last auf einer angenehmen Betriebstemperatur. Der temperaturgesteuerte Lüfter liefert einen Luftstrom von bis zu 1,4 CFM über den Prozessor, den Speicher und den Energieverwaltungs-IC. Der mitgelieferte Kühlkörper (18 x 8 x 10 mm) mit selbstklebendem Pad verbessert die Wärmeübertragung vom Prozessor.
Der Raspberry Pi 4 Gehäuselüfter funktioniert mit Raspberry Pi 4 und dem offiziellen Raspberry Pi 4 Gehäuse.
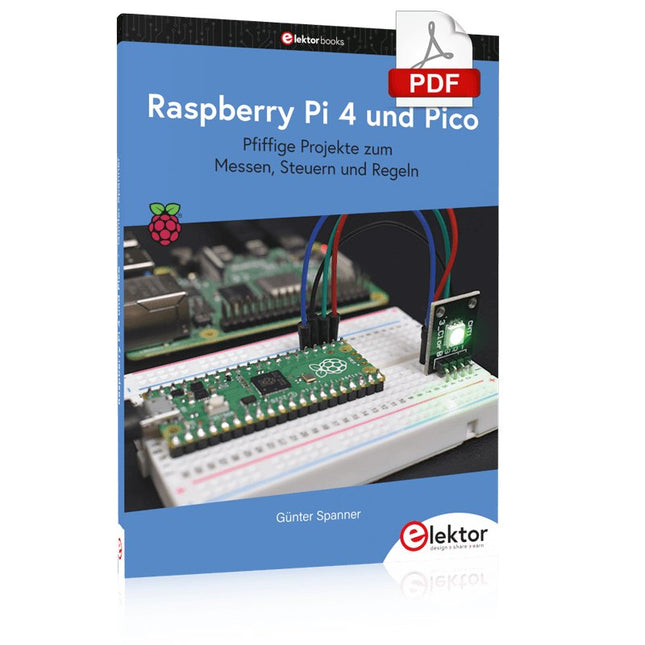
Pfiffige Projekte zum Messen, Steuern und Regeln
Der Raspberry Pi dominiert seit vielen Jahren die Maker-Szene. Frei verfügbare I/O-Pins erfordern ihn aller Zeiten zu einem der beliebtesten Prozessorboards. Allerdings verfügt der klassische Raspberry Pi über keinerlei Analogeingänge. Eine direkte Messung analoger Werte ist damit nicht möglich. So können weder Photodioden noch NTCs oder Hallsensoren etc. unmittelbar ausgelesen werden. Zudem sind die Pins direkt, d. H. ohne Treiber oder Schutzschaltung, mit den freiliegenden Kontakten verbunden. Dadurch kann der zentrale Controller und damit der gesamte Raspberry Pi schnell zerstört werden.
Mit dem Pico können diese Probleme elegant gelöst werden. Er kann als sogenanntes „Frontend“ problemlos verschiedene Messaufgaben übernehmen. Zudem ist der Pico deutlich preisgünstiger als ein klassischer Raspberry Pi 4. Falls eine Fehlbeschaltung zur Zerstörung des Pico führt, ist dies vor allem für nicht-professionelle Anwender relativ leicht zu verkraften. Der klassische Raspberry Pi und der Pico werden so zum idealen Duo.
Das Buch führt entsprechend in das weite und hochaktuelle Gebiet der modernen Controllertechnik anhand der beiden Boards „Raspberry Pi 4“ und „Raspberry Pi Pico“ ein. Neben einer tiefergehenden Einführung in die Arbeits- und Funktionsweise des Controllerboards selbst wird insbesondere auch auf die Messwerterfassung und -verarbeitung mit digitalen Prozessoren eingegangen. Insbesondere die Kombination beider Systeme bietet vielfältige und hochinteressante Möglichkeiten.
Praktische Projekte aus dem Inhalt:
USB-Verbindung zwischen Raspberry Pi 4 und Pico
I²C-Kommunikation und Pico als I²C-Device
Voltmeter und Computerthermometer
Pico W als Web-Server und WLAN-Scanner
Frequenzmesser und -generatoren
OLED-Displays an Pico und Raspberry Pi 4
Energiesparmonitor
Welche Astronauten sind im Orbit?
Mini-Monitor für den aktuellen Bitcoin-Kurs
Das Raspberry Pi 45 W USB-C Netzteil ist die ideale Wahl für die Stromversorgung USB-C-kompatibler Raspberry Pi-Produkte. Es eignet sich besonders für Raspberry Pi 5-Nutzer, die leistungsstarke Peripheriegeräte wie Festplatten und SSDs betreiben möchten.
Mit bis zu 5,1 V/5 A unterstützt es die USB-PD-Aushandlung (Power Delivery), sodass der Raspberry Pi 5 automatisch das optimale Energieprofil wählt. Dadurch kann der Raspberry Pi 5 die USB-Strombegrenzung von standardmäßig 600 mA auf 1,6 A erhöhen und so zusätzliche Leistung für Peripheriegeräte bereitstellen, die über die vier USB-A-Anschlüsse angeschlossen sind.
Dank der umfassenden Auswahl an integrierten Stromprofilen eignet sich das Raspberry Pi 45-W-USB-C-Netzteil auch hervorragend für die Stromversorgung von PD-kompatiblen Geräten von Drittanbietern wie Smartphones, Tablets und Laptops. Verfügbare Profile sind 9,0 V/5,0 A, 12,0 V/3,75 A, 15,0 V/3,0 A und 20,0 V/2,25 A, die alle eine maximale Leistung von 45 W liefern.
Technische Daten
Eingang
100-240 V AC
Ausgang
5,1 V/5,0 A, 9,0 V/5,0 A, 12,0 V/3,75 A, 15,0 V/3,0 A, 20,0 V/2,25 A (Power Delivery)
Anschluss
USB-C
Kabel
1,5 m, 17AWG (weiß)
Region
EU
Downloads
Datasheet
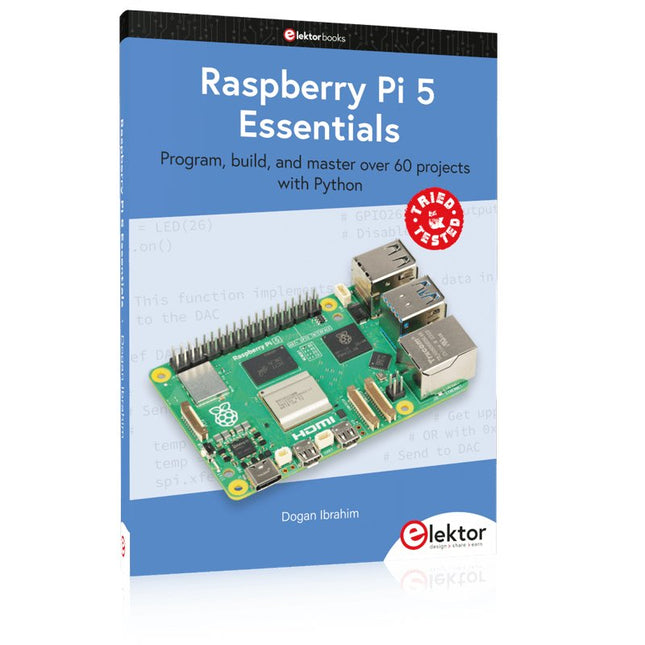
Program, build, and master over 60 projects with Python
The Raspberry Pi 5 is the latest single-board computer from the Raspberry Pi Foundation. It can be used in many applications, such as in audio and video media centers, as a desktop computer, in industrial controllers, robotics, and in many domestic and commercial applications. In addition to the well-established features found in other Raspberry Pi computers, the Raspberry Pi 5 offers Wi-Fi and Bluetooth (classic and BLE), which makes it a perfect match for IoT as well as in remote and Internet-based control and monitoring applications. It is now possible to develop many real-time projects such as audio digital signal processing, real-time digital filtering, real-time digital control and monitoring, and many other real-time operations using this tiny powerhouse.
The book starts with an introduction to the Raspberry Pi 5 computer and covers the important topics of accessing the computer locally and remotely. Use of the console language commands as well as accessing and using the desktop GUI are described with working examples. The remaining parts of the book cover many Raspberry Pi 5-based hardware projects using components and devices such as
LEDs and buzzers
LCDs
Ultrasonic sensors
Temperature and atmospheric pressure sensors
The Sense HAT
Camera modules
Example projects are given using Wi-Fi and Bluetooth modules to send and receive data from smartphones and PCs, and sending real-time temperature and atmospheric pressure data to the cloud.
All projects given in the book have been fully tested for correct operation. Only basic programming and electronics experience are required to follow the projects. Brief descriptions, block diagrams, detailed circuit diagrams, and full Python program listings are given for all projects described.
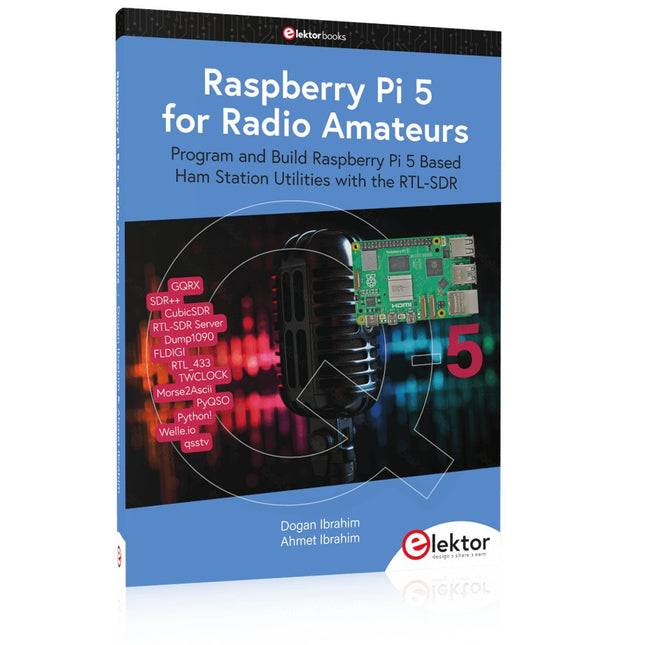
Program and Build Raspberry Pi 5 Based Ham Station Utilities with the RTL-SDR
The RTL-SDR devices (V3 and V4) have gained popularity among radio amateurs because of their very low cost and rich features. A basic system may consist of a USB based RTL-SDR device (dongle) with a suitable antenna, a Raspberry Pi 5 computer, a USB based external audio input-output adapter, and software installed on the Raspberry Pi 5 computer. With such a modest setup, it is possible to receive signals from around 24 MHz to over 1.7 GHz.
This book is aimed at amateur radio enthusiasts and electronic engineering students, as well as at anyone interested in learning to use the Raspberry Pi 5 to build electronic projects. The book is suitable for both beginners through experienced readers. Some knowledge of the Python programming language is required to understand and eventually modify the projects given in the book. A block diagram, a circuit diagram, and a complete Python program listing is given for each project, alongside a comprehensive description.
The following popular RTL-SDR programs are discussed in detail, aided by step-by-step installation guides for practical use on a Raspberry Pi 5:
SimpleFM
GQRX
SDR++
CubicSDR
RTL-SDR Server
Dump1090
FLDIGI
Quick
RTL_433
aldo
xcwcp
GPredict
TWCLOCK
CQRLOG
klog
Morse2Ascii
PyQSO
Welle.io
Ham Clock
CHIRP
xastir
qsstv
flrig
XyGrib
FreeDV
Qtel (EchoLink)
XDX (DX-Cluster)
WSJT-X
The application of the Python programming language on the latest Raspberry Pi 5 platform precludes the use of the programs in the book from working on older versions of Raspberry Pi computers.
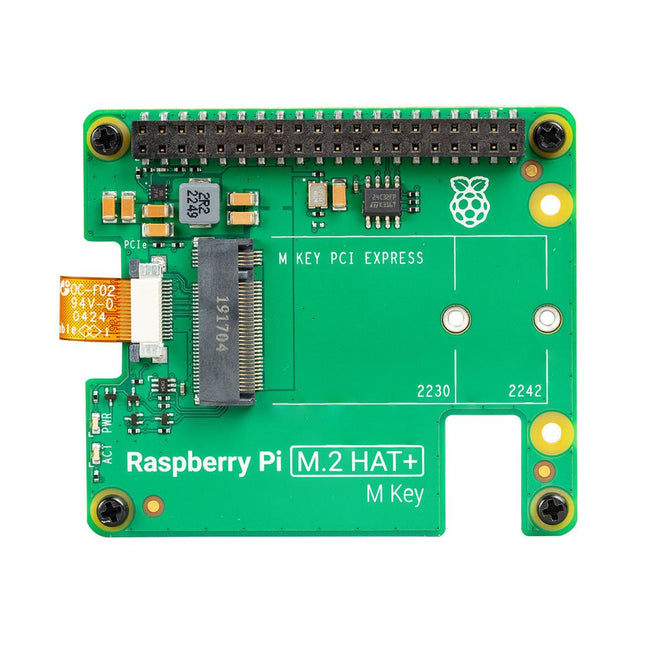
Der Raspberry Pi M.2 HAT+ ermöglicht den Anschluss von M.2-Peripheriegeräten wie NVMe-Laufwerken und KI-Beschleunigern an die PCIe 2.0-Schnittstelle des Raspberry Pi 5 und unterstützt eine schnelle Datenübertragung (bis zu 500 MB/s) zu und von NVMe-Laufwerken und anderem PCIe-Zubehör.
Raspberry Pi M.2 HAT+ unterstützt Geräte mit M.2 M Key Edge-Anschluss in den Formfaktoren 2230 und 2242. Es ist in der Lage, angeschlossene M.2-Geräte mit bis zu 3 A zu versorgen.
Features
Unterstützt Single-Lane-PCIe-2.0-Schnittstelle (500 MB/s Spitzenübertragungsrate)
Unterstützt Geräte, die den M.2 M Key Edge-Anschluss verwenden
Unterstützt Geräte mit dem Formfaktor 2230 oder 2242
Kann angeschlossene M.2-Geräte mit bis zu 3 A versorgen
Power- und Aktivitäts-LEDs
Lieferumfang
1x Raspberry Pi 5 M.2 HAT+
1x Flachbandkabel
1x GPIO Stacking-Header
4x Abstandshalter
8x Schrauben
Downloads
Datasheet
Schematics
Assembly instructions
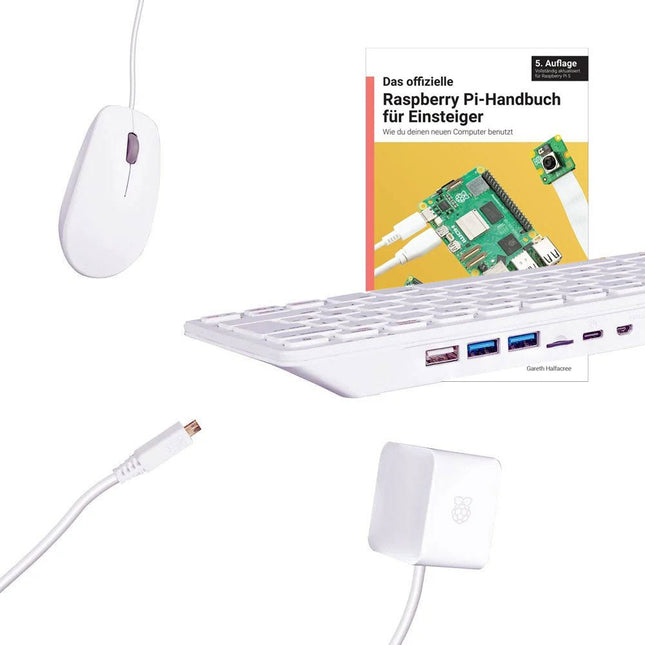
Der Raspberry Pi 500 (basierend auf dem Raspberry Pi 5) verfügt über einen Quad-Core-64-Bit-Arm-Prozessor, einen RP1-I/O-Controller, 8 GB RAM, drahtloses Netzwerk, Dual-Display-Ausgabe und 4K-Videowiedergabe und einen 40-poligen GPIO-Header. Es ist ein leistungsstarker, kompakter All-in-One-Computer, der in eine tragbare Tastatur integriert ist.
Der eingebaute Aluminium-Kühlkörper sorgt für eine verbesserte thermische Leistung, sodass der Raspberry Pi 500 auch bei starker Belastung schnell und reibungslos läuft.
Technische Daten
SoC
Broadcom BCM2712
CPU
ARM Cortex-A76 (ARM v8) 64-bit
Taktrate
4x 2,4 GHz
GPU
VideoCore VII (800 MHz)
RAM
8 GB LPDDR4X (4267 MHz)
WLAN
IEEE 802.11b/g/n/ac (2,4 GHz/5 GHz)
Bluetooth
Bluetooth 5.0, BLE
Ethernet
Gigabit-Ethernet (mit PoE+ Unterstützung)
USB
2x USB-A 3.0 (5 GBit/s)1x USB-A 2.01x USB-C (zur Stromversorgung)
PCI Express
1x PCIe 2.0
GPIO
Standard 40-Pin GPIO-Header
Video
2x Micro-HDMI-Anschlüsse (4K60)
Multimedia
H.265 (4K60-Dekodierung)OpenGL ES 3.1, Vulkan 1.2
SD-Karte
microSD
Stromversorgung
5 V DC (über USB-C)
Tastaturlayout
Deutsch (QWERTZ)
Abmessungen
286 x 122 x 23 mm
Lieferumfang
Raspberry Pi 500 (DE-Tastaturlayout, QWERTZ)
Offizielles 27 W Netzteil für Raspberry Pi (EU, weiß)
Offizielle Raspberry Pi Maus (weiß)
Offizielles Raspberry Pi HDMI-Kabel (weiß, 2 m)
32 GB microSD-Karte mit vorinstalliertem Raspberry Pi OS
Das offizielle Raspberry Pi-Handbuch für Einsteiger (5. Auflage)
Downloads
Datasheet
SD card quality is crucial for a good Raspberry Pi experience. Raspberry Pi's A2 microSD cards support higher bus speeds and command queuing, improving random read performance and narrowing the gap with NVMe SSDs. These cards are rigorously tested for optimal performance with Raspberry Pi models.
Features
Capacity: 32 GB
Support for DDR50 and SDR104 bus speeds and command queueing (CQ) extension
Speed Class: C10, U3, V30, A2
Random 4 KB read performance: 3,200 IOPS (Raspberry Pi 4, DDR50) 5,000 IOPS (Raspberry Pi 5, SDR104)
Random 4 K write performance: 1,200 IOPS (Raspberry Pi 4, DDR50) 2,000 IOPS (Raspberry Pi 5, SDR104)
Shock-proof, X-ray–proof, and magnet-proof
microSDHC/microSDXC formats
Downloads
Datasheets
SD card quality is crucial for a good Raspberry Pi experience. Raspberry Pi's A2 microSD cards support higher bus speeds and command queuing, improving random read performance and narrowing the gap with NVMe SSDs. These cards are rigorously tested for optimal performance with Raspberry Pi models.
Features
Capacity: 64 GB
Support for DDR50 and SDR104 bus speeds and command queueing (CQ) extension
Speed Class: C10, U3, V30, A2
Random 4 KB read performance: 3,200 IOPS (Raspberry Pi 4, DDR50) 5,000 IOPS (Raspberry Pi 5, SDR104)
Random 4 K write performance: 1,200 IOPS (Raspberry Pi 4, DDR50) 2,000 IOPS (Raspberry Pi 5, SDR104)
Shock-proof, X-ray–proof, and magnet-proof
microSDHC/microSDXC formats
Downloads
Datasheets
This book is about advanced programming of the Raspberry Pi computer using the Python programming language. The book explains in simple terms and with examples:
How to configure the Raspberry Pi computer;
How to install and use the Linux operating system and the desktop;
How to write advanced programs using the Python programming language;
How to use graphics in our programs;
How to develop hardware based projects using the Raspberry Pi.
The book starts with an introduction to the Raspberry Pi computer and covers the topics of purchasing all the necessary accessories and installing and operating the Linux operating system in command mode. The network interface of the RPi is explained in simple steps, demonstrating how the computer can be accessed remotely from a desktop or a laptop computer.
The remaining parts of the book cover the Python programming language in detail, including advanced topics such as operating system calls, multitasking, interprocess synchronization and interprocess communication techniques. The important topic of network programming using UDP and TCP protocols is described with working examples. The Tkinter graphical user interface module (GUI) is described in detail with example widgets and programs.
The last part of the book includes hardware projects based on using the advanced programming topics such as multitasking and interprocess communication techniques. All the projects given in the book have been fully tested and are working. Complete program listings of all projects are provided with detailed explanations.
Das Raspberry Pi AI HAT+ ist eine Erweiterungsplatine für den Raspberry Pi 5, die einen integrierten Hailo AI-Beschleuniger enthält. Dieses Add-on bietet einen kostengünstigen, effizienten und leicht zugänglichen Ansatz für die Integration von leistungsstarken KI-Funktionen, mit Anwendungen in den Bereichen Prozesssteuerung, Sicherheit, Heimautomatisierung und Robotik.
Das AI HAT+ ist in Modellen mit 13 oder 26 Tera-Operationen pro Sekunde (TOPS) erhältlich und basiert auf den neuronalen Netzwerkbeschleunigern Hailo-8L und Hailo-8. Dieses 13 TOPS-Modell unterstützt effizient neuronale Netze für Aufgaben wie Objekterkennung, Semantik- und Instanzsegmentierung, Posenschätzung und mehr. Die 26 TOPS-Variante ist für größere Netzwerke geeignet, ermöglicht eine schnellere Verarbeitung und ist für den gleichzeitigen Betrieb mehrerer Netzwerke optimiert.
Das AI HAT+ wird über die PCIe Gen3-Schnittstelle des Raspberry Pi 5 angeschlossen. Wenn auf dem Raspberry Pi 5 eine aktuelle Version des Raspberry Pi OS läuft, erkennt es automatisch den integrierten Hailo-Beschleuniger und macht die neuronale Verarbeitungseinheit (NPU) für KI-Aufgaben verfügbar. Darüber hinaus unterstützen die im Raspberry Pi OS enthaltenen rpicam-apps Kameraanwendungen das KI-Modul nahtlos und nutzen die NPU automatisch für kompatible Nachbearbeitungsfunktionen.
Lieferumfang
Raspberry Pi AI HAT+ (13 TOPS)
Montage-Hardware-Kit (Abstandshalter, Schrauben)
16 mm GPIO-Stacking-Header
Downloads
Datasheet
Das Raspberry Pi AI HAT+ ist eine Erweiterungsplatine für den Raspberry Pi 5, die einen integrierten Hailo AI-Beschleuniger enthält. Dieses Add-on bietet einen kostengünstigen, effizienten und leicht zugänglichen Ansatz für die Integration von leistungsstarken KI-Funktionen, mit Anwendungen in den Bereichen Prozesssteuerung, Sicherheit, Heimautomatisierung und Robotik.
Das AI HAT+ ist in Modellen mit 13 oder 26 Tera-Operationen pro Sekunde (TOPS) erhältlich und basiert auf den neuronalen Netzwerkbeschleunigern Hailo-8L und Hailo-8. Das 13 TOPS-Modell unterstützt effizient neuronale Netze für Aufgaben wie Objekterkennung, Semantik- und Instanzsegmentierung, Posenschätzung und mehr. Diese 26 TOPS-Variante ist für größere Netzwerke geeignet, ermöglicht eine schnellere Verarbeitung und ist für den gleichzeitigen Betrieb mehrerer Netzwerke optimiert.
Das AI HAT+ wird über die PCIe Gen3-Schnittstelle des Raspberry Pi 5 angeschlossen. Wenn auf dem Raspberry Pi 5 eine aktuelle Version des Raspberry Pi OS läuft, erkennt es automatisch den integrierten Hailo-Beschleuniger und macht die neuronale Verarbeitungseinheit (NPU) für KI-Aufgaben verfügbar. Darüber hinaus unterstützen die im Raspberry Pi OS enthaltenen rpicam-apps Kameraanwendungen das KI-Modul nahtlos und nutzen die NPU automatisch für kompatible Nachbearbeitungsfunktionen.
Lieferumfang
Raspberry Pi AI HAT+ (26 TOPS)
Montage-Hardware-Kit (Abstandshalter, Schrauben)
16 mm GPIO-Stacking-Header
Downloads
Datasheet
Bauen Sie robuste, intelligente Maschinen, die die Rechenleistung des Raspberry Pi mit LEGO-Komponenten kombinieren.
Der Raspberry Pi Build HAT bietet vier Anschlüsse für LEGO Technic Motoren und Sensoren aus dem SPIKE Portfolio. Zu den verfügbaren Sensoren gehören ein Abstandssensor, ein Farbsensor und ein vielseitiger Kraftsensor. Die Winkelmotoren sind in verschiedenen Größen erhältlich und verfügen über integrierte Encoder, die ihre Position abfragen können.
Der Build HAT passt auf alle Raspberry Pi-Computer mit einem 40-Pin-GPIO-Header, einschließlich – mit der Hinzufügung eines Flachbandkabels oder eines anderen Erweiterungsgeräts – Raspberry Pi 400. Angeschlossene LEGO Technic-Geräte können neben Standard-Raspberry-Pi-Zubehör problemlos in Python gesteuert werden wie zum Beispiel ein Kameramodul.
Merkmale
Steuert bis zu 4 Motoren und Sensoren
Versorgt den Raspberry Pi mit Strom (bei Verwendung mit einem geeigneten externen Netzteil)
Einfache Verwendung von Python auf dem Raspberry Pi
Dieses Bundle enthält das Raspberry Pi Zero W sowie das Elektor Raspberry Pi Buffer Board.
Raspberry Pi Zero W
Der Raspberry Pi Zero W erweitert die Raspberry Pi Zero-Familie. Der Raspberry Pi Zero W hat alle Funktionen des ursprünglichen Raspberry Pi Zero, kommt aber mit zusätzlichen Anschlussmöglichkeiten bestehend aus:
802.11 b/g/n wireless LAN
Bluetooth 4.1
Bluetooth Low Energy (BLE)
Weitere Features
1 GHz, Single-Core-CPU
512 MB RAM
Mini HDMI und USB On-The-Go Anschlüsse
Micro-USB power
HAT-compatible 40-pin header
Composite-Video- und Reset-Anschlüsse
CSI-Kamera-Anschluss
Downloads
Mechanical Drawing
Schematics
Elektor Raspberry Pi Buffer Board
Wenn Sie regelmäßig mit dem Raspberry Pi experimentieren und eine Vielzahl von externer Hardware über die Stiftleiste an den GPIO-Port anschließen, haben Sie in der Vergangenheit vielleicht schon einige Schäden verursacht. Das Raspberry Pi Buffer Board ist dazu da, dies zu verhindern! Das Board ist kompatibel mit Raspberry Pi Zero, 3, 4, 5 und 400.
Alle 26 GPIOs sind mit bidirektionalen Spannungswandlern gepuffert, um den Raspberry Pi beim Experimentieren mit neuen Schaltungen zu schützen. Die Platine ist dafür vorgesehen, auf der Rückseite des Raspberry Pi 400 eingesetzt zu werden. Der Stecker zum Anschluss an den Raspberry Pi ist eine rechtwinklige 40-polige Buchse (2x20). Die Platine ist nur ein wenig breiter. An die Pufferausgangsbuchse kann ein 40-poliges Flachbandkabel mit entsprechenden 2x20-Steckern angeschlossen werden, um z. B. mit einer Schaltung auf einem Breadboard oder einer Platine zu experimentieren.
Die Schaltung verwendet vier TXS0108E ICs von Texas Instruments. Die Platine lässt sich auch auf einem Raspberry Pi 3 oder neuer aufstellen.
Downloads
Schematics
Layout
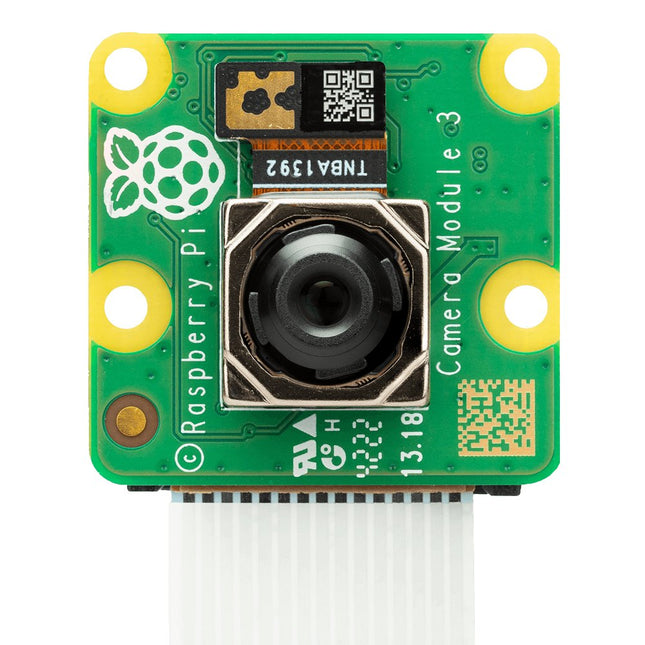
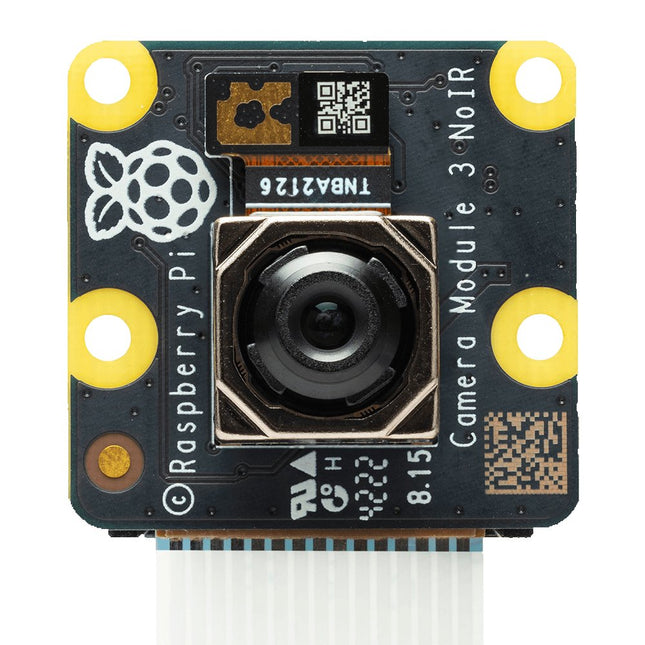
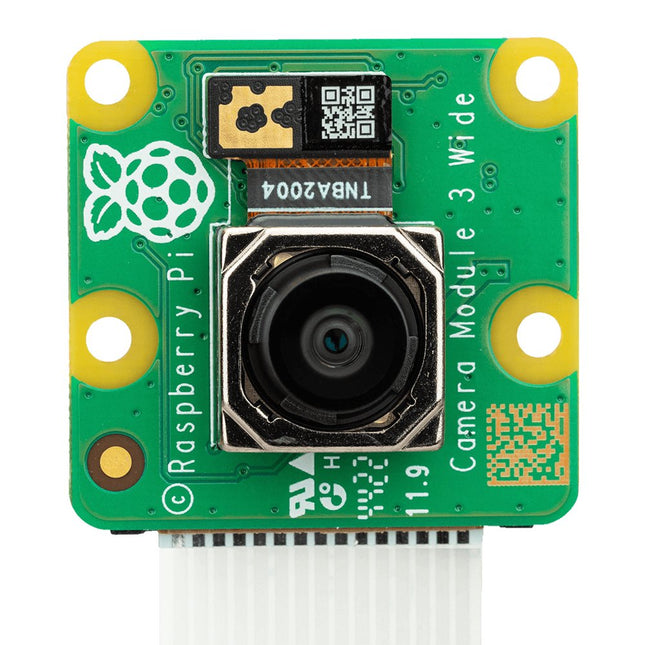
Raspberry Pi Camera Module 3 ist eine Kompaktkamera von Raspberry Pi. Es bietet einen IMX708 12-Megapixel-Sensor mit HDR und verfügt über einen Autofokus mit Phasenerkennung. Das Camera Module 3 ist in Standard- und Weitwinkelvarianten erhältlich, die beide mit oder ohne Infrarot-Sperrfilter erhältlich sind. Das Camera Module 3 kann sowohl Full-HD-Videos als auch Fotos aufnehmen und bietet einen HDR-Modus mit bis zu 3 MP. Sein Betrieb wird vollständig von der libcamera-Bibliothek unterstützt, einschließlich der schnellen Autofokus-Funktion des Camera Module 3: Dies macht es für Anfänger einfach zu bedienen und bietet gleichzeitig viel für fortgeschrittene Benutzer. Das Camera Module 3 ist mit allen Raspberry-Pi-Modellen kompatibel. Alle Varianten von Raspberry Pi Camera Module 3 bieten: Hintergrundbeleuchteter und gestapelter CMOS-12-Megapixel-Bildsensor (Sony IMX708) Hohes Signal-Rausch-Verhältnis (SNR) Integrierte dynamische 2D-Fehlerpixelkorrektur (DPC) Autofocus mit Phasenerkennung (PDAF) für schnellen Autofokus QBC Remosaic-Funktion HDR-Modus (bis zu 3 Megapixel-Ausgabe) Serielle CSI-2-Datenausgabe Serielle 2-Draht-Kommunikation (unterstützt I²C Fast Mode und Fast-Mode Plus) Serielle 2-Draht-Steuerung des Fokusmechanismus Technische Daten Sensor Sony IMX708 Auflösung 11,9 MP Sensorgröße 7,4 mm Sensor diagonal Pixelgröße 1.4 x 1.4 µm Horizontal/vertikal 4608 x 2592 Pixel Allgemeine Video-Modes 1080p50, 720p100, 480p120 Output RAW10 IR-Sperrfilter In Standardvarianten integriert; in NoIR-Varianten nicht vorhanden. Autofokus-System Autofokus mit Phasenerkennung Länge des Flachbandkabels 200 mm Kabelverbinder 15 x 1 mm FPC Abmessungen 25 x 24 x 11,5 mm (12,4 mm Höhe für Wide-Varianten) Varianten von Raspberry Pi Camera Module 3 Camera Module 3 Camera Module 3 NoIR Camera Module 3 Wide Camera Module 3 Wide NoIR Fokusbereich 10 cm - ∞ 10 cm - ∞ 5 cm - ∞ 5 cm - ∞ Brennweite 4,74 mm 4,74 mm 2,75 mm 2,75 mm Diagonales Sichtfeld 75 Grad 75 Grad 120 Grad 120 Grad Horizontales Sichtfeld 66 Grad 66 Grad 102 Grad 102 Grad Vertikales Sichtfeld 41 Grad 41 Grad 67 Grad 67 Grad Öffnungsverhältnis (Blende) F1.8 F1.8 F2.2 F2.2 Infrarot-empfindlich Nein Ja Nein Ja Downloads GitHub Documentation
Raspberry Pi Camera Module 3 ist eine Kompaktkamera von Raspberry Pi. Es bietet einen IMX708 12-Megapixel-Sensor mit HDR und verfügt über einen Autofokus mit Phasenerkennung. Das Camera Module 3 ist in Standard- und Weitwinkelvarianten erhältlich, die beide mit oder ohne Infrarot-Sperrfilter erhältlich sind. Das Camera Module 3 kann sowohl Full-HD-Videos als auch Fotos aufnehmen und bietet einen HDR-Modus mit bis zu 3 MP. Sein Betrieb wird vollständig von der libcamera-Bibliothek unterstützt, einschließlich der schnellen Autofokus-Funktion des Camera Module 3: Dies macht es für Anfänger einfach zu bedienen und bietet gleichzeitig viel für fortgeschrittene Benutzer. Das Camera Module 3 ist mit allen Raspberry-Pi-Modellen kompatibel. Alle Varianten von Raspberry Pi Camera Module 3 bieten: Hintergrundbeleuchteter und gestapelter CMOS-12-Megapixel-Bildsensor (Sony IMX708) Hohes Signal-Rausch-Verhältnis (SNR) Integrierte dynamische 2D-Fehlerpixelkorrektur (DPC) Autofocus mit Phasenerkennung (PDAF) für schnellen Autofokus QBC Remosaic-Funktion HDR-Modus (bis zu 3 Megapixel-Ausgabe) Serielle CSI-2-Datenausgabe Serielle 2-Draht-Kommunikation (unterstützt I²C Fast Mode und Fast-Mode Plus) Serielle 2-Draht-Steuerung des Fokusmechanismus Technische Daten Sensor Sony IMX708 Auflösung 11,9 MP Sensorgröße 7,4 mm Sensor diagonal Pixelgröße 1.4 x 1.4 µm Horizontal/vertikal 4608 x 2592 Pixel Allgemeine Video-Modes 1080p50, 720p100, 480p120 Output RAW10 IR-Sperrfilter In Standardvarianten integriert; in NoIR-Varianten nicht vorhanden. Autofokus-System Autofokus mit Phasenerkennung Länge des Flachbandkabels 200 mm Kabelverbinder 15 x 1 mm FPC Abmessungen 25 x 24 x 11,5 mm (12,4 mm Höhe für Wide-Varianten) Varianten von Raspberry Pi Camera Module 3 Camera Module 3 Camera Module 3 NoIR Camera Module 3 Wide Camera Module 3 Wide NoIR Fokusbereich 10 cm - ∞ 10 cm - ∞ 5 cm - ∞ 5 cm - ∞ Brennweite 4,74 mm 4,74 mm 2,75 mm 2,75 mm Diagonales Sichtfeld 75 Grad 75 Grad 120 Grad 120 Grad Horizontales Sichtfeld 66 Grad 66 Grad 102 Grad 102 Grad Vertikales Sichtfeld 41 Grad 41 Grad 67 Grad 67 Grad Öffnungsverhältnis (Blende) F1.8 F1.8 F2.2 F2.2 Infrarot-empfindlich Nein Ja Nein Ja Downloads GitHub Documentation
Raspberry Pi Camera Module 3 ist eine Kompaktkamera von Raspberry Pi. Es bietet einen IMX708 12-Megapixel-Sensor mit HDR und verfügt über einen Autofokus mit Phasenerkennung. Das Camera Module 3 ist in Standard- und Weitwinkelvarianten erhältlich, die beide mit oder ohne Infrarot-Sperrfilter erhältlich sind. Das Camera Module 3 kann sowohl Full-HD-Videos als auch Fotos aufnehmen und bietet einen HDR-Modus mit bis zu 3 MP. Sein Betrieb wird vollständig von der libcamera-Bibliothek unterstützt, einschließlich der schnellen Autofokus-Funktion des Camera Module 3: Dies macht es für Anfänger einfach zu bedienen und bietet gleichzeitig viel für fortgeschrittene Benutzer. Das Camera Module 3 ist mit allen Raspberry-Pi-Modellen kompatibel. Alle Varianten von Raspberry Pi Camera Module 3 bieten: Hintergrundbeleuchteter und gestapelter CMOS-12-Megapixel-Bildsensor (Sony IMX708) Hohes Signal-Rausch-Verhältnis (SNR) Integrierte dynamische 2D-Fehlerpixelkorrektur (DPC) Autofocus mit Phasenerkennung (PDAF) für schnellen Autofokus QBC Remosaic-Funktion HDR-Modus (bis zu 3 Megapixel-Ausgabe) Serielle CSI-2-Datenausgabe Serielle 2-Draht-Kommunikation (unterstützt I²C Fast Mode und Fast-Mode Plus) Serielle 2-Draht-Steuerung des Fokusmechanismus Technische Daten Sensor Sony IMX708 Auflösung 11,9 MP Sensorgröße 7,4 mm Sensor diagonal Pixelgröße 1.4 x 1.4 µm Horizontal/vertikal 4608 x 2592 Pixel Allgemeine Video-Modes 1080p50, 720p100, 480p120 Output RAW10 IR-Sperrfilter In Standardvarianten integriert; in NoIR-Varianten nicht vorhanden. Autofokus-System Autofokus mit Phasenerkennung Länge des Flachbandkabels 200 mm Kabelverbinder 15 x 1 mm FPC Abmessungen 25 x 24 x 11,5 mm (12,4 mm Höhe für Wide-Varianten) Varianten von Raspberry Pi Camera Module 3 Camera Module 3 Camera Module 3 NoIR Camera Module 3 Wide Camera Module 3 Wide NoIR Fokusbereich 10 cm - ∞ 10 cm - ∞ 5 cm - ∞ 5 cm - ∞ Brennweite 4,74 mm 4,74 mm 2,75 mm 2,75 mm Diagonales Sichtfeld 75 Grad 75 Grad 120 Grad 120 Grad Horizontales Sichtfeld 66 Grad 66 Grad 102 Grad 102 Grad Vertikales Sichtfeld 41 Grad 41 Grad 67 Grad 67 Grad Öffnungsverhältnis (Blende) F1.8 F1.8 F2.2 F2.2 Infrarot-empfindlich Nein Ja Nein Ja Downloads GitHub Documentation