Example projects with Node-RED, MQTT, WinCC SCADA, Blynk, and ThingSpeak
This comprehensive guide unlocks the power of Modbus TCP/IP communication with Arduino. From the basics of the Modbus protocol right up to full implementation in Arduino projects, the book walks you through the complete process with lucid explanations and practical examples.
Learn how to set up Modbus TCP/IP communication with Arduino for seamless data exchange between devices over a network. Explore different Modbus functions and master reading and writing registers to control your devices remotely. Create Modbus client and server applications to integrate into your Arduino projects, boosting their connectivity and automation level.
With detailed code snippets and illustrations, this guide is perfect for beginners and experienced Arduino enthusiasts alike. Whether you‘re a hobbyist looking to expand your skills or a professional seeking to implement Modbus TCP/IP communication in your projects, this book provides all the knowledge you need to harness the full potential of Modbus with Arduino.
Projects covered in the book:
TCP/IP communication between two Arduino Uno boards
Modbus TCP/IP communication within the Node-RED environment
Combining Arduino, Node-RED, and Blynk IoT cloud
Interfacing Modbus TCP/IP with WinCC SCADA to control sensors
Using MQTT protocol with Ethernet/ESP8266
Connecting to ThingSpeak IoT cloud using Ethernet/ESP8266
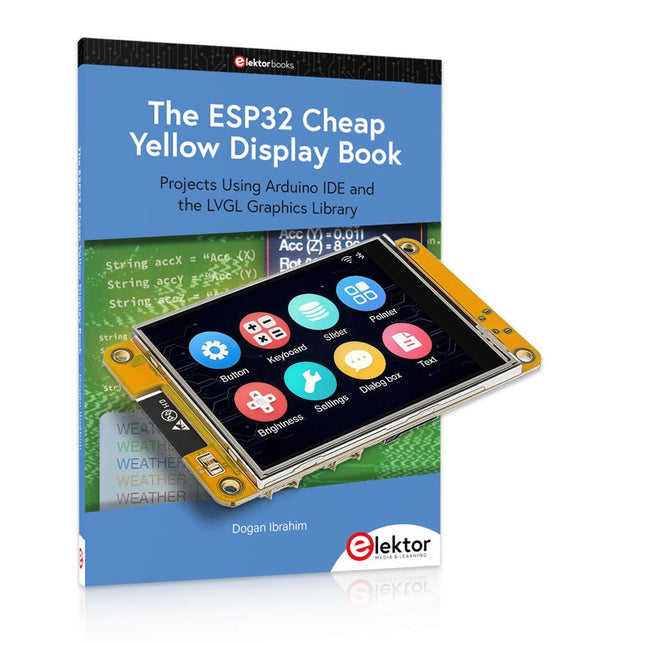
Über 40 vollständig getestete ESP32-Projekte mit Arduino IDE und der LVGL-Grafikbibliothek
Dieses Bundle enthält das ESP32 Cheap Yellow Display (CYD) – ein kompaktes Entwicklungsboard, das einen Standard-ESP32-Mikrocontroller mit einem 320 x 240 Pixel großen TFT-Farbdisplay kombiniert. Das Board verfügt außerdem über mehrere Anschlüsse für GPIO, serielle Kommunikation (TX/RX), Strom und Masse. Das integrierte Display ist ein großer Vorteil und ermöglicht die Erstellung komplexer, grafikbasierter Projekte ohne externe LCDs oder Displays.
Das Begleitbuch stellt die Hardware und die integrierten Anschlüsse des CYD-Boards detailliert vor. Es bietet eine Reihe von Projekten für Anfänger und Fortgeschrittene, die mit der beliebten Arduino IDE 2.0 entwickelt wurden. Sowohl grundlegende Grafikfunktionen als auch die leistungsstarke LVGL-Grafikbibliothek werden behandelt, und praktische Projekte veranschaulichen jeden Ansatz.
Alle enthaltenen Projekte wurden vollständig getestet und sind sofort einsatzbereit. Das Buch enthält Blockdiagramme, Schaltpläne, vollständige Codelisten und Schritt-für-Schritt-Erklärungen. Mit der LVGL-Bibliothek können Leser moderne, vollfarbige grafische Benutzeroberflächen mit Widgets wie Schaltflächen, Beschriftungen, Schiebereglern, Kalendern, Tastaturen, Diagrammen, Tabellen, Menüs, Animationen und mehr erstellen.
ESP32 Cheap Yellow Display Board
Dieses Entwicklungsboard (auch bekannt als "Cheap Yellow Display") wird vom ESP-WROOM-32 angetrieben, einem Dual-Core-MCU mit integrierten Wi-Fi- und Bluetooth-Funktionen. Es arbeitet mit einer Hauptfrequenz von bis zu 240 MHz, mit 520 KB SRAM, 448 KB ROM und einem 4 MB Flash-Speicher. Das Board verfügt über ein 2,8" Display mit einer Auflösung von 240x320 und Resistive Touch.
Darüber hinaus enthält die Platine einen Steuerkreis für die Hintergrundbeleuchtung, einen Schaltkreis für die Berührungssteuerung, einen Schaltkreis für die Lautsprecheransteuerung, einen lichtempfindlichen Schaltkreis und einen RGB-LED-Steuerschaltkreis. Es bietet außerdem einen TF-Kartensteckplatz, eine serielle Schnittstelle, eine DHT11-Schnittstelle für Temperatur- und Feuchtigkeitssensoren und zusätzliche E/A-Anschlüsse.
Das Modul unterstützt die Entwicklung in Arduino IDE, ESP-IDE, MicroPython und Mixly.
Anwendungen
Bildübertragung für Smart Home-Gerät
Drahtlose Überwachung
Intelligente Landwirtschaft
QR-Funkerkennung
Signal des drahtlosen Positionierungssystems
Und andere IoT-Anwendungen
Technische Daten
Mikrocontroller
ESP-WROOM-32 (Dual-Core-MCU mit integriertem WLAN und Bluetooth)
Frequenz
Bis zu 240 MHz (Rechenleistung bis zu 600 DMIPS)
SRAM
520 KB
ROM
448 KB
Flash
4 MB
Betriebsspannung
5 V
Stromverbrauch
ca. 115 mA
Display
2,8" TFT-Farbbildschirm (240 x 320)
Touch
Resistive Touch
Treiberchip
ILI9341
Abmessungen
50 x 86 mm
Gewicht
50 g
Downloads
GitHub
Inhalt des Bundles
The ESP32 Cheap Yellow Display Book (Einzelpreis: 35 €)
ESP32 Cheap Yellow Display Board (Einzelpreis: 25 €)
1x ESP32 Dev-Board mit 2,8" Display und Acrylgehäuse
1x Touch-Stift
1x Verbindungskabel
1x USB-Kabel
Example projects with Node-RED, MQTT, WinCC SCADA, Blynk, and ThingSpeak
This comprehensive guide unlocks the power of Modbus TCP/IP communication with Arduino. From the basics of the Modbus protocol right up to full implementation in Arduino projects, the book walks you through the complete process with lucid explanations and practical examples.
Learn how to set up Modbus TCP/IP communication with Arduino for seamless data exchange between devices over a network. Explore different Modbus functions and master reading and writing registers to control your devices remotely. Create Modbus client and server applications to integrate into your Arduino projects, boosting their connectivity and automation level.
With detailed code snippets and illustrations, this guide is perfect for beginners and experienced Arduino enthusiasts alike. Whether you‘re a hobbyist looking to expand your skills or a professional seeking to implement Modbus TCP/IP communication in your projects, this book provides all the knowledge you need to harness the full potential of Modbus with Arduino.
Projects covered in the book:
TCP/IP communication between two Arduino Uno boards
Modbus TCP/IP communication within the Node-RED environment
Combining Arduino, Node-RED, and Blynk IoT cloud
Interfacing Modbus TCP/IP with WinCC SCADA to control sensors
Using MQTT protocol with Ethernet/ESP8266
Connecting to ThingSpeak IoT cloud using Ethernet/ESP8266
Dieser mehrachsige Roboter bringt Leistung und Größe perfekt in Einklang.
Features
6 Achsen
Nutzlast: 3,5 kg
Reichweite: 700 mm
Wiederholgenauigkeit: 0,1 mm
Maximale Geschwindigkeit 1000 mm/s
Anwendungen
Maschinenwartung
Bin Picking
Mobile Plattform
Laborautomatisierung
Roboterforschung
Langlebige kollaborative Roboter für Ihre Automatisierung
Harmonische Antriebe und Servomotoren in Industriequalität garantieren einen ununterbrochenen Betrieb rund um die Uhr.
Hergestellt aus Kohlefaser, 15 kg Gewicht ermöglichen einen einfacheren Einsatz.
Flexible Bereitstellung mit sicherer Funktion
Handprogrammierung, leicht, platzsparend und einfach für mehrere Anwendungen einsetzbar, ohne Ihr Produktionslayout zu ändern. Perfekt für wiederkehrende Aufgaben.
Kollisionserkennung ist für alle unsere Cobots verfügbar. Ihre Sicherheit hat immer oberste Priorität.
Grafische Oberfläche für einsteigerfreundliche Programmierung
Kompatibel mit verschiedenen Betriebssystemen, einschließlich macOS und Windows.
Webbasierte Technologie, kompatibel mit allen gängigen Browsern.
Drag & Drop, um Ihren Code in wenigen Minuten zu erstellen.
Leistungsstarkes und Open-Source-SDK immer zur Hand
Das voll funktionsfähige Open-Source-Python/C++-SDK bietet eine flexiblere Programmierung.
ROS/ROS2-Pakete sind einsatzbereit.
Beispielcodes helfen Ihnen, den Roboterarm reibungslos einzusetzen.
Technische Daten
UFactory 850
xArm 5
xArm 6
xArm 7
Nutzlast
5 kg
3 kg
5 kg
3,5 kg
Reichweite
850 mm
700 mm
700 mm
700 mm
Freiheitsgrade
6
5
6
7
Wiederholbarkeit
±0,02 mm
±0,1 mm
±0,1 mm
±0,1 mm
Maximale Geschwindigkeit
1 m/s
1 m/s
1 m/s
1 m/s
Gewicht (nur Roboterarm)
20 kg
11,2 kg
12,2 kg
13,7 kg
Maximale Geschwindigkeit
180°/s
180°/s
180°/s
180°/s
Joint 1
±360°
±360°
±360°
±360°
Joint 2
-132°~132°
-118°~120°
-118°~120°
-118°~120°
Joint 3
-242°~3.5°
-225°~11°
-225°~11°
±360°
Joint 4
±360°
-97°~180°
±360°
-11°~225°
Joint 5
-124°~124°
±360°
-97°~180°
±360°
Joint 6
±360°
±360°
-97°~180°
Joint 7
±360°
Hardware
Umgebungstemperaturbereich
0-50°C
Stromverbrauch
Min. 8,4 W, typisch 200 W, max. 400 W
Eingangsstromversorgung
24 V DC, 16,5 A
Fußabdruck
Ø 126 mm
Materialien
Aluminium, Kohlefaser
Basis-Connector-Typ
M5x5
Reinraum der ISO-Klasse
5
Robotermontage
Alle
Endeffektor-Kommunikationsprotokoll
Modbus RTU(rs485)
Endeffektor-E/A
2x DI/2x DO/2x AI/1x RS485
Kommunikationsmodus
Ethernet
Lieferumfang
1x xArm 5 Roboterarm
1x AC-Steuerbox
1x Roboterarm-Stromkabel
1x Roboterarm-Endeffektor-Adapterkabel
1x Roboterarm-Signalkabel
1x Steuerbox-Stromkabel
1x Netzwerkkabel
1x Montagewerkzeug
1x Kurzanleitung
Aus dem Inhalt
Über ein Jahrhundert Triode
Neues vom Röhrenmarkt
Siebketten mit Drossel, Widerstand und Kondensatoren
Inserentenverzeichnis
Eintakt-A-Endstufe mit der Triode 833
Gegentakt-AB-Endstufe mit der 6C33
Gegentakt-Triodenstufe mit ECC 99 und ECC 832
Phonovorstufe in Röhrentechnik
Mehrkanalverstärker
High-End-Audio Digital-Analog-Converter (DAC)
Röhrensound mit Halbleitern
Leserbrief
CD-Two MKII
Röhrendaten mit Sockelschaltungen
Projects Using Arduino IDE and the LVGL Graphics Library
The ESP32 is probably one of the most popular microcontrollers used by many people, including students, hobbyists, and professional engineers. Its low cost, coupled with rich features makes it a popular device to use in many projects. Recently, a board called the ESP32 Cheap Yellow Display (CYD for short) is available from its manufacturers. The board includes a standard ESP32 microcontroller together with a 320x240 pixel TFT display. Additionally, the board provides several connectors for interfaces such as GPIO, serial port (TX/RX), power and Ground. The inclusion of a TFT display is a real advantage as it enables users to design complex graphics-based projects without resorting to an external LCD or graphics displays.
The book describes the basic hardware of the ESP32 CYD board and provides details of its on-board connectors. Many basic, simple, and intermediate-level projects are given in the book based on the ESP32 CYD, using the highly popular Arduino IDE 2.0 integrated development environment. The use of both the basic graphics functions and the use of the popular LVGL graphics library are discussed in the book and projects are given that use both types of approaches.
All the projects given in the book have been tested and are working. The block diagram, circuit diagram, and the complete program listings and program descriptions of all the projects are given with explanations. Readers can use the LVGL graphics library to design highly popular eye-catching full-color graphics projects using widgets such as buttons, labels, calendars, keypads, keyboards, message boxes, spinboxes, sliders, charts, tables, menus, bars, switches, drop-down lists, animations, and many more widgets.
Inhalt:
Praxis
JellyScope – Open Source Android-Oszilloskop
HDMI to VGA – USB-gespeister DVI/HDMI-zu-VGA-Wandler mit Audio-Extraction
WEB-ArByter – Mit dem PicosG20 Embedded-Projekte per Smartphone steuern
Aufsicht – USB-2.0 und 3.0 Port-Monitor mit MSP430
Nimm Zwei – Doppel-USB-Stromversorgung
Know-how
Gib dem Panda Android – Linaro Android auf dem PandaBoard installieren
Leinen los – Drahtlose Ladestation Qi-konform entwickeln
Info
Prêt-à-porter – Marktübersicht Embedded-CPU-Module
Der bessere Flash-Speicher – FRAM: Funktion, Qualität und Zuverlässigkeit
Transit-Chip – LPC-800: 32-Bit-ARM im 8-Bit-Gewand
Don't touch – E-Feld-basierte Gestensteuerung
Aktuell – MCUs, Companion-Chips, Eva-Boards und Tools
Weitere Hefte aus dieser Reihe:
Mikrocontroller 6 (PDF)
Mikrocontroller 5 (PDF)
Mikrocontroller 4 (PDF)
Mikrocontroller 3 (PDF)
Mikrocontroller 2 (PDF)
Mikrocontroller 1 (PDF)
Projects Using Arduino IDE and the LVGL Graphics Library
The ESP32 is probably one of the most popular microcontrollers used by many people, including students, hobbyists, and professional engineers. Its low cost, coupled with rich features makes it a popular device to use in many projects. Recently, a board called the ESP32 Cheap Yellow Display (CYD for short) is available from its manufacturers. The board includes a standard ESP32 microcontroller together with a 320x240 pixel TFT display. Additionally, the board provides several connectors for interfaces such as GPIO, serial port (TX/RX), power and Ground. The inclusion of a TFT display is a real advantage as it enables users to design complex graphics-based projects without resorting to an external LCD or graphics displays.
The book describes the basic hardware of the ESP32 CYD board and provides details of its on-board connectors. Many basic, simple, and intermediate-level projects are given in the book based on the ESP32 CYD, using the highly popular Arduino IDE 2.0 integrated development environment. The use of both the basic graphics functions and the use of the popular LVGL graphics library are discussed in the book and projects are given that use both types of approaches.
All the projects given in the book have been tested and are working. The block diagram, circuit diagram, and the complete program listings and program descriptions of all the projects are given with explanations. Readers can use the LVGL graphics library to design highly popular eye-catching full-color graphics projects using widgets such as buttons, labels, calendars, keypads, keyboards, message boxes, spinboxes, sliders, charts, tables, menus, bars, switches, drop-down lists, animations, and many more widgets.
Der Peak Atlas ESR70 gold ist eine verbesserte Version des früheren Peak Atlas ESR70 Plus. Er kann alles, was der ESR70 Plus konnte, nur noch besser.
Dank neuer Prüfalgorithmen misst er die Kapazität jetzt bis zu 10-mal schneller und über einen größeren Bereich. Dank unseres neuen Triple-Slope-Messsystems wird die Kapazitätsmessung auch viel weniger durch parallele Widerstände oder Leckströme beeinflusst.
Mit den mitgelieferten vergoldeten Sonden (abnehmbar) kann der Atlas ESR70 gold den ESR bis zu einer Auflösung von 0,01 Ohm und bis zu 40 Ohm messen. Es kann sogar den ESR von Kondensatoren messen, die sich im Stromkreis befinden. Die Messfühler sind abnehmbar, so dass 2 mm kompatible Messfühler angebracht werden können. Bei verschiedenen ESR-Werten ertönt ein akustisches Warnsignal, so dass Sie viele Tests hintereinander durchführen können, ohne auf das Display schauen zu müssen. Der ESR70 berücksichtigt automatisch den kapazitiven Blindwiderstand, so dass der ESR auch bei Kondensatoren mit niedrigem Wert (bis zu 0,3 uF) genau gemessen werden kann.
Features
Verwendet eine einzelne AAA-Alkalizelle (im Lieferumfang enthalten).
Alphanumerisches LCD mit Hintergrundbeleuchtung.
Automatischer Analysestart, wenn Sie die Sonden anwenden.
Automatische Kondensatorentladung durch kontrollierte Entladefunktion.
ESR-Messung (und niedriger Gleichstromwiderstand) (auch im Schaltkreis).
Kapazitive Reaktanz wird automatisch berücksichtigt, um einen genauen ESR zu gewährleisten.
Kapazitätsmessung (bei Prüfung außerhalb des Schaltkreises).
Akustische Warnungen für verschiedene ESR-Stufen.
Erweiterter ESR-Messbereich bis zu 40 Ohm.
Optionale Sondenalternativen einfach zu montieren.
Neue gold Features
Verbessertes LCD mit besserer Hintergrundbeleuchtung.
10x schnellere Kapazitätsmessung für große Kondensatoren.
Erweitertes Benutzeroptionensystem.
Neues Triple-Slope-Messsystem, um den Einfluss von Parallelwiderstand und/oder Leckstrom auf Kapazitätsmessungen erheblich zu reduzieren.
Viel größerer Kapazitätsmessbereich jetzt 0,3 uF bis 90.000 uF (vorher 1 uF bis 22.000 uF).
Technische Daten
Analyzertyp
ESR und Kapazität
Komponententypen
Kondensatoren (>0,3 uF)
ESR-Bereich
0,00 Ohm bis 40,0 Ohm
ESR-Auflösung
Ab 0,01 Ohm
In-Circuit-Verwendung
Nur ESR
Kapazitätsbereich
0,3 uF bis 90000 uF
Batterietyp
1,5-V-Alkali-AAA-Zelle (im Lieferumfang enthalten). Lebensdauer normalerweise 1500 Operationen
Anzeigetyp
Alphanumerisches LCD (mit Hintergrundbeleuchtung)
Lieferumfang
Widerstandsmessgerät der äquivalenten Serie ESR70
Extra lange und besonders flexible Prüfkabel (450 mm silikonummanteltes Kabel)
2 mm vergoldete Stecker und Buchsen mit abnehmbaren vergoldeten Krokodilklemmen
Umfassende bebilderte Bedienungsanleitung
AAA-Alkalizelle
Downloads
Datasheet (EN)
User Guide (DE)
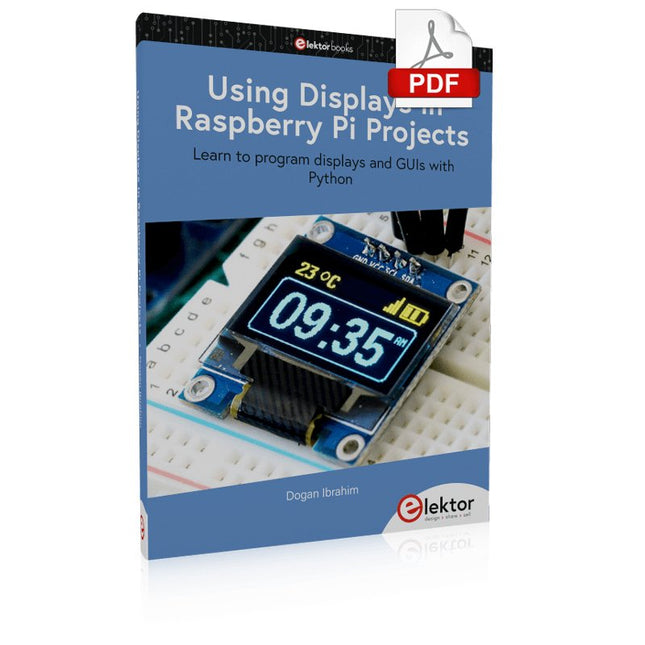
Learn to program displays and GUIs with Python
This book is about Raspberry Pi 4 display projects. The book starts by explaining how to install the latest Raspbian operating system on an SD card, and how to configure and use the GPIO ports.
The core of the book explains the following topics in simple terms with fully tested and working example projects:
Simple LED projects
Bar graph LED projects
Matrix LED projects
Bitmap LED projects
LED strips
LCDs
OLED displays
E-paper displays
TFT displays
7-inch touch screen
GUI Programming with Tkinder
One unique feature of this book is that it covers almost all types of display that readers will need to use in their Raspberry Pi based projects. The operation of each project is fully given, including block diagrams, circuit diagrams, and commented full program listings. It is therefore an easy task to convert the given projects to run on other popular platforms, such as Arduino or PIC microcontrollers.
Python program listings of all Raspberry Pi projects developed in this book are available for download at Elektor.com. Readers can use these programs in their projects. Alternatively, they can modify the programs to suit their applications.
PiKVM ist ein funktionsreiches, produktionstaugliches Open-Source-KVM-over-IP-Gerät auf Raspberry Pi-Basis. Es ermöglicht die Fernverwaltung von Servern oder Workstations, unabhängig vom Status des Betriebssystems oder davon, ob eines installiert ist. Mit PiKVM können Sie Ihren Computer ein-/ausschalten oder neu starten, das UEFI/BIOS konfigurieren und sogar das Betriebssystem mithilfe der virtuellen CD-ROM oder des Flash-Laufwerks neu installieren. Sie können Ihre Remote-Tastatur und -Maus verwenden oder PiKVM kann eine Tastatur, eine Maus und einen Monitor simulieren, die dann in einem Webbrowser angezeigt werden, als ob Sie direkt auf einem Remote-System arbeiten würden.
PiKVM V4 Plus ist die PiKVM-Version mit den meisten Funktionen! Als fortschrittlichstes und vielseitigstes PiKVM konzipiert, unterstützt es Sie in den einzigartigsten und komplexesten Szenarien des technischen Supports oder des Remote-Systemzugriffs/-managements. Die zukunftssichere Architektur ermöglicht es, weitere Features und Funktionen hinzuzufügen.
Features
PiKVM V4 wird als Komplettprodukt geliefert, das sofort mit allem ausgestattet ist, was Sie brauchen; ein Netzteil, USB & Ethernet-Kabel und sogar PCI-Halterungen zum Einbau des ATX-Boards in ein ATX- oder Mini-ITX-Computer-/Servergehäuse.
Das (mitgelieferte) Raspberry Pi Compute Module 4 (CM4) ermöglicht es, die Messlatte auf ein industrietaugliches Niveau zu legen.
Verbesserte WLAN-Konnektivität mit einem Anschluss für eine optionale externe Antenne.
Unterstützung der Auflösungen 1920x1080 @ 60 Hz und 1920x1200 @ 60 Hz für verbesserte UEFI/BIOS-Kompatibilität.
Neues, sorgfältig gefertigtes Stahlgehäuse mit glattem und elegantem Erscheinungsbild, Lichtleitern, Ortungsbake, SD-Karten-Zugriffsschutz und einem Kensington-Sicherheitssteckplatz.
Technische Daten
Raspberry Pi Compute Module 4 (CM4)
CM4102000 mit 2 GB RAM und WiFi/Bluetooth (Lite)
Verbindungstyp
USB-C
Stromart
12 V/2 A (DC)
Option für Stromausfall
Interner Superkondensator für die Echtzeituhr-Unterstützung
HDMI-Buchse
HDMI-Quelleneingang
USB-C-Buchse
Für die Emulation von Tastatur, Maus, Massenspeicher und anderen externen Geräten)
Serieller Konsolenverwaltungsport
Micro-SD-Kartensteckplatz
Für den Betriebssystemspeicher
ATX RJ-45
Spezieller Anschluss für Leistungssteuerung oder AUX
WLAN
Optionale WiFi b/g/n-Unterstützung mit interner/externer Antenne
LED-Anzeigen
Stromversorgung, Aktivität, Stromversorgung der Konsole, Such-LED, HDMI-Quelle aktiviert
Display
OLED 128x32 0,91" (weiß)
Unterstützte Auflösungen
Bis zu 1920 x 1200 bei 60 Hz
Videokomprimierungsmethoden
MJPEG, H.264
Audioaufnahmemodus
Unterstützung für HDMI-Audioaufnahme
Spitzenstromverbrauch
Bis zu 24 W (2 A/12 V)
Betriebstemperatur
0-50°C
Abmessungen
120 x 68 x 44 mm
Gewicht
350 g
Modellvergleich
PiKVM V3
PiKVM V4 Plus
Hauptrecheneinheit
Raspberry Pi 4 B
Raspberry Pi Compute Module 4 (CM4)
1920 x 1200 bei 60 Hz HDMI-Videounterstützung mit Ton
?
Verbesserte Kompatibilität für viele UEFI und BIOS
✓
Unterstützung für USB-Stick/Maus/Massenspeicher
✓
✓
USB-Host-Unterstützung (Unterstützung für die Konnektivität externer USB-Geräte)
✓
✓
Zusätzliche USB-Speicherunterstützung bei interner Installation
✓
RJ-45-Konsolenanschluss
✓
✓
Kühlsystem
Axiallüfter
Erweitert mit Radiallüfter
Locator-LED
✓
Stromverbrauch im Leerlauf
3,3 W
3,3 W
Unterstützung für externe Antennen
WLAN/LTE
mPCI-e-Steckplatz mit USB-Leitungen für LTE/5G-Karten
✓
Lieferumfang
PiKVM V4 Plus inkl. Raspberry Pi CM4, Gehäuse und OLED-Display
Micro-SD-Karte mit vorinstallierter PiKVM-Software
ATX-Steuerplatine
ATX-Verbindungskabel
ATX-Installationshalterungen
Ethernet-Kabel
ATX-Kabel
USB-C-auf-USB-A-Kabel
12 V/2 A Netzteil (internationale Adapter)
Downloads
Datasheet
Documentation
Images
GitHub
,
von Clemens Valens
Das Andonstar AD210, ein erschwingliches Digitalmikroskop mit einem 10,1"-Display
Das Andonstar AD210 ist ein Einsteigermodell unter den Digitalmikroskopen mit einem großen 10,1″ Display. Es richtet sich vor allem an Elektroniklabore, wo es z.B. für...