Technology is constantly changing. New microcontrollers become available every year. The one thing that has stayed the same is the C programming language used to program these microcontrollers. If you would like to learn this standard language to program microcontrollers, then this book is for you!
Arduino is the hardware platform used to teach the C programming language as Arduino boards are available worldwide and contain the popular AVR microcontrollers from Atmel.
Atmel Studio is used as the development environment for writing C programs for AVR microcontrollers. It is a full-featured integrated development environment (IDE) that uses the GCC C software tools for AVR microcontrollers and is free to download.
At a glance:
Start learning to program from the very first chapter
No programming experience is necessary
Learn by doing – type and run the example programs
A fun way to learn the C programming language
Ideal for electronic hobbyists, students and engineers wanting to learn the C programming language in an embedded environment on AVR microcontrollers
Use the free full-featured Atmel Studio IDE software for Windows
Write C programs for 8-bit AVR microcontrollers as found on the Arduino Uno and MEGA boards
Example code runs on Arduino Uno and Arduino MEGA 2560 boards and can be adapted to run on other AVR microcontrollers or boards
Use the AVR Dragon programmer/debugger in conjunction with Atmel Studio to debug C programs
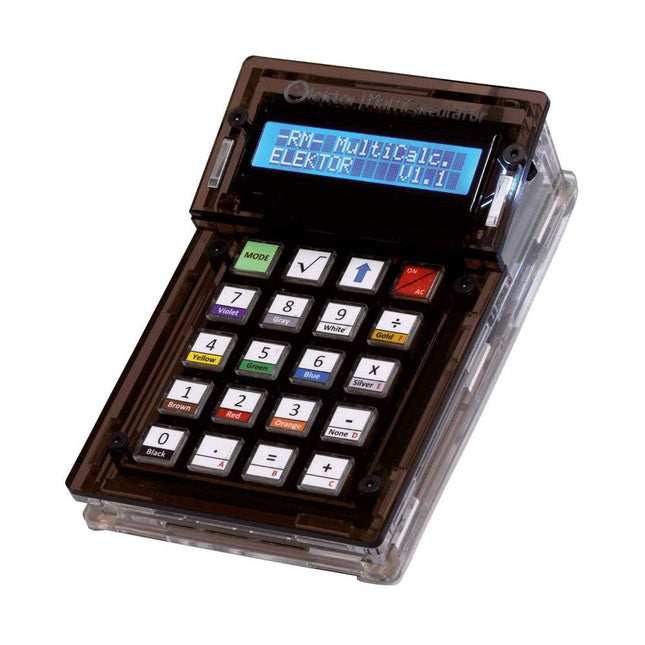
Das Elektor MultiCalculator Kit ist ein Arduino-basierter Multifunktionsrechner, der über einfache Berechnungen hinausgeht. Es bietet 22 Funktionen, darunter Licht- und Temperaturmessung, Differenztemperaturanalyse und NEC-IR-Fernbedienungsdekodierung. Der Elektor MultiCalculator ist ein praktisches Werkzeug für den Einsatz in Ihren Projekten oder für Bildungszwecke.
Das Kit enthält ein Pro Mini-Modul als Recheneinheit. Die Platine lässt sich mithilfe von Durchgangslochkomponenten einfach zusammenbauen. Das Gehäuse besteht aus 11 Acrylplatten und Montagematerial für eine einfache Montage. Darüber hinaus ist das Gerät mit einem 16x2 alphanumerischen LCD, 20 Tasten und Temperatursensoren ausgestattet.
Der Elektor MultiCalculator ist über einen 6-Wege-PCB-Header mit der Arduino-IDE programmierbar. Der Rechner kann mit einem Programmieradapter programmiert werden und wird über USB-C mit Strom versorgt.
Betriebsmodi
Rechner
4-Ring-Widerstandscode
5-Ring-Widerstandscode
Konvertierung von Dezimalzahlen in Hexadezimalzahlen und Zeichen (ASCII)
Konvertierung von Hexadezimalzahlen in Dezimalzahlen und Zeichen (ASCII)
Dezimal-zu-Binär- und Zeichen-Konvertierung (ASCII)
Binär-zu-Dezimal- und Hexadezimal-Konvertierung
Berechnung von Hz, nF und kapazitiver Reaktanz (XC)
Hz, µH, Berechnung der induktiven Reaktanz (XL)
Widerstandsberechnung zweier parallel geschalteter Widerstände
Widerstandsberechnung zweier in Reihe geschalteter Widerstände
Berechnung des unbekannten Parallelwiderstands
Temperaturmessung
Differenztemperaturmessung T1&T2 und Delta (δ)
Lichtmessung
Stoppuhr mit Rundenzeitfunktion
Artikelzähler
NEC IR-Fernbedienungsdekodierung
AWG-Umwandlung (American Wire Gauge)
Würfeln
Startnachricht personalisieren
Temperaturkalibrierung
Technische Daten
Menüsprachen: Englisch, Niederländisch
Abmessungen: 92 x 138 x 40 mm
Bauzeit: ca. 5 Stunden
Lieferumfang
Leiterplatten- und Durchgangslochkomponenten
Vorgeschnittene Acrylplatten mit allen mechanischen Teilen
Pro Mini Mikrocontroller-Modul (ATmega328/5 V/16 MHz)
Programmieradapter
Wasserdichte Temperatursensoren
USB-C Kabel
Downloads
Software
Jetzt können Sie Ihre Arduino-Boards mit dem offiziellen Arduino-USB-Kabel verbinden. Über einen USB-C-auf-USB-C-Anschluss mit USB-A-Adapter können Sie mit diesem Daten-USB-Kabel Ihre Arduino-Boards ganz einfach mit Ihrem Programmiergerät verbinden.
Das Arduino-USB-Kabel verfügt über einen geflochtenen Nylonmantel in den typischen Arduino-Farben Weiß und Blaugrün. Die Anschlüsse verfügen über ein Aluminiumgehäuse, das Ihr Kabel vor Beschädigungen schützt und gleichzeitig cool aussieht.
Länge: 100 cm
Alugehäuse mit Logo
Geflochtener Nylonmantel in Weiß und Blaugrün
Der Micro enthält alles, was zur Unterstützung des Mikrocontrollers benötigt wird. Schließen Sie ihn einfach mit einem Micro-USB-Kabel an einen Computer an, und schon kann es losgehen. Dank seines Formfaktors kann er problemlos auf einem Steckbrett platziert werden.
Die Micro-Platine ähnelt dem Arduino Leonardo darin, dass der ATmega32U4 über integrierte USB-Kommunikation verfügt, wodurch ein zweiter Prozessor überflüssig wird. Dadurch kann der Micro für einen angeschlossenen Computer als Maus und Tastatur fungieren und verfügt zusätzlich über einen virtuellen (CDC) seriellen/COM-Anschluss.
Mikrocontroller
ATmega32U4
Betriebsspannung
5 V
Eingangsspannung
7 V bis 12 V
Analoge Eingangspins
12
PWM-Pins
7
DC E/A-Pin
20
Gleichstrom pro E/A-Pin
20 mA
Gleichstrom für 3,3 V Pin
50 mA
Flash-Speicher
32 KB, davon 4 KB vom Bootloader genutzt
SRAM
2,5 KB
EEPROM
1 KB
Taktfrequenz
16 MHz
LED_Eingebaut
13
Länge
45 mm
Breite
18 mm
Gewicht
13 g
Dieser USB-Stick enthält eine Auswahl von über 300 Arduino-bezogenen Artikeln, die im Elektor-Magazin veröffentlicht wurden. Der Inhalt umfasst sowohl Hintergrundartikel als auch Projekte zu folgenden Themen:
Software- und Hardware-Entwicklung: Tutorials zur Arduino-Softwareentwicklung mit der Arduino IDE, Atmel Studio, verschiedenen Shields und grundlegenden Programmierkonzepten.
Lernen: Das Mikrocontroller-Bootcamp bietet einen strukturierten Einstieg in die Programmierung eingebetteter Systeme.
Datenerfassung und -messung: Projekte wie ein 16-Bit-Datenlogger, ein Drehbank-Tachometer und ein AC-Netzanalyzer ermöglichen die Erfassung und Analyse von Echtzeitsignalen.
Drahtlose Kommunikation: Erfahren Sie, wie man drahtlose Netzwerke implementiert, eine Android-Schnittstelle erstellt und effektiv mit Mikrocontrollern kommuniziert.
Robotik und Automatisierung: Lernen Sie den Arduino Nano Robot Controller, unterstützende Automatisierungs-Boards sowie diverse Arduino-Shields zur Funktionserweiterung kennen.
Selbstbauprojekte: Einzigartige DIY-Projekte wie Laserprojektion, eine Numitron-Uhr mit Thermometer, ein ELF-Empfänger, Theremino-Module und Touch-LED-Schnittstellen zeigen kreative Einsatzmöglichkeiten auf.
Egal, ob Sie Einsteiger oder erfahrener Maker sind – diese Sammlung ist eine wertvolle Ressource zum Lernen, Experimentieren und Erweitern der Möglichkeiten mit Arduino.
Lerne die Grundlagen der Elektronik, indem du manuell deinen Arduino Uno zusammenbaust, gewinne Erfahrung im Löten, indem du jedes einzelne Bauteil montierst, und entfalte dann deine Kreativität mit dem einzigen Kit, das sich zu einem Synthesizer verwandelt!
Das Arduino Make-Your-Uno-Kit ist wirklich der beste Weg, um zu lernen, wie man lötet. Und wenn du fertig bist, ermöglicht dir die Verpackung, einen Synthesizer zu bauen und deine eigene Musik zu machen.
Ein Kit mit allen Komponenten, um deinen eigenen Arduino Uno und einen Audio-Synthesizer-Schild zu bauen.
Das Make-Your-Uno-Kit wird mit einem kompletten Satz von Anweisungen in einer dedizierten Inhaltsplattform geliefert. Dazu gehören Videomaterial, ein 3D- interaktiver Viewer zur detaillierten Anleitung und wie man das Board programmiert, sobald es fertig ist.
Dieses Kit enthält:
Arduino Make-Your-Uno
1x Make-Your-Uno-PCB
1x USB-C-Serieller Adapter
7x Widerstände 1 kOhm
2x Widerstände 10 kOhm
2x Widerstände 1 MOhm
1x Diode (1N4007)
1x 16 MHz Quartz
4x gelbe LEDs
1x grüne LED 1x Drucktaster
1x MOSFET
1x LDO (3,3 V)
1x LDO (5 V)
3x Keramikkondensatoren (22pF)
3x Elektrolytkondensatoren (47uF)
7x Polyesterkondensatoren (100nF)
1x Sockel für ATMega 328p
2x I/O-Steckverbinder
1x Steckerleiste 6-polig
1x Buchsenstecker
1x ATmega 328p-Mikrocontroller
Arduino Audio Synth
1x Audio Synth PCB
1x Widerstand 100kOhm
1x Widerstand 10 Ohm
1x Audio-Verstärker (LM386)
1x Keramikkondensator (47nF)
1x Elektrolytkondensator (47uF)
1x Elektrolytkondensator (220uF)
1x Polyesterkondensator (100nF)
4x Anschluss-Pin-Header
6x Potentiometer 10kOhm mit Kunststoffknöpfen
Ersatzteile
2x Elektrolytkondensatoren (47uF)
2x Polyesterkondensatoren (100nF)
2x Keramikkondensatoren (22pF)
1x Drucktaster
1x gelbe LED
1x grüne LED
Mechanische Teile
5x Abstandshalter 12 mm
11x Abstandshalter 6 mm
5x Schraubmuttern
2x Schrauben 12 mm
Develop innovative hardware-based projects in C
The Raspberry Pi has traditionally been programmed using Python. Although this is a very powerful language, many programmers may not be familiar with it. C on the other hand is perhaps the most commonly used programming language and all embedded microcontrollers can be programmed using it.
The C language is taught in most technical colleges and universities and almost all engineering students are familiar with using it with their projects. This book is about using the Raspberry Pi with C to develop a range of hardware-based projects. Two of the most popular C libraries, wiringPi and pigpio are used.
The book starts with an introduction to C and most students and newcomers will find this chapter invaluable. Many projects are provided in the book, including using Wi-Fi and Bluetooth to establish communication with smartphones.
Many sensor and hardware-based projects are included. Both wiringPi and pigpio libraries are used in all projects. Complete program listings are given with full explanations. All projects have been fully tested and work.
The following hardware-based projects are provided in the book:
Using sensors
Using LCDs
I²C and SPI buses
Serial communication
Multitasking
External and timer interrupts
Using Wi-Fi
Webservers
Communicating with smartphones
Using Bluetooth
Sending data to the cloud
Program listings of all Raspberry Pi projects developed in this book are available on the Elektor website. Readers can download and use these programs in their projects. Alternatively, they can customize them to suit their applications.
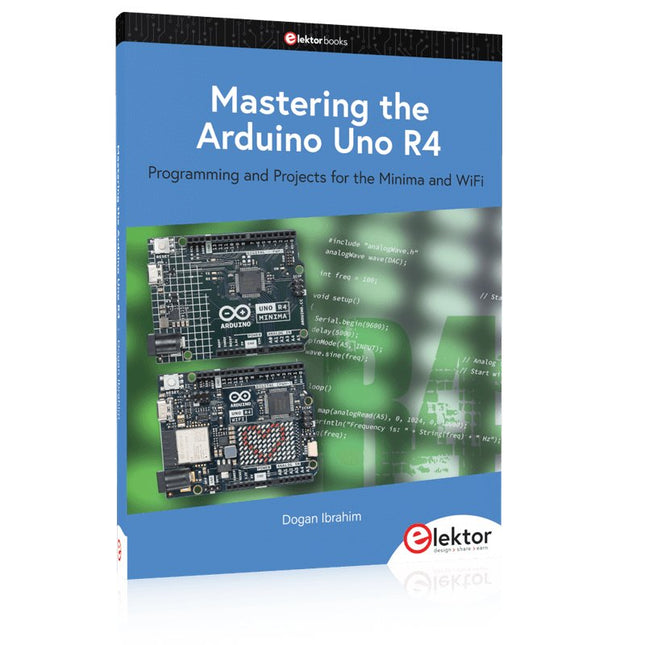
Programming and Projects for the Minima and WiFi
Based on the low-cost 8-bit ATmega328P processor, the Arduino Uno R3 board is likely to score as the most popular Arduino family member, and this workhorse has been with us for many years. Eleven years later, the long-overdue successor, the Arduino Uno R4, was released. It is built around a 48 MHz, 32-bit Arm Cortex-M4 microcontroller and provides significantly expanded SRAM and Flash memory. Additionally, a higher-precision ADC and a new DAC are added to the design. The Uno R4 board also supports the CAN Bus with an interface.
Two versions of the board are available: Uno R4 Minima, and Uno R4 WiFi. This book is about using these new boards to develop many different and interesting projects with just a handful of parts and external modules. All projects described in the book have been fully tested on the Uno R4 Minima or the Uno R4 WiFi board, as appropriate.
The project topics include the reading, control, and driving of many components and modules in the kit as well as on the relevant Uno R4 board, including
LEDs
7-segment displays (using timer interrupts)
LCDs
Sensors
RFID Reader
4x4 Keypad
Real-time clock (RTC)
Joystick
8×8 LED matrix
Motors
DAC (Digital-to-analog converter)
LED matrix
WiFi connectivity
Serial UART
CAN bus
Infrared controller and receiver
Simulators
… all in creative and educational ways with the project operation and associated software explained in great detail.
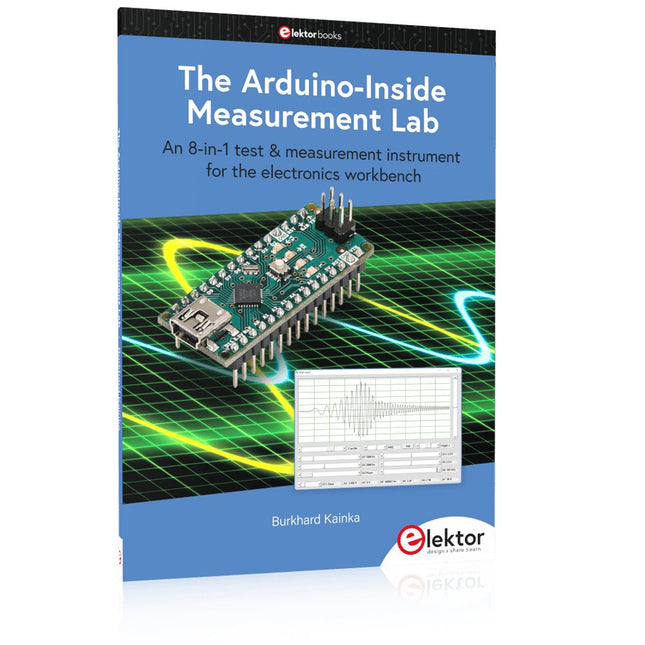
An 8-in-1 test & measurement instrument for the electronics workbench
A well-equipped electronics lab is crammed with power supplies, measuring devices, test equipment and signal generators. Wouldn‘t it be better to have one compact device for almost all tasks? Based on the Arduino, a PC interface is to be developed that’s as versatile as possible for measurement and control. It simply hangs on a USB cable and – depending on the software – forms the measuring head of a digital voltmeter or PC oscilloscope, a signal generator, an adjustable voltage source, a frequency counter, an ohmmeter, a capacitance meter, a characteristic curve recorder, and much more.
The circuits and methods collected here are not only relevant for exactly these tasks in the "MSR" electronics lab, but many details can also be used within completely different contexts.
Technology is constantly changing. New microcontrollers become available every year and old ones become redundant. The one thing that has stayed the same is the C programming language used to program these microcontrollers. If you would like to learn this standard language to program microcontrollers, then this book is for you!
ARM microcontrollers are available from a large number of manufacturers. They are 32-bit microcontrollers and usually contain a decent amount of memory and a large number of on-chip peripherals. Although this book concentrates on ARM microcontrollers from Atmel, the C programming language applies equally to other manufacturer’s ARMs as well as other microcontrollers.
Features of this book
Use only free or open source software.
Learn how to download, set up and use free C programming tools.
Start learning the C language to write simple PC programs before tackling embedded programming - no need to buy an embedded system right away!
Start learning to program from the very first chapter with simple programs and slowly build from there.
No programming experience is necessary!
Learn by doing - type and run the example programs and exercises.
Sample programs and exercises can be downloaded from the Internet.
A fun way to learn the C programming language.
Ideal for electronic hobbyists, students and engineers wanting to learn the C programming language in an embedded environment on ARM microcontrollers.
This e-book (pdf), a software-only follow up to the best-selling Elektor Visual Studio C# range of books, is aimed at Engineers, Scientists and Enthusiasts who want to learn about the C# language and development environment.
It covers steps from installation, the .NET framework and object oriented programming, through to more advanced concepts including database applications, threading and multi-tasking, internet/network communications and writing DLLs. The DirectX chapters also include video capture. The e-book concludes with several chapters on writing Android applications in C# using the Xamarin add-on.
This e-book is based on the Visual Studio 2015 development environment and latest C# additions including WPF applications, LINQ queries, Charts and new commands such as await and async. The latest Visual Studio debugging features (PerfTips, Diagnostic Tool window and IntellTrace) are covered. Finally, the Android chapters include GPS, E-mail and SMS applications.
Additionally, the e-book provides free on-line access to extensive, well-documented examples — in a try for yourself style — together with links to the author’s videos, guiding you through the necessary steps to get the expected results.