Dieses Shield wurde mit modernster Technologie entwickelt und bringt die Leistung von Ultrahochfrequenz-RFID (UHF) an Ihre Fingerspitzen.
Mit dem Ardi UHF Shield können Sie mühelos bis zu beeindruckende 50 Tags pro Sekunde lesen und ermöglichen so eine schnelle und effiziente Datenerfassung. Das Shield verfügt über eine integrierte UHF-Antenne, die eine zuverlässige und genaue Tag-Erkennung auch in anspruchsvollen Umgebungen gewährleistet.
Ausgestattet mit einem leistungsstarken 0,91-Zoll-OLED-Display bietet das Ardi UHF Shield ein klares und prägnantes visuelles Feedback, das die Überwachung und Interaktion mit den RFID-Messwerten erleichtert. Ganz gleich, ob Sie den Bestand verfolgen, die Zugangskontrolle verwalten, oder die Implementierung eines intelligenten Anwesenheitssystems, dieser Schutz ist genau das Richtige für Sie.
Mit einer bemerkenswerten Leseentfernung von 1 Meter bietet das Ardi UHF Shield eine erweiterte Reichweite für die Erfassung von RFID-Daten. Verabschieden Sie sich von den Einschränkungen berührungsbasierter RFID-Systeme und genießen Sie die Flexibilität und den Komfort einer größeren Lesereichweite.
Das Shield bietet Lese-/Schreibfunktionen, so dass Sie nicht nur Informationen von RFID-Tags abrufen, sondern bei Bedarf auch Daten aktualisieren oder ändern können. Diese Vielseitigkeit eröffnet eine Welt voller Möglichkeiten für fortschrittliche Anwendungen und maßgeschneiderte Lösungen.
Features
Onboard-Hochleistungs-UHF-RFID-Lesemodul
Normalerweise 24 Stunden x 365 Tage in Betrieb
0,91-Zoll-OLED-Display für visuelle Interaktion mit dem Shield
Mehrton-Summer an Bord für Audiowarnungen
Abschirmung kompatibel mit 3,3 V- und 5 V-MCU
Wird direkt auf ArdiPi, Ardi32 oder andere Arduino-kompatible Boards montiert
Technische Daten
OLED-Auflösung 128x32 Pixel
I²C-Schnittstelle für OLED
UHF-Frequenzbereich (EU/UK): 865,1–867,9 MHz
UHF-Modultyp: Lesen/Schreiben
Unterstützte Protokolle: EPCglobal UHF Class 1 Gen 2 / ISO 18000-6C
Leseentfernung: 1 Meter
Kann über 50 Tags gleichzeitig identifizieren
Kommunikationsschnittstelle: TTL UART-Schnittstelle für UHF
Kommunikationsbaudrate: 115200 bps (Standard und empfohlen) – 38400 bps
Betriebsstrom: 180 mA bei 3,5 V (26 dBm Ausgang, 25°C), 110 mA bei 3,5 V (18 dBm Ausgang, 25°C)
Arbeitsfeuchtigkeit <95 % (+25 °C)
Wärmeableitungsmethode Luftkühlung (keine Installation einer Kühlrippe erforderlich)
Tags-Speicherkapazität: 200 Stück Tags bei 96-Bit-EPC
Ausgangsleistung: 18-26 dBm
Genauigkeit der Ausgangsleistung: +/-1 dB
Tags RSSI-Unterstützung
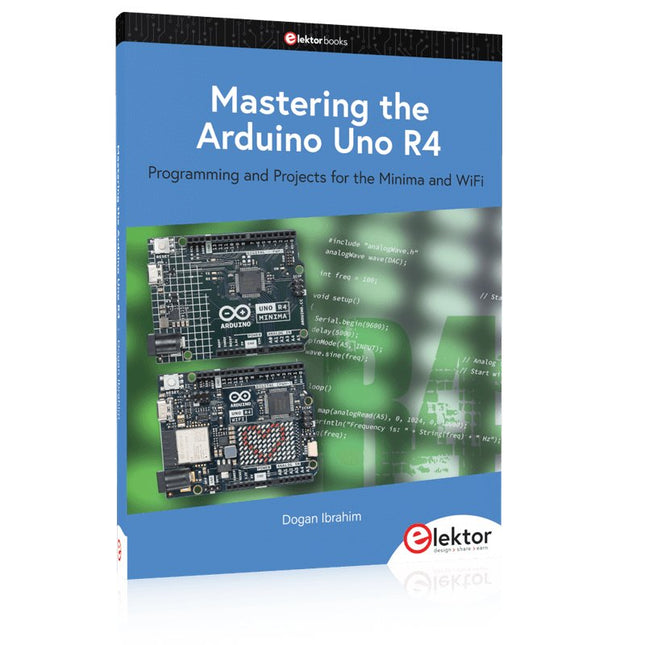
Programming and Projects for the Minima and WiFi
Based on the low-cost 8-bit ATmega328P processor, the Arduino Uno R3 board is likely to score as the most popular Arduino family member, and this workhorse has been with us for many years. Eleven years later, the long-overdue successor, the Arduino Uno R4, was released. It is built around a 48 MHz, 32-bit Arm Cortex-M4 microcontroller and provides significantly expanded SRAM and Flash memory. Additionally, a higher-precision ADC and a new DAC are added to the design. The Uno R4 board also supports the CAN Bus with an interface.
Two versions of the board are available: Uno R4 Minima, and Uno R4 WiFi. This book is about using these new boards to develop many different and interesting projects with just a handful of parts and external modules. All projects described in the book have been fully tested on the Uno R4 Minima or the Uno R4 WiFi board, as appropriate.
The project topics include the reading, control, and driving of many components and modules in the kit as well as on the relevant Uno R4 board, including
LEDs
7-segment displays (using timer interrupts)
LCDs
Sensors
RFID Reader
4x4 Keypad
Real-time clock (RTC)
Joystick
8×8 LED matrix
Motors
DAC (Digital-to-analog converter)
LED matrix
WiFi connectivity
Serial UART
CAN bus
Infrared controller and receiver
Simulators
… all in creative and educational ways with the project operation and associated software explained in great detail.
Lerne die Grundlagen der Elektronik, indem du manuell deinen Arduino Uno zusammenbaust, gewinne Erfahrung im Löten, indem du jedes einzelne Bauteil montierst, und entfalte dann deine Kreativität mit dem einzigen Kit, das sich zu einem Synthesizer verwandelt!
Das Arduino Make-Your-Uno-Kit ist wirklich der beste Weg, um zu lernen, wie man lötet. Und wenn du fertig bist, ermöglicht dir die Verpackung, einen Synthesizer zu bauen und deine eigene Musik zu machen.
Ein Kit mit allen Komponenten, um deinen eigenen Arduino Uno und einen Audio-Synthesizer-Schild zu bauen.
Das Make-Your-Uno-Kit wird mit einem kompletten Satz von Anweisungen in einer dedizierten Inhaltsplattform geliefert. Dazu gehören Videomaterial, ein 3D- interaktiver Viewer zur detaillierten Anleitung und wie man das Board programmiert, sobald es fertig ist.
Dieses Kit enthält:
Arduino Make-Your-Uno
1x Make-Your-Uno-PCB
1x USB-C-Serieller Adapter
7x Widerstände 1 kOhm
2x Widerstände 10 kOhm
2x Widerstände 1 MOhm
1x Diode (1N4007)
1x 16 MHz Quartz
4x gelbe LEDs
1x grüne LED 1x Drucktaster
1x MOSFET
1x LDO (3,3 V)
1x LDO (5 V)
3x Keramikkondensatoren (22pF)
3x Elektrolytkondensatoren (47uF)
7x Polyesterkondensatoren (100nF)
1x Sockel für ATMega 328p
2x I/O-Steckverbinder
1x Steckerleiste 6-polig
1x Buchsenstecker
1x ATmega 328p-Mikrocontroller
Arduino Audio Synth
1x Audio Synth PCB
1x Widerstand 100kOhm
1x Widerstand 10 Ohm
1x Audio-Verstärker (LM386)
1x Keramikkondensator (47nF)
1x Elektrolytkondensator (47uF)
1x Elektrolytkondensator (220uF)
1x Polyesterkondensator (100nF)
4x Anschluss-Pin-Header
6x Potentiometer 10kOhm mit Kunststoffknöpfen
Ersatzteile
2x Elektrolytkondensatoren (47uF)
2x Polyesterkondensatoren (100nF)
2x Keramikkondensatoren (22pF)
1x Drucktaster
1x gelbe LED
1x grüne LED
Mechanische Teile
5x Abstandshalter 12 mm
11x Abstandshalter 6 mm
5x Schraubmuttern
2x Schrauben 12 mm
Buch: Mastering the Arduino Uno R4
Das Arduino Uno R3 Board basiert auf dem kostengünstigen 8-Bit-Prozessor ATmega328P und dürfte sich als das beliebteste Mitglied der Arduino-Familie erweisen. Dieses zuverlässige Board begleitet uns seit vielen Jahren. Elf Jahre später erschien der lang erwartete Nachfolger, das Arduino Uno R4. Es basiert auf einem 48-MHz-32-Bit-Arm-Cortex-M4-Mikrocontroller und bietet deutlich erweiterten SRAM- und Flash-Speicher. Zusätzlich wurden ein hochpräziserer ADC und ein neuer DAC integriert. Das Uno R4 Board unterstützt außerdem den CAN-Bus mit einer entsprechenden Schnittstelle.
Das Board ist in zwei Versionen erhältlich: Uno R4 Minima und Uno R4 WiFi. Dieses Buch zeigt, wie man mit diesen neuen Boards und nur wenigen Bauteilen und externen Modulen viele verschiedene und interessante Projekte realisieren kann. Alle im Buch beschriebenen Projekte wurden, je nach Modell, vollständig auf dem Uno R4 Minima oder dem Uno R4 WiFi-Board getestet.
Die Projektthemen umfassen das Auslesen, Steuern und Ansteuern zahlreicher Komponenten und Module des Bausatzes sowie des jeweiligen Uno R4-Boards, einschließlich
LEDs
7-Segment-Anzeigen (mit Timer-Interrupts)
LCDs
Sensoren
RFID-Leser
4×4-Tastatur
Echtzeituhr (RTC)
Joystick
8×8 LED-Matrix
Motoren
DAC (Digital-Analog-Wandler)
LED-Matrix
WiFi-Konnektivität
Serieller UART
CAN-Bus
Infrarot-Controller und -Empfänger
Simulatoren
… alles auf kreative und lehrreiche Weise, wobei die Funktionsweise des Projekts und die zugehörige Software sehr detailliert erklärt werden.
Arduino Uno R4 WiFi
Der Arduino Uno R4 wird vom Renesas RA4M1 32-Bit ARM Cortex-M4 Prozessor angetrieben und bietet dadurch eine deutliche Steigerung der Rechenleistung, des Speichers und der Funktionalität. Die WiFi-Version verfügt zusätzlich zum RA4M1 über ein ESP32-S3 WLAN-Modul und erweitert so die kreativen Möglichkeiten für Maker und Ingenieure.
Der Arduino Uno R4 taktet mit 48 MHz und bietet damit eine dreifache Steigerung gegenüber dem beliebten Uno R3. Darüber hinaus wurde der SRAM von 2 kB auf 32 kB und der Flash-Speicher von 32 kB auf 256 kB erweitert, um komplexere Projekte zu unterstützen. Auf Wunsch der Community wurde der USB-Anschluss auf USB-C umgestellt und die maximale Versorgungsspannung dank eines verbesserten Wärmemanagements auf 24 V erhöht. Die Platine verfügt über einen CAN-Bus und einen SPI-Anschluss, wodurch Anwender den Verkabelungsaufwand reduzieren und durch den Anschluss mehrerer Shields parallele Aufgaben ausführen können. Ein 12-Bit-Analog-DAC ist ebenfalls auf der Platine vorhanden.
Technische Daten
Mikrocontroller
Renesas RA4M1 (ARM Cortex-M4)
USB
USB-C
Programmieranschluss
Anschlüsse
Digitale Ein-/Ausgangsanschlüsse
14
Anschlüsse
Analoge Eingangsanschlüsse
6
DAC
1
RTC
1
PWM-Anschlüsse
6
Kommunikation
UART
1x
I²C
1x
SPI
1x
Qwiic I²C-Anschluss
1x
CAN
1x CAN-Bus
Stromversorgung
Betriebsspannung
5 V
Eingangsspannung (VIN)
6-24 V
Gleichstrom pro I/O-Pin
8 mA
Taktfrequenz
Hauptkern
48 MHz
Speicher
RA4M1
256 kB Flash, 32 kB RAM
LED-Matrix
12 x 8 (96 rote LEDs)
Abmessungen
68,9 x 53,4 mm
Downloads
Datasheet
Schematics
Dieses Bundle enthält:
Buch: Mastering the Arduino Uno R4 (Einzelpreis: 40 €)
Arduino Uno R4 WiFi (Einzelpreis: 30 €)
Programming and Projects for the Minima and WiFi
Based on the low-cost 8-bit ATmega328P processor, the Arduino Uno R3 board is likely to score as the most popular Arduino family member, and this workhorse has been with us for many years. Eleven years later, the long-overdue successor, the Arduino Uno R4, was released. It is built around a 48 MHz, 32-bit Arm Cortex-M4 microcontroller and provides significantly expanded SRAM and Flash memory. Additionally, a higher-precision ADC and a new DAC are added to the design. The Uno R4 board also supports the CAN Bus with an interface.
Two versions of the board are available: Uno R4 Minima, and Uno R4 WiFi. This book is about using these new boards to develop many different and interesting projects with just a handful of parts and external modules. All projects described in the book have been fully tested on the Uno R4 Minima or the Uno R4 WiFi board, as appropriate.
The project topics include the reading, control, and driving of many components and modules in the kit as well as on the relevant Uno R4 board, including
LEDs
7-segment displays (using timer interrupts)
LCDs
Sensors
RFID Reader
4x4 Keypad
Real-time clock (RTC)
Joystick
8×8 LED matrix
Motors
DAC (Digital-to-analog converter)
LED matrix
WiFi connectivity
Serial UART
CAN bus
Infrared controller and receiver
Simulators
… all in creative and educational ways with the project operation and associated software explained in great detail.
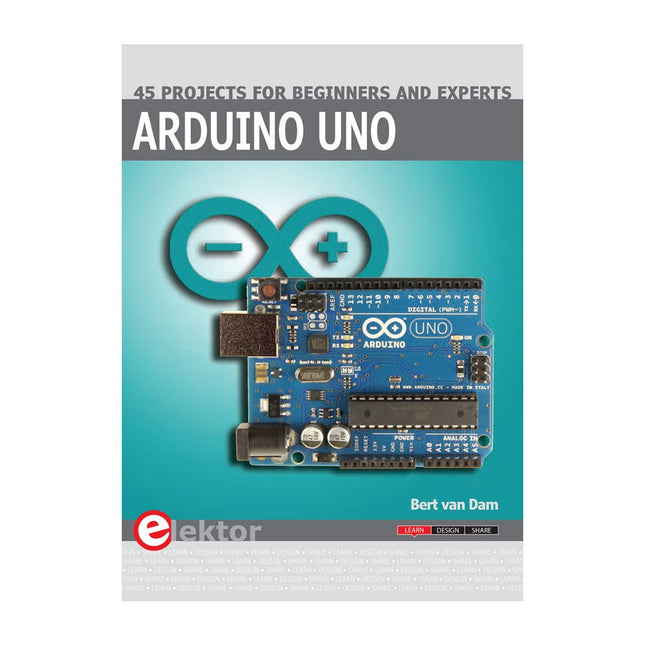
This book covers a series of exciting and fun projects for the Arduino, such as a silent alarm, people sensor, light sensor, motor control, internet and wireless control (using a radio link). Contrary to many free projects on the internet all projects in this book have been extensively tested and are guaranteed to work!
You can use it as a projects book and build more than 45 projects for your own use. The clear explanations, schematics, and pictures of each project make this a fun activity. The pictures are taken of a working project, so you know for sure that they are correct.
You can combine the projects in this book to make your own projects. To facilitate this, clear explanations are provided on how the project works and why it has been designed the way it has That way you will learn a lot about the project and the parts used, knowledge that you can use in your own projects.
Apart from that, the book can be used as a reference guide. Using the index, you can easily locate projects that serve as examples for the C++ commands and Arduino functionality. Even after you’ve built all the projects in this book, it will still be a valuable reference guide to keep next to your PC.
Funktionalitäten 324x324 Pixel Kamerasensor: Benutzen Sie einen der Kerne von Portenta und verwenden Sie das OpenMV für den Arduino-Editor um Bilderkennungsalgorithmen auszuführen 100 Mbps Ethernet-Anschluss: Verbinden Sie Ihre Portenta H7 mit dem kabelgebundenen Internet 2 Onboard-Mikrofone zur Richtungsschallerkennung: Schall in Echtzeit erfassen und analysieren JTAG-Konnektor: Führen Sie Low-Level-Debugging Ihres Portenta-Boards oder spezielle Firmware-Updates mit einem externen Programmiergerät durch SD-Card-Anschluss: Speichern Sie Ihre erfassten Daten auf der Karte oder lesen Sie Konfigurationsdateien aus Das Vision Shield wurde als Erweiterung der Arduino Portenta-Familie entwickelt. Die Portenta-Boards verfügen über Multicore-32-Bit-ARM-Cortex-Prozessoren®™ und laufen mit Hunderten von Megahertz, haben Megabytes Programmspeicher und verfügen über ausreichend RAM. Portenta-Boards sind mit WiFi und Bluetooth ausgestattet. Embedded Computer Bilderkennung leicht gemacht Arduino hat sich mit OpenMV zusammengetan, um Ihnen eine kostenlose Lizenz für die OpenMV IDE Entwicklungsumgebung anzubieten. Ein einfacher Weg in die Bilderkennungsentwicklung mit MicroPython als Programmiersprache. Laden Sie den OpenMV für Arduino Editor von unserer professionellen Tutorial-Seite herunter und blättern Sie durch diverse Beispiele, die wir für Sie in der OpenMV IDE vorbereitet haben. Unternehmen auf der ganzen Welt entwickeln ihre kommerziellen Produkte bereits auf der Grundlage dieses einfachen, aber leistungsstarken Ansatzes zur Erkennung, Filterung und Klassifizierung von Bildern, QR-Codes und anderem. Debuggen mit professionellen Tools Verbinden Sie Ihre Portenta H7 über den JTAG-Anschluss mit einem professionellen Debugger. Nutzen Sie professionelle Software-Tools wie die von Lauterbach oder Segger auf Ihrem Board, um Ihren Code Schritt für Schritt zu debuggen. Das Vision Shield zeigt die erforderlichen Pins an, um einfach Ihr externes JTAG Interface anschließen zu können. Kamera Himax HM-01B0 Kameramodul Auflösung 320 x 320 aktive Pixel Auflösung mit Unterstützung für QVGA Bildsensor Hochempfindliche 3,6-μ-BrightSense™-Pixeltechnologie Mikrofon 2 x MP34DT05 Länge 66 mm Breite 25 mm Gewicht 11 gr Weitere Informationen finden Sie hier in den Tutorials von Arduino.
Verwirklichen Sie Ihre Projekt-Träume: Der Kilometerzähler fürs Hamsterrad, eine vollautomatische Steuerung Ihrer Ameisenfarm mit Webinterface, oder den Sandwich-O-Mat – eine Maschine, die Sandwich-Toasts nach Wahl belegt und überbackt.
Mit Arduino und der DIY- oder Maker-Bewegung wurde nicht nur der Einstieg in die Mikrocontroller-Programmierung kinderleicht, auch eine zweite Entwicklung fand statt: Viele Entwickler bringen kleine Boards – sogenannte Shields oder Module – auf den Markt, die den Einsatz zusätzlicher Hardware stark vereinfachten. Die kleinen Baugruppen enthalten alle wichtigen elektronischen Teile, um mit ein paar Steckkabeln an den Mikrocontroller angeschlossen zu werden, so dass ein frickeliger und aufwändiger Aufbau auf dem Steckboard entfällt. Zudem ist es so möglich, auch winzige kleine Bauteile zur Hand zu haben, die keine Anschlussbeinchen mehr haben (sogenannte SMDs).
Enthaltene Projekte
Arduino sucht Anschluss
BMP, Einführung in Bibliotheken und I²C
Mit den Mehrzweck-Shield I/O-Grundlagen kennenlernen
I²C-LCD-Adapter und Punktmatrixanzeigen
LCD-Tastaturschutz
Level-Konverter
W5100: Internetanbindung
I/O-Erweiterungs-Shields
Relais und Solid-State-Relais
Das Multi-Funktions-Shield: eine universelle Bedieneinheit
SD-Kartenleser über SPI anbinden
Tasten und 7-Segmentanzeigen
16-Bit-ADC
DAC MCP4725
16-fach PWM Servo-Treiber
MP3-Player
GPS-Datenlogger mit SD-Karte
Berührungssensor
Joystick
SHT31: Temperatur und Luftfeuchtigkeit
UV A-Sensor VEML6070
VL53L0X Flugzeit
Ultraschallsensor-Entfernungsmesser
LED-Punktmatrixanzeige mit MAX7219
Echtzeituhr DS3231
Port-Expander MCP23017
433 MHz Funk
MPU-650: Gyroskop
Beschleunigungssensor ADXL345
WS2812 RGB-LEDs
Spannungsversorgung
MQ-xx Gassensoren
CO2-Gassensor
ACS712 Stromstärkesensor
INA219 Stromstärkesensor
L298 Motortreiber
RFID-Modul MFRC522
28BYJ-48 Schrittmotor
TMC2209 Leiser Trittschalter
X9C10x Digitales Poti
Farb-TFT-Display mit ST7735
E-Paper-Anzeige
Bluetooth
Geigerzähler
SIM800L GSM-Modul
I²C-Multiplexer
Controller Area Network
A Reference and User Guide for the Arduino Uno Hardware and Firmware
A manual providing up-to-date hardware information for the popular Arduino Uno, the easy to use open-source electronics platform used by hobbyists, makers, hackers, experimenters, educators and professionals.
Get all the information that you need on the hardware and firmware found on Arduino Uno boards in this handy reference and user guide.
ldeal for the workbench or desktop
Contains all of the Arduino Uno hardware information in one place
Covers Arduino / Genuino Uno revision 3 and earlier boards
Easily find hardware technical specifications with explanations
Pin reference chapter with interfacing examples
Diagrams and illustrations for easy reference to alternate pin functions and hardware connections
Learn to back up and restore firmware on the board, or load new firmware
Basic fault finding and repair procedures for Arduino Uno boards
Power supply circuits simplified and explained
Mechanical dimensions split into five easy to reference diagrams
Contains circuit diagrams, parts list and board layout reference to easily locate components
This book covers a series of exciting and fun projects for the Arduino, such as a silent alarm, people sensor, light sensor, motor control, internet and wireless control (using a radio link). Contrary to many free projects on the internet all projects in this book have been extensively tested and are guaranteed to work!
You can use it as a projects book and build more than 45 projects for your own use. The clear explanations, schematics, and pictures of each project make this a fun activity. The pictures are taken of a working project, so you know for sure that they are correct.
You can combine the projects in this book to make your own projects. To facilitate this, clear explanations are provided on how the project works and why it has been designed the way it has That way you will learn a lot about the project and the parts used, knowledge that you can use in your own projects.
Apart from that, the book can be used as a reference guide. Using the index, you can easily locate projects that serve as examples for the C++ commands and Arduino functionality. Even after you’ve built all the projects in this book, it will still be a valuable reference guide to keep next to your PC.
The Arduino Uno is an open-source microcontroller development system encompassing hardware, an Integrated Development Environment (IDE), and a vast number of libraries. It is supported by an enormous community of programmers, electronic engineers, enthusiasts, and academics. The libraries in particular really smooth Arduino programming and reduce programming time. What’s more, the libraries greatly facilitate testing your programs since most come fully tested and working.
The Raspberry Pi 4 can be used in many applications such as audio and video media devices. It also works in industrial controllers, robotics, games, and in many domestic and commercial applications. The Raspberry Pi 4 also offers Wi-Fi and Bluetooth capability which makes it great for remote and Internet-based control and monitoring applications.
This book is about using both the Raspberry Pi 4 and the Arduino Uno in PID-based automatic control applications. The book starts with basic theory of the control systems and feedback control. Working and tested projects are given for controlling real-life systems using PID controllers. The open-loop step time response, tuning the PID parameters, and the closed-loop time response of the developed systems are discussed together with the block diagrams, circuit diagrams, PID controller algorithms, and the full program listings for both the Raspberry Pi and the Arduino Uno.
The projects given in the book aim to teach the theory and applications of PID controllers and can be modified easily as desired for other applications. The projects given for the Raspberry Pi 4 should work with all other models of Raspberry Pi family.
The book covers the following topics:
Open-loop and closed-loop control systems
Analog and digital sensors
Transfer functions and continuous-time systems
First-order and second-order system time responses
Discrete-time digital systems
Continuous-time PID controllers
Discrete-time PID controllers
ON-OFF temperature control with Raspberry Pi and Arduino Uno
PID-based temperature control with Raspberry Pi and Arduino Uno
PID-based DC motor control with Raspberry Pi and Arduino Uno
PID-based water level control with Raspberry Pi and Arduino Uno
PID-based LED-LDR brightness control with Raspberry Pi and Arduino Uno
,
von Clemens Valens
Zwei neue Arduino UNO R4 Boards: Minima und Wi-Fi
Der leistungsstarke Arduino UNO R4 ist das neueste Mitglied der kultigen Arduino UNO Familie. Es gibt ihn sogar in zwei Versionen. Werfen wir einen Blick...