ARM Cortex-M Embedded Design from 0 to 1
Hobbyists can mash together amazing functional systems using platforms like Arduino or Raspberry Pi, but it is imperative that engineers and product designers understand the foundational knowledge of embedded design. There are very few resources available that describe the thinking, strategies, and processes to take an idea through hardware design and low-level driver development, and successfully build a complete embedded system. Many engineers end up learning the hard way, or never really learn at all.
ARM processors are essentially ubiquitous in embedded systems. Design engineers building novel devices must understand the fundamentals of these systems and be able to break down large, complicated ideas into manageable pieces. Successful product development means traversing a huge amount of documentation to understand how to accomplish what you need, then put everything together to create a robust system that will reliably operate and be maintainable for years to come.
This book is a case study in embedded design including discussion of the hardware, processor initialization, low‑level driver development, and application interface design for a product. Though we describe this through a specific application of a Cortex-M3 development board, our mission is to help the reader build foundational skills critical to being an excellent product developer. The completed development board is available to maximize the impact of this book, and the working platform that you create can then be used as a base for further development and learning.
The Embedded in Embedded program is about teaching fundamental skill sets to help engineers build a solid foundation of knowledge that can be applied in any design environment. With nearly 20 years of experience in the industry, the author communicates the critical skill development that is demanded by companies and essential to successful design. This book is as much about building a great design process, critical thinking, and even social considerations important to developers as it is about technical hardware and firmware design.
Downloads
EiE Software Archive (200 MB)
IAR ARM 8.10.1 (Recommended IDE version to use) (1.2 GB)
IAR ARM 7.20.1 (Optional IDE version to use) (600 MB)
History and Future in the Internet of Things
This book thoroughly reviews the history of the development of embedded Operating Systems, covers the technical characteristics, historic facts, as well as background business stories of mainstream embedded Operating Systems, and analyzes the technical evolution, market development, and new opportunities of embedded Operating Systems in the age of the Internet of Things.
From the perspective of time, the book examines the evolution of critical technical aspects, including real-time and Power Management of embedded Operating Systems and Linux, Internet of Things security, communication, and cloud computing.
The book looks into applications of embedded Operating Systems with important markets of mobile phones, communication equipment, automobile, and wearable devices, and also discusses business model and the issue of intellectual property of embedded Operating Systems.
In addition, the book walks through the status quo, technical features, product evaluation and background of the Internet of Things Operating Systems in the second half of the book.
Linux auf dem Desktop – das ist heute leicht und einfach möglich. Embedded Linux ebenso, auch wenn es kompliziert erscheint. Das vorliegende Buch gibt allen Interessierten Hilfestellung, die Linux auf einer Embedded-Plattform installieren und nutzen möchten. Das im Buch vorgestellte System arbeitet mit der Toshiba-ARM9-Familie.
Grundlegende Linux-Kenntnisse auf dem PC werden Schritt für Schritt in Richtung Embedded Linux erweitert. Das Buch beantwortet die Fragen, welche Komponenten hierzu erforderlich sind und wie sich diese erstellen lassen. Nach der Vorstellung der verwendeten Hardware beginnt dies bei der Toolchain und setzt sich über JTAG-Debugger, Bootloader und Kernel bis zur Applikation fort.
Rezension: c't 25/2010"... Ein Buch aus der Praxis für die Praxis – besser geht es kaum."
Über 180 Projekte mit Raspberry Pi, Pico W, Arduino und ESP32
Dieses Bundle enthält das Universal Maker Sensor Kit mit zahlreichen Sensoren, Aktoren, Displays und Motoren. Es eignet sich perfekt für Umweltüberwachung, Smart-Home-Projekte, Robotik und Gamecontroller.
Das neue Elektor-Buch beschreibt die Entwicklung zahlreicher Projekte mit dem Kit und den beliebten Entwicklungsboards Raspberry Pi, Raspberry Pi Pico W, Arduino Uno und der ESP32-Familie. Sie können jedes dieser Entwicklungsboards für Ihre Projekte auswählen und die bereitgestellten Programme entweder unverändert verwenden oder an Ihre Anwendungen anpassen.
Dieses Bundle enthält:
Buch: Universal Maker Sensor Kit (Einzelpreis: 45 €)
Universal Maker Sensor Kit (für Raspberry Pi, Pico W, Arduino, ESP32) (Einzelpreis: 70 €)
Buch: Universal Maker Sensor Kit
Lernen Sie, mehr als 35 Sensoren und Aktoren mit C++, Python und MicroPython zu verwenden
Dieses Buch enthält über 180 Projekte für alle vier wichtigen Entwicklungsboards (Arduino, Raspberry Pi, Pico W und ESP32). Je nach Entwicklungsboard sind Projekte in den Programmiersprachen C, Python oder MicroPython verfügbar.
Die Projekttitel, Kurzbeschreibungen, Schaltpläne und vollständigen Programmlisten sind zusammen mit ihren detaillierten Beschreibungen im Buch aufgeführt.
Universal Maker Sensor Kit (für Raspberry Pi, Pico W, Arduino, ESP32)
Entdecken Sie grenzenlose Kreativität mit dem Universal Maker Sensor Kit, das für Raspberry Pi, Pico W, Arduino und ESP32 entwickelt wurde. Dieses vielseitige Kit ist mit gängigen Entwicklungsplattformen kompatibel, darunter Arduino Uno R4 Minima/WiFi, Uno R3, Mega 2560, Raspberry Pi 5, 4, 3B+, 3B, Zero, Pico W und ESP32.
Mit über 35 Sensoren, Aktoren und Displays eignet es sich perfekt für Projekte von Umweltüberwachung und Smart-Home-Automatisierung bis hin zu Robotik und interaktivem Gaming. Schritt-für-Schritt-Tutorials in C/C++, Python und MicroPython führen Anfänger und erfahrene Maker gleichermaßen durch 169 spannende Projekte.
Features
Umfassende Kompatibilität: Vollständige Unterstützung für Arduino (Uno R3, Uno R4 Minima/WiFi, Mega 2560), Raspberry Pi (5, 4, 3B+, 3B, Zero, Pico W) und ESP32. Dies ermöglicht umfassende Flexibilität auf zahlreichen Entwicklungsplattformen. Enthält Anleitungen für 169 Projekte.
Umfassende Komponenten: Mehr als 35 Sensoren, Aktoren und Anzeigemodule für vielfältige Projekte wie Umweltüberwachung, Smart Home-Automatisierung, Robotik und interaktive Spielesteuerungen.
Ausführliche Tutorials: Klare Schritt-für-Schritt-Anleitungen für Arduino, Raspberry Pi, Pico W, ESP32 und alle enthaltenen Komponenten. Es stehen Tutorials in C/C++, Python und MicroPython zur Verfügung, die sowohl für Anfänger als auch für erfahrene Maker geeignet sind.
Für alle Kenntnisstufen geeignet: Bietet strukturierte Projekte, die Benutzer nahtlos vom Anfänger zum Fortgeschrittenen in Elektronik und Programmierung führen und so Kreativität und technisches Know-how fördern.
Lieferumfang
Breadboard
Tastenmodul
Kapazitives Bodenfeuchtemodul
Flammensensormodul
Gas-/Rauchsensormodul (MQ2)
Gyroskop & Beschleunigungssensormodul (MPU6050)
Hall-Sensormodul
Infrarot-Geschwindigkeitssensormodul
IR-Hindernisvermeidungssensormodul
Joystickmodul
PCF8591 ADC/DAC-Wandlermodul
Fotowiderstandsmodul
PIR-Bewegungssensormodul (HC-SR501)
Potentiometermodul
Pulsoximeter- und Herzfrequenzsensormodul (MAX30102)
Regentropfenerkennungsmodul
Echtzeituhrmodul (DS1302)
Drehgebermodul
Temperatursensormodul (DS18B20)
Temperatur- und Feuchtigkeitssensormodul (DHT11)
Temperatur, Luftfeuchtigkeit und Drucksensor (BMP280)
Time-of-Flight-Mikro-LIDAR-Distanzsensor (VL53L0X)
Berührungssensormodul
Ultraschallsensormodul (HC-SR04)
Vibrationssensormodul (SW-420)
Wasserstandssensormodul
I²C LCD 1602
OLED-Displaymodul (SSD1306)
RGB-LED-Modul
Ampelmodul
5-V-Relaismodul
Kreiselpumpe
L9110-Motortreibermodul
Passives Summermodul
Servomotor (SG90)
TT-Motor
ESP8266 Modul
JDY-31 Bluetooth-Modul
Stromversorgungsmodul
Dokumentation
Online-Tutorial
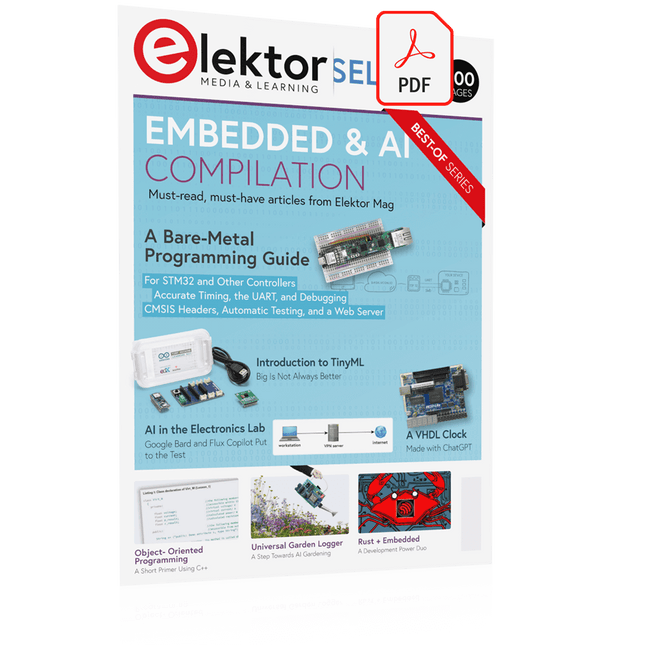
This collection features the best of Elektor Magazine's articles on embedded systems and artificial intelligence. From hands-on programming guides to innovative AI experiments, these pieces offer valuable insights and practical knowledge for engineers, developers, and enthusiasts exploring the evolving intersection of hardware design, software innovation, and intelligent technology.
Contents
Programming PICs from the Ground UpAssembler routine to output a sine wave
Object-Oriented ProgrammingA Short Primer Using C++
Programming an FPGA
Tracking Down Microcontroller Buffer Overflows with 0xDEADBEEF
Too Quick to Code and Too Slow to Test?
Understanding the Neurons in Neural NetworksEmbedded Neurons
MAUI Programming for PC, Tablet, and SmartphoneThe New Framework in Theory and Practice
USB Killer DetectorBetter Safe Than Sorry
Understanding the Neurons in Neural NetworksArtificial Neurons
A Bare-Metal Programming Guide
Part 1: For STM32 and Other Controllers
Part 2: Accurate Timing, the UART, and Debugging
Part 3: CMSIS Headers, Automatic Testing, and a Web Server
Introduction to TinyMLBig Is Not Always Better
Microprocessors for Embedded SystemsPeculiar Parts, the Series
FPGAs for BeginnersThe Path From MCU to FPGA Programming
AI in Electronics DevelopmentAn Update After Only One Year
AI in the Electronics LabGoogle Bard and Flux Copilot Put to the Test
ESP32 and ChatGPTOn the Way to a Self-Programming System…
Audio DSP FX Processor Board
Part 1: Features and Design
Part 2: Creating Applications
Rust + EmbeddedA Development Power Duo
A Smart Object CounterImage Recognition Made Easy with Edge Impulse
Universal Garden LoggerA Step Towards AI Gardening
A VHDL ClockMade with ChatGPT
TensorFlow Lite on Small MicrocontrollersA (Very) Beginner’s Point of View
Mosquito DetectionUsing Open Datasets and Arduino Nicla Vision
Artificial Intelligence Timeline
Intro to AI AlgorithmsPrompt: Which Algorithms Implement Each AI Tool?
Bringing AI to the Edgewith ESP32-P4
The Growing Role of Edge AIA Trend Shaping the Future
Technology is constantly changing. New microcontrollers become available every year and old ones become redundant. The one thing that has stayed the same is the C programming language used to program these microcontrollers. If you would like to learn this standard language to program microcontrollers, then this book is for you!
ARM microcontrollers are available from a large number of manufacturers. They are 32-bit microcontrollers and usually contain a decent amount of memory and a large number of on-chip peripherals. Although this book concentrates on ARM microcontrollers from Atmel, the C programming language applies equally to other manufacturer’s ARMs as well as other microcontrollers.
Features of this book
Use only free or open source software.
Learn how to download, set up and use free C programming tools.
Start learning the C language to write simple PC programs before tackling embedded programming - no need to buy an embedded system right away!
Start learning to program from the very first chapter with simple programs and slowly build from there.
No programming experience is necessary!
Learn by doing - type and run the example programs and exercises.
Sample programs and exercises can be downloaded from the Internet.
A fun way to learn the C programming language.
Ideal for electronic hobbyists, students and engineers wanting to learn the C programming language in an embedded environment on ARM microcontrollers.
Maker Line ist ein Zeilensensor mit einem Array aus 5 IR-Sensoren, der Linien mit einer Breite von 13 mm bis 30 mm verfolgen kann.
Auch die Sensorkalibrierung wird vereinfacht. Es ist nicht mehr nötig, das Potentiometer für jeden einzelnen IR-Sensor einzustellen. Sie müssen nur die Kalibrierungstaste 2 Sekunden lang drücken, um in den Kalibrierungsmodus zu wechseln. Anschließend müssen Sie das Sensorarray über die Linie bewegen, die Taste erneut drücken und schon kann es losgehen.
Die Kalibrierungsdaten werden im EEPROM gespeichert und bleiben auch nach dem Ausschalten des Sensors erhalten. Die Kalibrierung muss daher nur einmal durchgeführt werden, es sei denn, die Sensorhöhe, Linienfarbe oder Hintergrundfarbe hat sich geändert.
Maker Line unterstützt auch zwei Ausgänge: 5 x digitale Ausgänge für den Zustand jedes Sensors unabhängig voneinander, was einem herkömmlichen IR-Sensor ähnelt, aber Sie profitieren von der einfachen Kalibrierung, und auch ein analoger Ausgang, dessen Spannung die Linienposition darstellt. Der analoge Ausgang bietet auch eine höhere Auflösung im Vergleich zu einzelnen digitalen Ausgängen. Dies ist besonders nützlich, wenn beim Bau eines Linienverfolgungsroboters mit PID-Steuerung eine hohe Genauigkeit erforderlich ist.
Features
Betriebsspannung: DC 3,3 V und 5 V kompatibel (mit Verpolungsschutz)
Empfohlene Linienbreite: 13 mm bis 30 mm
Wählbare Linienfarbe (hell oder dunkel)
Erfassungsabstand (Höhe): 4 mm bis 40 mm (Vcc = 5 V, schwarze Linie auf weißer Oberfläche)
Sensor-Aktualisierungsrate: 200 Hz
Einfacher Kalibrierungsprozess
Duale Ausgabetypen: 5 x digitale Ausgänge repräsentieren jeden IR-Sensorstatus, 1 x analoger Ausgang repräsentiert die Zeilenposition.
Unterstützt eine breite Palette von Controllern wie Arduino, Raspberry Pi usw.
Downloads
Datenblatt
Tutorial: Einen kostengünstigen Linienverfolgungsroboter bauen
Entdecken Sie grenzenlose Kreativität mit dem Universal Maker Sensor Kit, das für Raspberry Pi, Pico W, Arduino und ESP32 entwickelt wurde. Dieses vielseitige Kit ist mit gängigen Entwicklungsplattformen kompatibel, darunter Arduino Uno R4 Minima/WiFi, Uno R3, Mega 2560, Raspberry Pi 5, 4, 3B+, 3B, Zero, Pico W und ESP32.
Mit über 35 Sensoren, Aktoren und Displays eignet es sich perfekt für Projekte von Umweltüberwachung und Smart-Home-Automatisierung bis hin zu Robotik und interaktivem Gaming. Schritt-für-Schritt-Tutorials in C/C++, Python und MicroPython führen Anfänger und erfahrene Maker gleichermaßen durch 169 spannende Projekte.
Features
Umfassende Kompatibilität: Vollständige Unterstützung für Arduino (Uno R3, Uno R4 Minima/WiFi, Mega 2560), Raspberry Pi (5, 4, 3B+, 3B, Zero, Pico W) und ESP32. Dies ermöglicht umfassende Flexibilität auf zahlreichen Entwicklungsplattformen. Enthält Anleitungen für 169 Projekte.
Umfassende Komponenten: Mehr als 35 Sensoren, Aktoren und Anzeigemodule für vielfältige Projekte wie Umweltüberwachung, Smart Home-Automatisierung, Robotik und interaktive Spielesteuerungen.
Ausführliche Tutorials: Klare Schritt-für-Schritt-Anleitungen für Arduino, Raspberry Pi, Pico W, ESP32 und alle enthaltenen Komponenten. Es stehen Tutorials in C/C++, Python und MicroPython zur Verfügung, die sowohl für Anfänger als auch für erfahrene Maker geeignet sind.
Für alle Kenntnisstufen geeignet: Bietet strukturierte Projekte, die Benutzer nahtlos vom Anfänger zum Fortgeschrittenen in Elektronik und Programmierung führen und so Kreativität und technisches Know-how fördern.
Lieferumfang
Breadboard
Tastenmodul
Kapazitives Bodenfeuchtemodul
Flammensensormodul
Gas-/Rauchsensormodul (MQ2)
Gyroskop & Beschleunigungssensormodul (MPU6050)
Hall-Sensormodul
Infrarot-Geschwindigkeitssensormodul
IR-Hindernisvermeidungssensormodul
Joystickmodul
PCF8591 ADC/DAC-Wandlermodul
Fotowiderstandsmodul
PIR-Bewegungssensormodul (HC-SR501)
Potentiometermodul
Pulsoximeter- und Herzfrequenzsensormodul (MAX30102)
Regentropfenerkennungsmodul
Echtzeituhrmodul (DS1302)
Drehgebermodul
Temperatursensormodul (DS18B20)
Temperatur- und Feuchtigkeitssensormodul (DHT11)
Temperatur, Luftfeuchtigkeit und Drucksensor (BMP280)
Time-of-Flight-Mikro-LIDAR-Distanzsensor (VL53L0X)
Berührungssensormodul
Ultraschallsensormodul (HC-SR04)
Vibrationssensormodul (SW-420)
Wasserstandssensormodul
I²C LCD 1602
OLED-Displaymodul (SSD1306)
RGB-LED-Modul
Ampelmodul
5-V-Relaismodul
Kreiselpumpe
L9110-Motortreibermodul
Passives Summermodul
Servomotor (SG90)
TT-Motor
ESP8266 Modul
JDY-31 Bluetooth-Modul
Stromversorgungsmodul
Dokumentation
Online-Tutorial
This book is all about building your own DIY home control system. It presents two innovative ways to assemble such a system: By recycling old PC hardware – possibly extending the life of an old PC, or by using Raspberry Pi. In both cases, the main system outlined in this book will consist of a computer platform, a wireless mains outlet, a controller and a USB webcam – All linked together by Linux.
By using the Raspberry Pi in conjunction with Arduino (used as an advanced I/O system board), it is possible to construct a small, compact, embedded control system offering enhanced capacity for USB integration, webcams, thermal monitoring and communication with the outside world.
The experience required to undertake the projects within this book are minimal exposure to PC hardware and software, the ability to surf the internet, burn a CD-ROM and assemble a small PCB.
Der Maker pHAT ist die Lösung für die häufigsten Probleme, mit denen Einsteiger beim Einstieg in Raspberry PI konfrontiert sind. Sein intelligentes und einfaches Design erleichtert die Anbringung an Ihrem Pi und erspart Ihnen die mühsame Arbeit, verschiedene andere Zubehörteile anzuschließen. Darüber hinaus können Sie anhand der jedem Pin zugeordneten LEDs ganz einfach erkennen, wo ein potenzielles Problem liegt
Der Maker pHat hat die gleiche Größe wie der Raspberry Pi Zero, wobei alle 4 Befestigungslöcher ausgerichtet sind. Es kann jedoch mit Raspberry Pi 3B, 3B+ und 3A+ verwendet werden, indem ein 2 x 20-Stacking-Header eingesetzt wird.
Features
Raspberry Pi Zero-Größe, lässt sich perfekt auf Raspberry Pi Zero stapeln
Kompatibel mit Raspberry Pi 3B / 3B+ in Standardgröße, Raspberry Pi 3A+ in mittlerer Größe und Raspberry Pi Zero / W / WH in kleinerer Größe.
Standard-GPIO-Footprint des Raspberry Pi.
LED-Array für ausgewählte GPIO-Pins (GPIO 17, 18, 27, 22, 25, 12, 13, 19).
3x integrierte programmierbare Drucktasten (GPIO 21, 19 und 20, müssen als Eingangs-Pullup konfiguriert werden).
Integrierter aktiver Summer (GPIO 26).
Richtige Bezeichnungen für alle GPIOs, einschließlich SPI, UART, I2C, 5V, 3,3V und GND.
Nutzen Sie die USB-Micro-B-Buchse für den 5-V-Eingang und die USB-zu-UART-Kommunikation.
USB seriell ermöglicht durch den FT231X
Eingangsspannung: USB 5 V, von einem Computer, einer Powerbank oder einem Standard-USB-Adapter.
Bringen Sie Farbe in Ihre Projekte mit dieser Kollektion aus roten, grünen, gelben, blauen und weißen LEDs. Sie sind mit verschiedenen Strombegrenzungswiderständen ausgestattet, um die Teile zu schützen und die Helligkeit zu steuern.
Inbegriffen
10-mm-LEDs
1x Hrsg
1x grün
1x gelb
1x blau
1x weiß
5-mm-LEDs
5x Aufl
5x grün
5x gelb
5x blau
5x weiß
3mm LEDs
5x Aufl
5x grün
5x gelb
5x blau
5x weiß
25x 330 Ω Widerstände
10x 1 kΩ Widerstände
10x 10 kΩ Widerstände
10x 100 kΩ Widerstände
10x 1 MΩ Widerstände
,
von Udo Bormann
Electronics Projects Archive for Engineers, Makers & Education
Access thousands of electronics projects, Arduino tutorials, audio designs, and power supply circuits with Elektor Classics USB sticks. Designed for younger engineers, university professors, electronics educators,...