Topseller
-

Elektor Digital PIO-Programmierung mit dem Raspberry Pi Pico (PDF)
Praxisnahe Projekte, Profi-Tricks und eigene Anwendungen Dieses Buch führt Sie Schritt für Schritt in die faszinierende Welt der State Machines ein und zeigt, wie Sie Hardware direkt und effizient ansteuern können – jenseits klassischer CPU-gesteuerter Ansätze. In diesem Buch lernen Sie: LEDs und NeoPixel kreativ steuern: Blinken, Dimmen, Farbwechsel und komplexe Animationen Taster und Encoder zuverlässig auslesen und in Echtzeit in Ihre Projekte integrieren Analoge Eingänge (ADC) nutzen und Signale digital steuern Servos präzise ansteuern und Bewegungsabläufe automatisieren SPI mit PIO umsetzen, um Displays, Sensoren und Module anzusteuern Menüsysteme und Submenüs auf SPI-Displays realisieren, inklusive Navigation über mehrere Taster PWM, Signalgenerierung und Frequenzsteuerung für akustische oder visuelle Effekte Debugging-Strategien und Tipps, um Ihre PIO-Programme effizient zu entwickeln Alle Beispiele sind praxisnah, sofort umsetzbar und zuverlässig. Mit klaren Anleitungen, Hintergrundwissen und fertigen Codebeispielen lernen Sie, die PIO-Fähigkeiten des Pico maximal zu nutzen – egal ob für Maker-Projekte, Prototypen oder professionelle Anwendungen. Erleben Sie, wie Sie komplexe Hardwaresteuerung elegant mit dem Pico realisieren können – schneller, flexibler und leistungsfähiger als je zuvor.
€ 29,80
Mitglieder: € 26,82
-
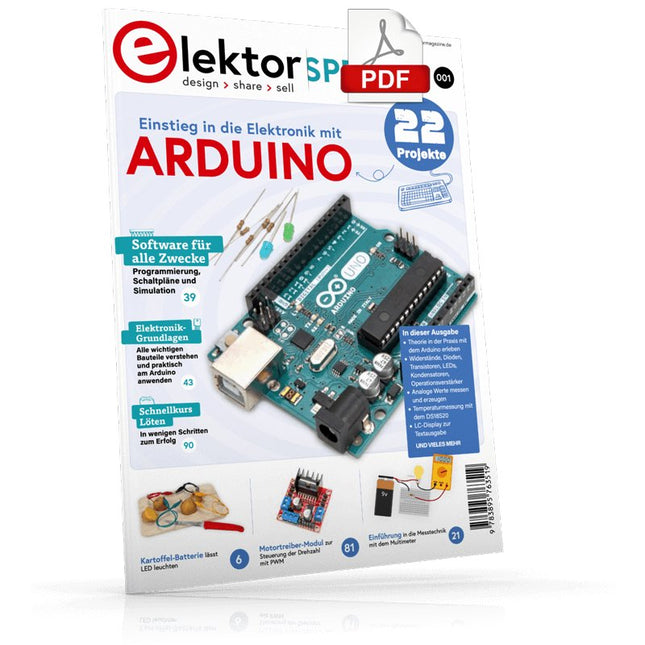
Elektor Digital Elektor Special: Einstieg in die Elektronik mit Arduino (PDF)
Der ideale Start für alle, die in die Welt der Elektronik und Mikrocontroller eintauchen möchten! Dieses Sonderheft vermittelt auf verständliche und praxisnahe Weise die Grundlagen der Elektronik – kombiniert mit spannenden Projekten rund um den beliebten Arduino. Statt trockener Theorie bietet dieses Heft viele leicht nachvollziehbare Experimente, die auf einem Steckboard und mit einem Arduino Uno umgesetzt werden können. So lernen Sie Schritt für Schritt, wie elektronische Bauteile funktionieren und wie Sie sie gezielt einsetzen, um eigene Projekte zu entwickeln. Enthaltene Projekte Strom & Spannung: Wie alles begann Arduino-Hardware Arduino-Programmierung Der Stromkreis Mit dem Multimeter messen Schaltpläne und Experimentier boards Schaltpläne erstellen Breadboard ansichten mit Fritzing Schaltungen online simulieren Unverzichtbar: Widerstände (Teil 1) Praxis mit Widerständen (Teil 2) Veränderliche Widerstände Dioden: Einbahnstraße für den Strom Der Transistor-Schalter Elektromagnetismus Relais und Motoren OpAmps: Operationsverstärker Kondensatoren Timer NE555 PWM und analoge Werte mit Arduino 7-Segment Temperatur anzeige Einführung ins Löten und LCDs
€ 11,90
Mitglieder: € 10,71
-

Elektor Digital Mastering the I²C Bus (E-book)
Mastering the I²C Bus takes you on an exploratory journey of the I²C Bus and its applications. Besides the Bus protocol, plenty of attention is given to the practical applications and designing a stable system. The most common I²C compatible chip classes are covered in detail. Two experimentation boards are available that allow for rapid prototype development. These boards are completed by a USB to I²C probe and a software framework to control I²C devices from your computer. All samples programs can be downloaded from the 'Attachments/Downloads' section on this page. Projects built on Board 1: USB to I²C Interface, PCA 9534 Protected Input, PCA 9534 Protected Output, PCA 9553 PWM LED Controller, 24xxx EEPROM Module, LM75 Temperature Sensor, PCA8563 Real-time Clock with Battery Backup, LCD and Keyboard Module, Bus Power Supply. Projects built on Board 2: Protected Input, Protected Output, LM75 Temperature Sensor, PCF8574 I/O Board, SAA1064 LED Display, PCA9544 Bus Expander, MCP40D17 Potentiometer, PCF8591 AD/DA, ADC121 A/D Converter, MCP4725 D/A Converter, 24xxx EEPROM Module.
€ 34,95
Mitglieder: € 31,46
-
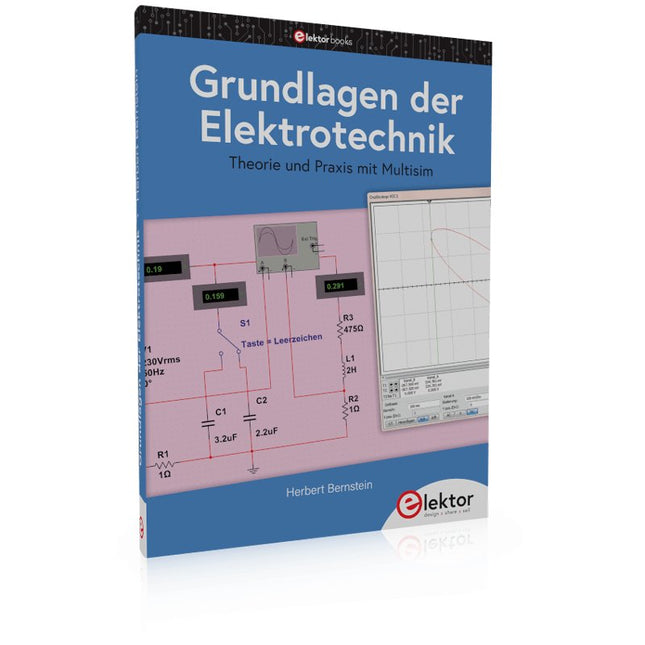
Elektor Publishing Grundlagen der Elektrotechnik
Dieses Fachbuch führt Studenten, Schüler und Selbststudierende in die wichtigsten Grundlagen der Elektrotechnik ein. Es werden die Gebiete der Gleichstromtechnik, des elektrischen und magnetischen Feldes sowie der Wechselstromtechnik, des Kondensators und der Spulen in einem Band zusammenhängend und übersichtlich dargestellt. Daran schließt sich die Beschreibung des elektrischen und magnetischen Feldes an. Zur Erzielung einer optimalen Verständlichkeit erfolgt die Darbietung des Stoffes nach dem Grundsatz, den Leser von einfachen Sachverhalten schrittweise zu komplexeren Problemstellungen zu führen. Zusätzlich sind den einzelnen Abschnitten Aufgaben mit ausführlichen Lösungswegen zugeordnet. Sie sind zum Erfassen der Gedankengänge von besonderer Bedeutung. Das Buch ist in acht Kapiteln unterteilt: Physikalische Größen und ihre Einheiten Elektrotechnische Größen im Gleichstromkreis Einfacher Stromkreis Erweiterter Strombereich Messgeräte für die Grundschaltungen der Elektronik Kondensator Spulen, Transformatoren, Relais und Lautsprecher Zusammengesetzte Wechselstromkreise Die Aufgaben sind zum großen Teil der elektrotechnischen Praxis entnommen und werden mit steigendem Schwierigkeitsgrad angeboten, so dass für jede Vorbildungsstufe geeigneter Übungsstoff zu finden ist. Der Inhalt ist als Hilfsmittel für den Unterricht und das Selbststudium bestimmt, sie kann auch dem Praktiker beim Auffrischen seiner Kenntnisse und zur Förderung seiner Rechenfertigkeit nützlich sein. Mit diesem Buch gibt der Autor sein gesamtes Wissen, das er sich im Laufe der Zeit in der Industrie und dem Unterricht an einer Technikerschule angeeignet hat, an den Leser weiter.
€ 39,80
Bestpreis
-

Elektor Academy Pro ESP32 by Example (Lernkurs)
Vollständiger ESP32-Mikrocontroller-Lernkurs mit speziell entwickelter MCU-Erweiterungsplatine, praxisorientierten Projekten und einem umfassenden Online-Guide – ideal, um Hardware, Programmierung und Konnektivität Schritt für Schritt zu erlernen. Praktische Einführung in eingebettete Systeme mit dem ESP32 Dieser Kurs richtet sich an Einsteiger in die Welt der eingebetteten Systeme, die einen strukturierten, beispielorientierten Einstieg suchen. Falls Sie sich bereits mit allgemeiner Elektronik oder Arduino-basierten Materialien beschäftigt haben, diese aber als zu allgemein oder zu wenig praxisnah empfunden haben, bietet dieser Kurs eine fokussiertere Alternative. Mit dem "ESP32 by Example Kit" (EEK) – einem kompakten und kostengünstigen Komponentensatz mit LEDs, Sensoren, einem OLED-Display und einem Bewegungsprozessor – arbeiten Sie während des gesamten Kurses mit einem einheitlichen Hardware-Setup. Nach dem Zusammenbau bleibt das EEK weitgehend unverändert, sodass Sie sich ganz auf das Lernen und Experimentieren konzentrieren können, ohne ständig neu konfigurieren zu müssen. Themen: Verstehen und Programmieren des ESP32-Mikrocontrollers Programmieren und Ausführen von Code mit der Arduino IIDE Erkunden von cyber-physischen Systemen, abschließend zur grundlegenden Drohnensteuerung Vorkenntnisse in Arduino oder Embedded-Entwicklung sind nicht erforderlich. Jeder Abschnitt enthält praktische Beispiele und Miniprojekte, die die wichtigsten Konzepte festigen und zu einer tiefergehenden Auseinandersetzung anregen. Am Ende des Kurses können Sie die Beispiele des Buches nicht nur nachvollziehen, sondern auch mit eigenen Ideen und Anwendungen erweitern. Ob Sie sich für Embedded-Programmierung, interaktive Systeme oder die Grundlagen der Drohnensteuerung interessieren – dieser Kurs bietet einen klaren und praxisorientierten Einstieg. Was Sie lernen werden Eingebettete Programmierung mit dem ESP32 mithilfe der Arduino IDE Echtzeit-Sensoreingabe und -steuerung über Tasten, LEDs und Displays Gestenbasierte Interaktion mit dem Bewegungssensor MPU6050 Integration von Bluetooth-Gamepads und Drohnensteuerungssimulation WLAN- und UDP-Netzwerke, lokale Webserver und NTP MQTT-Kommunikation mit Cloud-Plattformen wie AWS und Arduino IoT Aufbau und Bereitstellung voll funktionsfähiger IoT-Systeme Perfekt für Studierende und Autodidakten, die sich mit eingebetteten Systemen beschäftigen Bastler und IoT-Begeisterte, die ihre Hardwarekenntnisse verbessern möchten Lehrkräfte und Dozenten, die nach sofort einsetzbarem Unterrichtsmaterial suchen Entwickler, die über die Grundlagen von Raspberry Pi oder Arduino hinausgehen möchten Support, wenn Sie ihn brauchen Zugang zu Kursleitern über die Elektor Academy Hilfreiche Community-Foren und wichtige Dokumentation Was ist in der Box (Kurs)? Neues 384-seitiges Buch: "ESP32 by Example" (Wert: 45 €) Elektor ESP32 by Example Kit (EEK): Mikrocontroller-Erweiterungsplatine mit 6 LEDs und 6 Tasten + OLED-Display, MPU6050 3-Achsen Beschleunigungsmesser und Gyroskop-Modul (Wert: 40 €) Adafruit HUZZAH32 – ESP32 Feather MCU Board (Wert: 30 €) ESP32 Cheap Yellow Display Board (Wert: 25 €) DHT11 Feuchtigkeitssensor & Temperatursensor Breadboard Jumperkabel USB-C-Kabel Zugang zum vollständigen Kurs auf der Elektor Academy Pro Lernplattform Lehrvideos Herunterladbare Arduino-Projektdateien für jedes Modul Lernmaterial (dieser Box) ▶ Klicken Sie hier zum Öffnen Module 1 – Getting Started with the ESP32 & EEK Module 2 – Digital Output – LEDs and GPIO Module 3 – Switches and Input Handling Module 4 – EEK and PWM Module 5 – OLED and Display Output Module 6 – Motion Sensing with the MPU6050 Module 7 – Capstone Project (EEK in Action) Module 8 – WiFi and Web Control with ESP32 Module 9 – Cloud Concepts using EEK Module 10 – Hands-on: Arduino IoT Cloud and EEK Module 11 – BlueTooth and EEK GamePad Integration Module 12 – Why Drones? Module 13 – Drone Simulator Concepts Module 14 – Simple Drone Flight Control Module 15 – Real-Time Drone Flight Control Module 16 – Drone Control Mini-Projects Module 17 – Middleware and Python Scripting Module 18 – Python Applications for Drone Control Module 19 – Capstone EEK Control Project and Presentation Über den Autor Dr. Jim Solderitsch ist Dozent, Softwarearchitekt, Systementwickler und Cybersicherheitsforscher mit Schwerpunkt auf cyber-physischen Systemen. Derzeit ist er als Lehrbeauftragter für Informatik an der Villanova University in Pennsylvania tätig. Was ist Elektor Academy Pro? Elektor Academy Pro bietet maßgeschneiderte Lernlösungen für Fachkräfte, Ingenieurteams und technische Experten in der Elektronik- und Embedded-Systems-Branche. Sie unterstützt Einzelpersonen und Organisationen dabei, ihr praktisches Know-how zu vertiefen, ihre Skills gezielt auszubauen und dank hochwertiger Inhalte und praxisnaher Tools stets einen Schritt voraus zu sein. Von realen Projekten und spezialisierten Kursen bis hin zu fundierten technischen Insights – Elektor versetzt Ingenieure in die Lage, aktuelle Herausforderungen der Branche erfolgreich zu meistern. Unser Bildungsportfolio umfasst Academy-Bücher, Pro-Boxen, Webinare, Konferenzen und B2B-Fachmagazine – alles mit Blick auf praxisnahe Weiterbildung und berufliches Wachstum. Ob Ingenieur, F&E-Spezialist oder technischer Entscheider: Elektor Academy Pro schlägt die Brücke zwischen Theorie und Praxis – und hilft Ihnen, neue Technologien zu beherrschen und Innovationen in Ihrem Unternehmen gezielt voranzutreiben.
€ 269,00€ 219,00Bestpreis
-

Elektor Publishing Grundlagen und Schaltungen der Stromversorgungstechnik
Aus der Reihe "Stromversorgung ohne Stress" (Band 1) 2., überarbeitete und erweiterte Auflage Eines haben alle elektronischen Schaltungen und Geräte gemeinsam: Ihre Funktion hängt von der Stromversorgung ab. Deshalb muss dieser Baugruppe besondere Aufmerksamkeit gewidmet werden. Dieses Buch beinhaltet Grundlagen und Schaltungen der Stromversorgungstechnik für elektronische Geräte aus der Praxis. Dem aktuellen Trend folgend behandelt der Autor insbesondere die mobile Stromversorgungstechnik sowie die Schaltnetzteiltechnik. Dabei wird berücksichtigt, dass Stromkonstanter gegenüber Spannungskonstantern zunehmend an Bedeutung gewinnen. Im Buch finden sich die notwendigen Grundlagen zum Bau eigener Stromversorgungsgeräte und -baugruppen. Außerdem enthält es ganz praktische Anwendungsbeispiele, z. B. für den Ersatz defekter Netztransformatoren, für die mobile Stromversorgung auf Fahrradtouren oder für den Betrieb von LEDs. Diese zweite Auflage wurde gründlich überarbeitet, Fehler wurden behoben und einige Ergänzungen vorgenommen. Der Autor Franz Peter Zantis ist Energieanlagenelektroniker und Ingenieur der Nachrichtentechnik. In einem Forschungsprojekt hat er sich ausführlich mit der Stromversorgung eigensicherer Geräte auseinandergesetzt und zahlreiche Beiträge zum Thema Schaltnetzteile veröffentlicht.
€ 39,80
Bestpreis
-
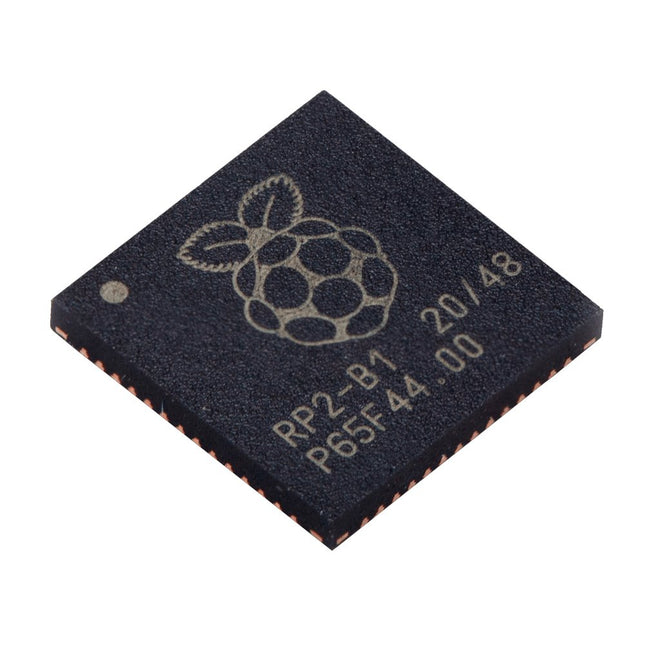
Raspberry Pi Foundation Raspberry Pi RP2040 Microcontroller (10 pcs)
Technische Spezifikationen Zwei ARM Cortex-M0+ mit 133 MHz 264 kB On-Chip-SRAM in sechs unabhängigen Bänken Unterstützung für bis zu 16 MB Off-Chip-Flash-Speicher über dedizierten QSPI-Bus DMA-Steuerung Vollständig angeschlossene AHB-Crossbar Interpolator- und Integer-Teiler-Peripherie On-Chip programmierbarer LDO zur Erzeugung der Kernspannung 2x On-Chip-PLLs zur Erzeugung von USB- und Kerntakten 30x GPIO-Pins, von denen 4 als Analogeingänge verwendet werden können Peripheriegeräte 2x UARTs 2x SPI-Steuerungen 2x I²C-Steuerungen 16x PWM-Kanäle USB 1.1-Controller und PHY, mit Host- und Geräteunterstützung 8x PIO-Zustandsmaschinen Was Sie erhalten 10x nackte RP2040-Chips
€ 7,95€ 3,18Bestpreis
-

Elektor Publishing PIO-Programmierung mit dem Raspberry Pi Pico
Praxisnahe Projekte, Profi-Tricks und eigene Anwendungen Dieses Buch führt Sie Schritt für Schritt in die faszinierende Welt der State Machines ein und zeigt, wie Sie Hardware direkt und effizient ansteuern können – jenseits klassischer CPU-gesteuerter Ansätze. In diesem Buch lernen Sie: LEDs und NeoPixel kreativ steuern: Blinken, Dimmen, Farbwechsel und komplexe Animationen Taster und Encoder zuverlässig auslesen und in Echtzeit in Ihre Projekte integrieren Analoge Eingänge (ADC) nutzen und Signale digital steuern Servos präzise ansteuern und Bewegungsabläufe automatisieren SPI mit PIO umsetzen, um Displays, Sensoren und Module anzusteuern Menüsysteme und Submenüs auf SPI-Displays realisieren, inklusive Navigation über mehrere Taster PWM, Signalgenerierung und Frequenzsteuerung für akustische oder visuelle Effekte Debugging-Strategien und Tipps, um Ihre PIO-Programme effizient zu entwickeln Alle Beispiele sind praxisnah, sofort umsetzbar und zuverlässig. Mit klaren Anleitungen, Hintergrundwissen und fertigen Codebeispielen lernen Sie, die PIO-Fähigkeiten des Pico maximal zu nutzen – egal ob für Maker-Projekte, Prototypen oder professionelle Anwendungen. Erleben Sie, wie Sie komplexe Hardwaresteuerung elegant mit dem Pico realisieren können – schneller, flexibler und leistungsfähiger als je zuvor.
€ 34,80
Bestpreis
-

Elektor Digital Ultimate Arduino Mega 2560 Hardware Manual (E-book)
A Reference and User Guide for the Arduino Mega 2560 Hardware and Firmware A manual providing up-to-date hardware information for the Arduino Mega 2560. The Arduino Mega 2560 is an upgrade to the popular Arduino Uno board, providing more pins, serial ports and memory. Arduino is the easy to use open-source electronics platform used by hobbyists, makers, hackers, experimenters, educators and professionals. Get all the information that you need on the hardware and firmware found on Arduino Mega 2560 boards in this handy reference and user guide. Ideal for the workbench or desktop. This manual covers the Arduino Mega 2560 hardware and firmware, and is a companion volume to the Ultimate Arduino Uno Hardware Manual, which covers the Arduino Uno hardware and firmware. Contains all of the Arduino Mega 2560 hardware information in one place Covers Arduino / Genuino Mega 2560 revision 3 and earlier boards Easily find hardware technical specifications with explanations Pin reference chapter with interfacing examples Diagrams and illustrations for easy reference to pin functions and hardware connections Learn to back up and restore firmware on the board, or load new firmware Basic fault finding and repair procedures for Arduino Mega 2560 boards Power supply circuits simplified and explained Mechanical dimensions split into five easy to reference diagrams Contains circuit diagrams, parts list and board layout to easily locate components A chapter on shield compatibility explains how shields work across different Arduino boards
€ 32,95
Mitglieder: € 29,66
-

Elektor Publishing ESP32 by Example
A Project-Based Introduction to Microcontrollers and Drone Control A Practical Introduction to Embedded Systems with the ESP32 This book is intended for readers who are new to embedded systems and looking for a structured, example-driven way to begin. If you’ve explored general-purpose electronics or Arduino-based resources but found them too broad or lacking in practical application, this guide offers a more focused alternative. With a small, affordable set of components – such as LEDs, sensors, an OLED screen and a motion sensor – you’ll build and work with the same hardware setup throughout the book. This allows you to focus on learning and experimenting without constant reconfiguration. Topics include: Understanding and programming the ESP32 microcontroller Using the Arduino IDE to write and deploy code Exploring cyber-physical systems, culminating in basic drone control No prior experience with Arduino or embedded development is required. Each section includes hands-on examples and mini-projects designed to reinforce core concepts and encourage deeper exploration. By the end, you’ll be equipped not only to reproduce the book’s examples, but also to extend them toward your own ideas and applications. Whether your interest is in learning embedded programming, building interactive systems, or exploring educational drone control, this book provides a clear and practical path to getting started.
€ 44,95
Mitglieder: € 40,46
-

Elektor Digital Electric Guitar (2nd Edition) (E-book)
Sound Secrets and Technology What would today’s rock and pop music be without electric lead and bass guitars? These instruments have been setting the tone for more than sixty years. Their underlying sound is determined largely by their electrical components. But, how do they actually work? Almost no one is able to explain this to the true musician with no technical background. This book answers many questions simply, in an easily-understandable manner. For the interested musician (and others), this book unveils, in a simple and well-grounded way, what have, until now, been regarded as manufacturer secrets. The examination explores deep within the guitar, including pickups and electrical environment, so that guitar electronics are no longer considered highly secret. With a few deft interventions, many instruments can be rendered more versatile and made to sound a lot better – in the most cost-effective manner. The author is an experienced electronics professional and active musician. He has thoroughly tested everything described here, in practice.
€ 32,95
Mitglieder: € 29,66
-

Elektor Digital Logic Analyzer im Einsatz (PDF)
USB-Logikanalysatoren am PC mit Arduino, Raspberry Pi und Co Schritt-für-Schritt-Anleitungen führen Sie in die Analyse moderner Protokolle von I²C, SPI, UART, RS-232, NeoPixel, WS28xx, HD44780 und 1-Wire ein. Anhand zahlreicher Experimentierschaltungen mit dem Raspberry Pi Pico, Arduino Uno und dem Bus Pirate üben Sie die praxisnahe Anwendung gängiger USB-Logikanalysatoren ein. Alle in diesem Buch vorgestellten Experimentierschaltungen wurden gründlich getestet und sind funktionsfähig. Die notwendigen Programmlistings sind enthalten, es sind keine besonderen Programmier- oder Elektronikkenntnisse für diese Schaltungen notwendig. Es werden die Programmiersprachen MicroPython und C mit den Entwicklungsumgebungen Thonny und Arduino IDE eingesetzt. Dieses Buch verwendet mehrere Modelle flexibler und weit verbreiteter USB-Logikanalysatoren und zeigt die Stärken und Schwächen jeder Preisklasse. Sie werden herausfinden, welche Kriterien für Ihre Arbeit wichtig sind und in der Lage sein, das passende Gerät für Sie zu finden. Egal ob Arduino, Raspberry Pi oder Raspberry Pi Pico: Die abgebildeten Beispielschaltungen ermöglichen einen schnellen Einstieg in die Protokollanalyse und können auch als Grundlage für eigene weitere Experimente dienen. Sie werden alle wichtigen Begriffe und Zusammenhänge kennenlernen, eigene Experimente durchführen, selbstständig Protokolle analysieren und nach der Lektüre dieses Buches – im Bereich der digitalen Signale und Protokolle – ein umfassendes Wissen aufgebaut haben.
€ 32,80
Mitglieder: € 29,52
-

Elektor Digital Arduino for Radio Amateur Applications (E-book)
Program and build Arduino-based ham station utilities, tools, and instruments In addition to a detailed introduction to the exciting world of the Arduino microcontroller and its many variants, this book introduces you to the shields, modules, and components you can connect to the Arduino. Many of these components are discussed in detail and used in the projects included in this book to help you understand how these components can be incorporated into your own Arduino projects. Emphasis has been placed on designing and creating a wide range of amateur radio-related projects that can easily be built in just a few days. This book is written for ham radio operators and Arduino enthusiasts of all skill levels, and includes discussions about the tools, construction methods, and troubleshooting techniques used in creating amateur radio-related Arduino projects. The book teaches you how to create feature-rich Arduino-based projects, with the goal of helping you to advance beyond this book, and design and build your own ham radio Arduino projects. In addition, this book describes in detail the design, construction, programming, and operation of the following projects: CW Beacon and Foxhunt Keyer Mini Weather Station RF Probe with LED Bar Graph DTMF Tone Encoder DTMF Tone Decoder Waveform Generator Auto Power On/Off Bluetooth CW Keyer Station Power Monitor AC Current Monitor This book assumes a basic knowledge of electronics and circuit construction. Basic knowledge of how to program the Arduino using its IDE will also be beneficial.
€ 32,95
Mitglieder: € 29,66
-

iFixit iFixit Pro Tech Toolkit
Das Pro Tech Toolkit ist das Einzige, was jeder Heimwerker, Reparateur, Hacker, Bastler und Profi braucht, um jede Aufgabe zu bewältigen. Jedes Tool im Pro Tech Toolkit wurde überarbeitet, um besser zu sein. Vom 64 Bit-Treiber-Kit bis hin zu den iFixit Opening Picks wurde jedes Werkzeug speziell entwickelt und ausgewählt, um Ihre Reparaturmöglichkeiten zu maximieren. Das Herzstück dieses Kits ist das iFixit 64 Bit-Schraubendreher-Kit, das auf der Grundlage umfangreicher Untersuchungen darüber entwickelt wurde, welche Befestigungstypen derzeit in der Unterhaltungselektronikindustrie verwendet werden und welche älteren Befestigungselemente von Verbrauchern immer noch nachgefragt werden. Von der Apple Watch mit ihren neuen winzigen Tri-Point-Schrauben bis hin zu Vintage-Nintendo-Spielekonsolen mit Gamebit-Befestigungen – das 64-Bit-Kit deckt sie alle mit CNC-gefrästen Bits höchster Qualität ab. Sogar das robuste Gehäuse wurde sorgfältig konstruiert, hat keine Scharniere oder Riegel, die brechen könnten, und verfügt über ein Sortierfach im magnetisch befestigten Deckel. Das umfassende Werkzeug-Set für Elektronikreparaturen aller Art Perfekt geeignet für DIY-Enthusiasten und professionelle Reparaturtechniker. Enthält Werkzeuge zum Schrauben, Öffnen, Greifen, Hebeln und Sondieren - alles was benötigt wird um Geräte aus dem Bereich der Unterhaltungselektronik zu reparieren. Und das ESD-sicher. Komplette Neuentwicklung – kein Werkzeug zu viel oder zu wenig. Inhalt des Sets Erdungsarmband – schützt dich und empfindliche Geräte vor elektrostatischen Entladungen Saugheber – zum sicheren Anheben und Halten griffloser Komponenten 3x iFixit Opening Tool – aus weichem Kunststoff zum kratzerfreien Aufhebeln von Gehäusen 6x iFixit Opening Picks – zum Aufhebeln, Aufschieben, Auftrennen und natürlich zum Luftgitarre spielen Kreuzpinzette – Zum Festhalten kleiner Teile ohne Fingerdruck Gebogene Pinzette – ESD-sicher, mit gezahnter Greiffläche Stumpfe Pinzette – ESD-sicher, mit gezahnter Greiffläche Spudger (Spatel) – robustes ESD-sicheres Allround-Tool Halberd Spudger – spezieller Spudger (Spatel) mit Haken, ESD-sicher Metallspatel – für die härteren Fälle Jimmy – der ultimative Geräteöffner Magnetische Unterlage – hält Schrauben und Kleinteile an ihrem Platz Werkzeugrolle – praktische Aufbewahrung für alle Bestandteile des Kits Mako Precision Bit Set – 64 essentielle Bits für Arbeiten an unterschiedlichsten Elektronikgeräten Inhalt des Mako Precision Bit Sets Magnetischer Aluminiumschraubendreher 4 mm mit kugelgelagerter Drehkappe Flexible Wellenverlängerung Länge 150 mm 64 Bits (4 mm) in folgenden Größen: Kreuzschlitz (Phillips) 000, 00, 0, 1, 2 Schlitz 1, 1.5, 2, 2.5, 3, 4 mm Torx T2, T3, T4, T5 Torx Security TR6, TR7, TR8, TR9, TR10, TR15, TR20, TR25 Pentalobe P2, P5, P6 JIS J000, J00, J0, J1 Sechskant 0.7, 0.9, 1.3, 1.5, 2, 2.5, 3, 3.5, 4, 4.5, 5 mm Tri-point Y000, Y00, Y0, Y1 Innensechskant Nuss 2.5, 3, 3.5, 4, 5, 5.5 mm Quadrat 1, 2 Gamebit 3.8, 4.5 mm Spanner 6, 8 Dreieck 2, 3 mm Standoff Bit für iPhone Oval Bit magnetisches Bit zur Aufnahme von Kleinteilen SIM Eject Bit 1/4 Zoll auf 4 mm Adapter
€ 68,79
-

Würth Abc der Kondensatoren (E-book)
Inhalt Grundlagen Dieses Kapitel vermittelt Basiswissen zum Zusammenhängen des elektrischen Feldes, der Permittivität sowie Aufbau und Wirkprinzip eines Kondensators. Kenngrössen von Kondensatoren Die elektrischen Parameter und wesentlichsten Kenngrößen eines Kondensators werden dem Leser hier näher erläutert. Dies reicht von der eigentlichen Kapazität eines Kondensators bis hin zum Abhängigkeitsverhalten. Kondensatortypen Es werden existierende Kondensatortypen und deren Eigenschaften vorgestellt. In detaillierter Form werden hierbei Film-, Elektrolyt- und Keramikkondensatoren betrachtet.
€ 8,99
Mitglieder: € 8,09
-

Elektor Publishing Software Defined Radio zum Selbstbau
Praktischer Einstieg mit Arduino, GnuRadio und FPGA Das Thema „Software Defined Radio“ ist facettenreich: Neben der Schaltungstechnik ist auch eine Einarbeitung in die Programmierung von Hardware und PC wichtig. Ein schrittweises Vorgehen erleichtert Ihnen den Einstieg. Mit dem im Buch vorgestellten modularen „RF Bricks“-Konzept werden Sie zum Architekten Ihrer Signalkette. Auf einem Chassis angeordnet gewährleisten die Module einen soliden und gut abgeschirmten Aufbau, den Sie einfach verändern und mit eigenen Ideen anreichern können. Der skalierbare Aufbau bildet Ihr Blockschaltbild auch mechanisch ab – die so gewonnene Übersicht kann in der Aus- und Weiterbildung nützlich sein. Ein Arduino in Ihrem Chassis kommuniziert nach einigen Anpassungen mit üblichen SDR-Programmen, z. B. SDRCPP, GQRX und CubicSDR auf einer Linux-Plattform. Damit können Sie Ihren Empfänger direkt per Mausklick abstimmen. Wenn Sie Blockschaltbilder mögen, ist GnuRadio ein natürlicher Partner der „RF Bricks“. Mit einem selbst programmierten Python-Block gelingt Ihnen in GnuRadio die Fernsteuerung Ihres Empfängers. Im GnuRadio-Universum können Sie Ihre GUI stufenweise ausbauen, behalten dabei aber immer volle Kontrolle über die inneren Abläufe des Programms. Mit einem FPGA können zeitaufwändige Operationen auch direkt in die Hardware verlagert werden. Sie bauen stufenweise einen Doppelsuperhet auf und entwickeln die Filterkoeffizienten für FIR-Filter mit Scilab. Das in VHDL realisierte Weaver-Schema rundet diesen Empfänger ab, der mit hoher Empfindlichkeit und Dynamik aufwarten kann. Mit dem gewonnen Überblick und Ihrer neuen Hardware können Sie die einzelnen Aspekte des Themenkomplexes SDR beliebig weiter vertiefen. Downloads Software
€ 44,80
Bestpreis
-

Raspberry Pi Foundation FPC Kamera-Kabel für Raspberry Pi 5 (500 mm)
Der Raspberry Pi 5 verfügt über zwei vierspurige MIPI-Anschlüsse, von denen jeder entweder eine Kamera oder ein Display unterstützen kann. Diese Anschlüsse verwenden dasselbe 22-polige "Mini"-FPC-Format mit 0,5 mm Raster wie das Compute Module Development Kit und erfordern Adapterkabel für den Anschluss an die 15-poligen "Standard"-Anschlüsse mit 1 mm Raster an aktuellen Raspberry Pi Kamera- und Display-Produkten. Diese Mini-zu-Standard-Adapterkabel für Kameras und Displays (beachten Sie, dass ein Kamerakabel nicht mit einem Display verwendet werden sollte und umgekehrt) sind in den Längen 200 mm, 300 mm und 500 mm erhältlich.
€ 3,95€ 1,58Bestpreis
-

Elektor Labs Elektor 'Wortreicher' LED-Weihnachtsbaum
Mehrsprachiges DIY-Kit (inkl. 27 RGB-LEDs + Raspberry Pi Pico) Verleihen Sie Ihrer Weihnachtszeit einen Hauch von Ingenieurskunst – mit dem "wortreichen" LED-Weihnachtsbaum von Elektor. Der kunstvoll gestaltete 3D-Weihnachtsbaum vereint elf Platinen, einen Raspberry Pi Pico und 27 adressierbare RGB-LEDs, um festliche Botschaften in sieben Sprachen erstrahlen zu lassen: Dänisch, Niederländisch, Englisch, Französisch, Deutsch, Italienisch und Spanisch. Anders als bei herkömmlichen LED-Bäumen verfügt jedes Wort im Inneren über eine eigene Leuchtkammer. So entsteht eine elegante, sanft leuchtende Anzeige ohne Geräusche oder Flackern. Die LEDs sind vollständig WS2812-kompatibel und werden über die beliebte Adafruit NeoPixel-Bibliothek angesteuert, wodurch sich individuelle Animationen und Farbeffekte ganz einfach erstellen lassen. Dieses Kit ist perfekt für Maker, Tüftler und alle, die sich für festliche Elektronik begeistern. Es bietet sowohl ein unterhaltsames Bauprojekt als auch eine beeindruckende Dekoration, die garantiert für Gesprächsstoff sorgt. Der Elektor LED-Weihnachtsbaum ist das ideale Bastelprojekt für die Feiertage! Features Mehrsprachige Begrüßungen (7 Sprachen) in die Frontplatte eingefräst 3D-Konstruktion aus 11 ineinandergreifenden Leiterplatten Angetrieben von einem Raspberry Pi Pico 27 einzeln ansteuerbare RGB-LEDs (vormontiert) Sanfte Ein- und Ausblendanimationen Vollständig programmierbar mit der Arduino IDE Für maximale Helligkeit wird ein 5-V-Netzteil (mit Micro-USB-Anschluss) mit einer Leistung von ≥1 A empfohlen (nicht im Lieferumfang enthalten) Abmessungen (H x B x T): 130 x 115 x 75 mm Lieferumfang Alle benötigten Leiterplatten mit LEDs und anderen SMD-Bauteilen Raspberry Pi Pico (vom Benutzer zu löten und zu programmieren) 3-polige Stiftleiste (vom Benutzer zu löten) 3-polige Buchse (vom Benutzer zu löten) 4x Selbstklebende Gummipuffer Projektseite Elektor Labs
€ 59,95€ 49,95Bestpreis
-

Elektor Publishing Logic Analyzers in Practice
PC USB Logic Analyzers with Arduino, Raspberry Pi, and Co. Step-by-step instructions guide you through the analysis of modern protocols such as I²C, SPI, UART, RS-232, NeoPixel, WS28xx, HD44780 and 1-Wire. With the help of numerous experimental circuits based on the Raspberry Pi Pico, Arduino Uno and the Bus Pirate, you will learn the practical application of popular USB logic analyzers. All the experimental circuits presented in this book have been fully tested and are fully functional. The necessary program listings are included – no special programming or electronics knowledge is required for these circuits. The programming languages used are MicroPython and C along with the development environments Thonny and Arduino IDE. This book uses several models of flexible and widely available USB logic analyzers and shows the strengths and weaknesses of each price range. You will learn about the criteria that matter for your work and be able to find the right device for you. Whether Arduino, Raspberry Pi or Raspberry Pi Pico, the example circuits shown allow you to get started quickly with protocol analysis and can also serve as a basis for your own experiments. After reading this book, you will be familiar with all the important terms and contexts, conduct your own experiments, analyze protocols independently, culminating in a comprehensive knowledge set of digital signals and protocols.
€ 34,95
Mitglieder: € 31,46
-

FNIRSI FNIRSI DPS150PD DC-Netzteil (150 W)
Das FNIRSI DPS150 ist ein leistungsstarkes, einstellbares Gleichstromnetzteil, das über eine USB-C-Eingangsschnittstelle und mehrere Stromversorgungsmodi verfügt und eine präzise Einstellung der Ausgangsspannung (0-30 V) und des Ausgangsstroms (0-5 A) ermöglicht. Es bietet einen effizienten, verbrauchsarmen und stabilen Ausgang und ist mit mehreren Sicherheitsschutzfunktionen ausgestattet, darunter Überspannung, Überstrom, Überlastung, Überhitzung und Verpolung. Es kann flexibel für die serielle Verbindung mehrerer Geräte eingesetzt werden, verfügt über eine umfangreiche und benutzerfreundliche Anzeige und Bedienung sowie ein kompaktes und tragbares Design und erfüllt verschiedene Anwendungsanforderungen. Features 30 V, 5 A, 150 W variabler Gleichstrom mit 0,01 V, 0,001 A Präzision, CC/CV-Modi und <20 mV Welligkeit zum Schutz empfindlicher Elektronik. Unterstützt PC-, QC- und DC-Eingänge mit programmierbaren Ausgängen und 6 voreingestellten Spannungs-/Stromeinstellungen. Kompatibel mit 4 mm-Bananensteckern, U-förmigen Anschlüssen und Kupferdrähten für verschiedene Geräte. 8 Sicherheitsmechanismen, einschließlich Überspannungs-, Strom-, Kurzschluss- und Überhitzungsschutz. 2,8" HD-IPS-Bildschirm mit um 90° umklappbarer, numerischer und Kurvenanzeige für einfache Überwachung. Kleines, platzsparendes Design für den Einsatz in Laboren, Reparaturen und Heimwerkerprojekten. Technische Daten Eingangsspannung 5~32 V DC Eingangsstrom 100 mA-5 A Ausgangsspannung 0-30 V Ausgangsstrom 0~5 A Ausgangsleistung 0-150 W Eingabeweg PD-Schnellladegerät QC-Schnellladegerät Powerbank Gleichstromadapter Betriebsumgebung 0-40°C Regulierung laden 0,49% Volllasteffizienz 96,30% Display 2,8 Zoll (320 x 240) Abmessungen 106 x 76 x 28 mm Gewicht 178 g Lieferumfang 1x DPS150 Netzteil 2x Krokodilklemmendrähte (schwarz und rot) 1x C2C PD Ladekabel 1x 100 W PD GaN Adapter (EU) 1x Micro-USB-Kabel 1x Manual Downloads Manual Firmware V0.0.1
€ 93,43
-

Elektor Digital Stromversorgung ohne Stress 2 (PDF)
Aus der Reihe "Stromversorgung ohne Stress" (Band 2) Anwendungen, Applikationen und Bauanleitungen Eines haben alle elektronischen Schaltungen und Geräte gemeinsam: Ihre Funktion steht und fällt mit der Stromversorgung. Schon deshalb muss man dieser Baugruppe besondere Aufmerksamkeit widmen. Beschäftigte sich Band 1 mit den Grundlagen und Schaltungen der Stromversorgungstechnik für elektronische Geräte aus der Praxis, bietet der zweite Band neben direkt verwertbaren Grundlageninformationen eine Sammlung verschiedener praktischer Anleitungen und Applikationen sowie Bauanleitungen. Damit ist das Buch für jeden ambitionierten Elektronik-Praktiker eine wertvolle Bereicherung seiner Gestaltungsmöglichkeiten. Aus dem Inhalt: Kapitel 1 • Messungen an Spannungs- und Stromquellen Kapitel 2 • Mobile Spannungs- und Stromquellen Kapitel 3 • Netzbetriebene Versorgungsgeräte Kapitel 4 • Verschiedene Themen zur Stromversorgung, unter anderem auch zur drahtlosen Energieübertragung
€ 32,80
Mitglieder: € 29,52
-
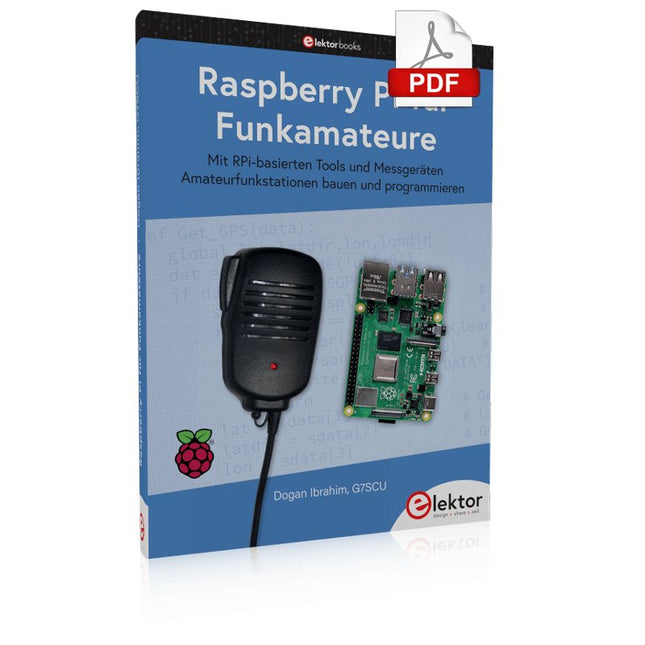
Elektor Digital Raspberry Pi für Funkamateure (PDF)
Mit RPi-basierten Tools und Messgeräten Amateurfunkstationen bauen und programmieren Obwohl viele Funkamateure immer noch mit klassischer HF- und Mobilfunkausrüstung arbeiten, ist der Einsatz von Computern und digitalen Techniken mittlerweile sehr beliebt. wür überwä wür wich überwä ich wür wich überwä ich wür wämich überwä ich wür wich überich wür wämich überbich wür wich überwä ich wür wich überbich wür wäm ...ich wür wich überbich wür ich überbich wür ich wür wich überbich wür Für 40 € einen Raspberry Pi-Computer kaufen und schnell jede Amateurfunk-Software auf dem 'RPi' ausführen. Die RTL-SDR-Geräte sind bei Funkamateuren sehr beliebt, weil sie sehr preiswert sind und viele Funktionen bieten. Ein Basissystem kann aus einem USB-basierten RTL-SDR-Dongle mit einer geeigneten Antenne, einem RPi-Computer, einem USB-basierten externen Audio-Eingangs-/Ausgangsadapter und einer auf dem RPi installierten Software bestehen. Mit einer solchen einfachen Einrichtung ist es möglich, Signale von etwa 24 MHz bis über 1,7 GHz zu empfangen. Dieses Buch richtet sich an Funkamateure, die lernen wollen, wie man mit dem Raspberry Pi elektronische Projekte baut. Das Buch eignet sich für die gesamte Bandbreite von Anfängern bis hin zu alten Hasen im Amateurfunk. Die schrittweise Installation des Betriebssystems wird mit vielen Details zu den gängigsten Linux-Befehlen beschrieben. Einige Kenntnisse der Programmiersprache Python sind erforderlich, um die im Buch beschriebenen Projekte zu verstehen und zu bearbeiten. Zu den im Buch entwickelten Beispielprojekten gehören eine Stationsuhr, ein Signalgenerator, der Entwurf eines Transistorverstärkers, der Entwurf eines aktiven Filters, ein Morsezeichen-Übungsgerät, ein Frequenzzähler, ein HF-Meter und vieles mehr. Für jedes Projekt werden das Blockdiagramm, der Schaltplan und der vollständige Python-Quellcode angegeben, einschließlich der vollständigen Beschreibung des Projektes. Neben der umfassenden Behandlung von RTL-SDR für Amateurfunk fasst das Buch auch die Installations- und Gebrauchsanweisungen der folgenden Amateurfunkprogramme zusammen, die Sie auf Ihrem Raspberry Pi ausführen können: TWCLOCK, Klog, Gpredict, FLDIGI, DIRE WOLF, xcwcp, QSSTV, LinPsk, Ham Clock, CHIRP, xastir und CQRLOG.
€ 34,80
Mitglieder: € 31,32
-

Peak Peak Atlas ZEN50 Zenerdioden-Analyzer
Der Peak Atlas ZEN50 ist ideal zum Testen von Zenerdioden (einschließlich Lawinendioden), Transientenunterdrückern, LEDs und LED-Strängen. Es erzeugt konstante Stromimpulse (wählbar zwischen 2 mA, 5 mA, 10 mA und 15 mA) bei Spannungen von 0 V bis 50 V. So können sogar Hochspannungs-Zener oder Hochspannungs-LED-Stränge getestet werden. Prüfströme werden in schmalen Impulsen zugeführt, um sicherzustellen, dass die zu prüfende Komponente eine konstante Temperatur behält. Die Spannung des Teils wird auf dem Bildschirm zusammen mit dem Prüfstrom und einem Maß für den Steilheitswiderstand des Bauteils (auch als dynamische Impedanz bezeichnet) angezeigt. Technische Daten Analyzertyp Zener, LEDs, TVS usw Testströme 2mA, 5mA, 10mA, 15mA Spannungsbereich 0,00 bis 50,00 V Neigungswiderstandsbereich 0 bis 8000 Ohm Akku-Typ Einzelnes AAA (im Lieferumfang enthalten). Die Lebensdauer beträgt normalerweise 1400 Operationen Testmethode Dreifachimpuls-Burst bei 10pps (typisch) Testen Sie den aktuellen Arbeitszyklus 3% Anzeigetyp Alphanumerisches LCD (mit Hintergrundbeleuchtung) Lieferumfang Peak Atlas ZEN50 Zenerdioden-Analyzer Angepasste flexible Messleitungen mit vergoldeten Krokodilen Umfangreiche bebilderte Bedienungsanleitung AAA-Alkalibatterie Downloads Datenblatt (EN) Benutzerhandbuch (DE)
€ 84,49
-

Elektor Digital Technical Modeling with OpenSCAD (E-book)
Create Models for 3D Printing, CNC Milling, Process Communication and Documentation Engineers dread designing 3D models using traditional modeling software. OpenSCAD takes a refreshing and completely different approach. Create your models by arranging geometric solids in a JavaScript-like language, and use them with your 3D printer, CNC mill, or process communication. OpenSCAD differs from other design systems in that it uses programmatical modeling. Your model is made up of primitives that are invoked using a C-, Java- or Python-like language. This approach to model design is close to the “mechanical work” done in the real world and appeals to engineers and others who are not a member of the traditional creative class. OpenSCAD also provides a wide variety of comfort functions that break the 1:1 relationship between code and geometry. This book demonstrates the various features of the programming language using practical examples such as a replacement knob for a LeCroy oscilloscope, a wardrobe hanger, a container for soap dispensers, and various other real-life examples. Written by an engineer with over 15 years of experience, this book is intended for Linux and Windows users alike. If you have programming experience in any language, this book will have you producing practical three-dimensional objects in short order!
€ 29,95
Mitglieder: € 26,96


