
Suchergebnisse für "seeed OR studio OR grove OR starter OR kit OR for OR raspberry OR pi OR pico"
-

Elektor Digital Practical Microcontroller Cryptography (E-book)
From Simple Ciphers to Secure Systems Understanding how to apply cryptography on modern microcontrollers is essential for building secure, reliable, and trustworthy systems. This book explains cryptography in the context of embedded hardware, from classical ciphers that illustrate core principles to modern techniques such as AES for practical high-security applications. By combining mathematical theory with real-world microcontroller implementations, readers learn not only how cryptography works, but also how to implement it effectively on systems with limited processing power and memory. The book is intended for students starting out in cryptography, hobbyists securing personal projects, and engineers looking for a structured guide to embedded security. The book covers these key topics in applied cryptography: Classical ciphers on Arduino Uno and Raspberry Pi Pico, with full programs: Spartan Scytale, Hebrew Atbash, Caesar, ROT13, Alberti Disk, Vigenère, Affine, Polybius, Playfair, Beaufort, Ottoman Codebook, and One-Time Pad. Hacking classical ciphers using microcontrollers, with examples. Pseudo-random (PRNG) and true random number generation (TRNG) on microcontrollers. Symmetric-key cryptography with full programs: DES and AES-128/256. Memory and speed constraints of cryptography on microcontrollers. Asymmetric cryptography: public/private keys, digital signatures, key distribution and derivation (KDF), RSA, and SHA-256 implementations. A complete secure communication program using RSA and AES-256. A glossary of commonly used cryptography terms.
€ 29,95
Mitglieder: € 26,96
-

Elektor Digital Edge AI Made Practical (E-book)
AI Projects for the Raspberry Pi with the AI HAT+ Edge AI is transforming everyday devices by putting intelligence where it matters most: directly inside the hardware. With on-device inference, a camera can recognize a visitor instantly, a phone can translate speech without streaming audio to the cloud, and a wearable can detect anomalies in real time—fast, private, and reliable even when the network disappears. This book is your practical guide to building exactly those kinds of systems with the Raspberry Pi AI HAT+ and the Hailo-8L accelerator. You’ll start with clear foundations: core AI and machine-learning concepts, how neural networks work, and what truly distinguishes Edge AI from cloud AI—plus an honest look at ethical considerations and future impacts. Then it’s straight to hands-on physical computing. Step by step, you’ll set up Raspberry Pi OS, power and cooling, and develop in Python using the Thonny IDE. You’ll learn GPIO basics with lights and servos, mount the AI HAT+ hardware, install and verify the Hailo software stack, and connect the right camera—official modules or USB webcams, even multiple cameras. From your first pipeline to real projects, you’ll run person detection, pose estimation, segmentation, and depth estimation, then level up with YOLO object detection: smart alerts, guest counters, and custom extensions. You’ll even connect vision to motion by combining gesture recognition with servo-driven mechanisms, including a robotic arm. With troubleshooting tips, hardware essentials, and a practical Python refresher, this book turns Edge AI from buzzword into buildable reality.
€ 29,95
Mitglieder: € 26,96
-

Elektor Labs Elektor Arduino Nano MCCAB Trainingsboard
Das Elektor Arduino Nano MCCAB Trainingsboard enthält alle Bauteile (inkl. Arduino Nano), die für die Übungen des "Mikrocontroller-Praxiskurs für Arduino-Einsteiger" benötigt werden wie Leuchtdioden, Schalter, Taster, akustische Signalgeber usw. Auch externe Sensoren, Motoren oder Baugruppen können mit diesem Mikrocontroller-Übungssystem abgefragt oder gesteuert werden. Technische Daten (Arduino Nano Trainingsboard MCCAB) Stromversorgung Über die USB-Verbindung des zur Erstellung der Programme sowieso angeschlossenen PCs oder ein externes Netzteil (nicht im Lieferumfang enthalten) Betriebsspannung +5 Vcc Eingangsspannung Alle Eingänge 0 V bis +5 V VX1 und VX2 +8 V bis +12 V (nur bei Verwendung eines externen Netzteils) Mikrocontrollermodul Arduino Nano Hardwareperipherie LCD 2x16 Zeichen Potenziometer P1 & P2 JP3: Auswahl der Betriebsspannung von P1 & P2 Verteiler SV4: Verteiler für die BetriebsspannungenSV5, SV6: Verteiler für die Ein-/Ausgänge des Mikrocontrollers Schalter und Taster RESET-Taster auf dem Arduino Nano-Modul6x Tastschalter K1 … K66x Schiebeschalter S1 … S6JP2: Verbindung der Schalter mit den Eingängen des Mikrocontrollers Summer Piezo-Summer Buzzer1 mit Steckbrücke auf JP6 Leuchtanzeigen LED L auf dem Arduino Nano-Modul, verbunden mit GPIO D1311x LED: Zustandsanzeige für die Ein-/AusgängeJP6: Verbindung der LEDs LD10 … LD20 mit den GPIOs D2 … D12 Serielle SchnittstellenSPI & I²C JP4: Auswahl des Signals an Pin X der SPI-Steckerleiste SV12SV9 bis SV12: SPI-Interface (3,3 V/5 V) bzw. I²C-Interface Schaltausgang für externe Geräte SV1, SV7: Schaltausgang (maximal +24 V/160 mA, extern zugeführt)SV2: 2x13 Pins zum Anschluss externer Module 3x3 LED-Matrix (9 rote LEDs) SV3: Spalten der 3x3 LED-Matrix (Ausgänge D6 … D8)JP1: Verbindung der Reihen mit den GPIOs D3 … D5 Software Library MCCABLib Steuerung der Hardware-Komponenten (Schalter, Taster, Leuchtdioden, 3x3 LED-Matrix, Summer) auf dem MCCAB Trainingsboard Betriebstemperatur bis +40 °C Abmessungen 100 x 100 x 20 mm Technische Daten (Arduino Nano) Mikrocontroller ATmega328P Architektur AVR Betriebsspannung 5 V Flashspeicher 32 KB, davon 2 KB vom Bootloader belegt SRAM 2 KB Taktfrequenz 16 MHz Analoge IN-Pins 8 EEPROM 1 KB DC-Strom pro I/O-Pin 40 mA an einem I/O-Pin, insgesamt maximal 200 mA an allen Pins gemeinsam Eingangsspannung 7-12 V Digitale I/O-Pins 22 (6 davon sind PWM-fähig) PWM-Ausgänge 6 Stromverbrauch 19 mA Abmessungen 18 x 45 mm Gewicht 7 g Lieferumfang 1x Elektor Arduino Nano Trainingsboard (MCCAB) 1x Arduino Nano
€ 79,95€ 69,95Bestpreis
-

Elektor Labs Elektor Super Servo Tester Kit
Der Elektor Super Servo Tester kann Servos steuern und Servosignale messen. Es können bis zu vier Servokanäle gleichzeitig getestet werden. Der Super Servo Tester wird als Bausatz geliefert. Alle zum Zusammenbau des Super Servo Testers erforderlichen Teile sind im Bausatz enthalten. Für den Zusammenbau des Bausatzes sind grundlegende Lötkenntnisse erforderlich. Der Mikrocontroller ist bereits programmiert. Der Super Servo Tester verfügt über zwei Betriebsmodi: Steuerung/Manuell und Messen/Eingänge. Im Control/Manual Modus generiert der Super Servo Tester an seinen Ausgängen Steuersignale für bis zu vier Servos oder für den Flugregler oder ESC. Die Signale werden über die vier Potentiometer gesteuert. Unter Measure/Inputs misst der Super Servo Tester die an seine Eingänge angeschlossenen Servosignale. Diese Signale können beispielsweise von einem Regler, einem Flugregler, dem Empfänger oder einem anderen Gerät stammen. Die Signale werden auch an die Ausgänge weitergeleitet, um die Servos oder den Flugregler bzw. ESC zu steuern. Die Ergebnisse werden auf dem Display angezeigt. Technische Daten Betriebsmodi Control/Manual & Measure/Inputs Kanäle 3 Servosignaleingänge 4 Servosignalausgänge 4 Alarm Summer & LED Anzeige 0,96' OLED (128 x 32 Pixel) Eingangsspannung an K5 7-12 VDC Eingangsspannung an K1 5-7,5 VDC Eingangsstrom 30 mA (9 VDC an K5, nichts an K1 und K2 angeschlossen) Abmessungen 113 x 66 x 25 mm Gewicht 60 g Lieferumfang Widerstände (0,25 W) R1, R3 1 kΩ, 5% R2, R4, R5, R6, R7, R9, R10 10 kΩ, 5% R8 22 Ω, 5% P1, P2, P3, P4 10 kΩ, lin/B, vertikales Potentiometer Kondensatoren C1 100 µF 16 V C2 10 µF 25 V C3, C4, C7 100 nF C5, C6 22 pF Halbleiter D1 1N5817 D2 LM385Z-2.5 D3 BZX79-C5V1 IC1 7805 IC2 ATmega328P-PU, programmiert LED1 LED, 3 mm, rot T1 2N7000 Außerdem BUZ1 Piezo-Summer mit Oszillator K1, K2 2-reihiger, 12-poliger Pinheader, 90° K5 Barrel jack K4 1-reihige, 4-polige Stiftbuchse K3 2-reihiger, 6-fach geschachtelter Pinheader S1 Slide Switch DPDT S2 Slide Switch SPDT X1 Crystal, 16 MHz 28-polige DIP-Buchse für IC2 Elektor Platine OLED-Display, 0,96', 128 x 32 Pixel, 4-pin I²C-Interface Links Elektor Magazine Elektor Labs
€ 59,95€ 49,95Bestpreis
-

Elektor Digital Le manuel officiel du Raspberry Pi (PDF)
Réalisés par les créateurs du MagPi, le magazine officiel de Raspberry Pi Démarrez avec le Raspberry Pi 5, le dernier-né et le plus performant de la famille des nano-ordinateurs Raspberry Pi. Apprenez à coder et à réaliser des projets avec cet ordinateur étonnant. Dans ce manuel dédié au Raspberry Pi 5, nous vous proposons aussi de nombreuses idées de projets également réalisables avec le Raspberry Pi 4, le Raspberry Pi Zero 2 W et le Raspberry Pi Pico W. Avec des tutoriels, des projets pratiques, des essais techniques, des guides et bien plus encore, il s’agit de la ressource ultime pour le Raspberry Pi ! 228 pages sur le Raspberry Pi Tout ce que vous devez savoir sur le Raspberry Pi 5 Prise en main de tous les Raspberry Pi Amusez-vous et apprenez l’électronique avec le Pico W Des projets inspirants pour vous donner des idées de réalisations Apprenez μPython en construisant une mini-console Démarrez avec le module caméra Raspberry Pi Intelligence artificielle, codage de son propre agent ChatGP
€ 29,95
Mitglieder: € 26,96
-

Elektor Digital Elektor Special: Robotics and Automation (PDF)
AI in Practice Dive into the fascinating world of robotics and automation! This Elektor Special shows you how to build your own robots with creativity, a little know-how, and affordable technology. From your first DIY project with Arduino or Raspberry Pi to intelligent systems with AI – this issue makes modern robotics understandable and accessible. Discover practical instructions, inspiring projects, and exciting insights into the maker scene. Learn how experimentation, community, and openness give rise to true innovation – and why robotics is so much more than just a technical hobby. Contents Imagination turns into reality Arduino-controlled Drawing Robot GalaxyRVR Mars Rover Kit for Arduino YDLIDAR X4Pro Lidar xHuskyLens AI Camera DOF Robot Arm with Raspberry Pi Pico Manufacturing Robots with Fischertechnik Pneumatic Industrial Robot Why Do We Keep Building Robot Dogs? Elektor Mini-Wheelie Robot Vehicles and Autonomous Driving
€ 14,95
Mitglieder: € 13,46
-

Elektor Bundles MakePython ESP32 Development Kit (EN)
Learn how to use the ESP32 Microcontroller and MicroPython programming in your future projects! The project book, written by well-known Elektor author Dogan Ibrahim, holds many software- and hardware-based projects especially developed for the MakePython ESP32 Development Kit. The kit comes with several LEDs, sensors, and actuators. The kit will help you acquire the basic knowledge to create IoT projects. The book’s fully evaluated projects feature all the supplied components. Each project includes a block diagram, a circuit diagram, a full program listing, and a complete program description. Included in the kit 1x MakePython ESP32 development board with LCD 1x Ultrasonic ranging module 1x Temperature and humidity sensor 1x Buzzer module 1x DS18B20 module 1x Infrared module 1x Potentiometer 1x WS2812 module 1x Sound sensor 1x Vibration sensor 1x Photosensitive resistance module 1x Pulse sensor 1x Servo motor 1x USB cable 2x Button 2x Breadboard 45x Jumper wire 10x Resistor 330R 10x LED (Red) 10x LED (Green) 1x Project book (206 pages) 46 Projects in the Book LED Projects Blinking LED Flashing SOS Blinking LED – using a timer Alternately flashing LEDs Button control Changing the LED flashing rate using pushbutton interrupts Chasing-LEDs Binary-counting LEDs Christmas lights (random-flashing 8 LEDs) Electronic dice Lucky day of the week Pulsewidth Modulation (PWM) Projects Generate a 1000-Hz PWM waveform with 50% duty cycle LED brightness control Measuring the frequency and duty cycle of a PWM waveform Melody maker Simple electronic organ Servo motor control Servo motor DS18B20 thermometer Analog To Digital Converter (ADC) Projects Voltmeter Plotting the analog input voltage ESP32 internal temperature sensor Ohmmeter Photosensitive resistance module Digital To Analog Converter (DAC) Projects Generating fixed voltages Generating a sawtooth-wave signal Generating a triangular-wave signal Arbitrary periodic waveform Generating a sinewave signal Generating accurate sinewave signal using timer interrupts Using The OLED Display Seconds counter Event counter DS18B20 OLED based digital thermometer ON-OFF temperature controller Measuring the temperature and humidity Ultrasonic distance measurement Height of a person (stadiometer) Heart rate (pulse) measurement Other Sensors Supplied with the Kit Theft alarm Sound-activated light Infrared obstacle avoidance with buzzer WS2812 RGB LED ring Timestamping temperature and humidity readings Network Programming Wi-Fi scanner Remote control from the Internet browser (using a smartphone or PC) – Web Server Storing temperature and humidity data in the Cloud Low-Power Operation Using a timer to wake up the processor
€ 89,95€ 69,95Bestpreis
-

Elektor Digital Elektor September/October 2026 (PDF) EN
Elektor GREEN and GOLD members can download their digital edition here. Not a member yet? Click here. The ESP-BLASTA Mini ESP32 Rocket Drone That Flies 100 km/h+ Wireless Workshop (1)Radio Modules Unlocked: 433 MHz CC1101 Sub-GHz Transceiver AM TransmitterWith Square/Sine Wave Generator on Raspberry Pi Pico STM32Cube Innovation ChallengeCompete with Your Best STM32C5 Design CoffeeCallerHow a Long Hallway Led to a Custom Mesh-Networked PCB AudiotronicsTotal Harmonic Distortion Elektor at 65Projects from Septembers and Octobers Past Bluetooth Channel Sounding for Asset TrackingCentimeter-Level Precision Ranging for Next-Generation IoT 2026: An AI OdysseyQuantum Computing Is Not the Next GPU Protecting the Cloud Demands Security at the Edge First Experiences with the HackRF ProPractical Tests with the New SDR Hardware Modem Upgrade from GPRS/2G to LTE/4GUsing a Wireless Alarm Control Panel as an Example Loop Antenna with RF BricksPart 1: A DIY Shortwave Antenna with Adjustable Directivity Internet Radio to AM ConverterUsing an ESP32-S3 as Transmitter Err-lectronics mioty — An OverviewFraunhofer’s Approach to LPWAN Workbench WisdomPractical Tips from Experts Walter, the Compact IoT ModulePart 2: Accessing Weather and Data Services
€ 9,50
-

Holybro Holybro X500 V2 ARF Drohnen-Kit
Das X500 V2 ARF-Kit ist ein erschwingliches, leichtes und robustes professionelles Drohnen-Kit aus Kohlefaser, das einfach zusammenzubauen ist (weniger als 15 Minuten). Es wird mit dem X500 V2-Rahmenkit und vorinstallierten Motoren, Reglern, Stromverteilerplatinen und Propellern geliefert. Es ist perfekt kompatibel mit verschiedenen Flugsteuerungen wie der Holybro Pixhawk-Serie, Durandal, Pix32 V5 usw. Im Vergleich zum Vorgängermodell gibt es zahlreiche Verbesserungen. Technische Daten Radstand: 500 mm Motormontagemuster: 16x16 mm Rahmenkörper: 144x144 mm, 2 mm dick Fahrwerkshöhe: 215 mm Abstand zwischen Ober- und Unterplatte: 28 mm Gewicht: 610 g Flugzeit: ca. 18 Minuten im Schwebeflug ohne zusätzliche Nutzlast. Getestet mit 5000 mAh-Akku. Nutzlast: 1500 g (ohne Akku) Batterieempfehlung: 4S 3000-5000 mAh 20C+ mit XT60 Lipo-Batterie (nicht im Lieferumfang enthalten) Lieferumfang X500 V2 Rahmenkit Mit vorinstallierten Elementen: 4x Motoren: Holybro 2216 KV920 Motor (4 Stück) mit XT30-Stecker 4x Regler (BLHeli S ESC 20A) 6x 1045 Propeller Stromverteilungsplatine – XT60-Stecker für Batterie & XT30-Stecker für ESCs & Peripheriegeräte Hinweis: Die Tiefenkamerahalterung ist separat erhältlich.
€ 379,95
Bestpreis
-

Elektor Zenerdioden-Tester
Der Elektor Zenerdioden-Tester ist im Wesentlichen eine Konstantstromquelle, die in Stufen von 1 bis 50 mA geschaltet werden kann. Er kann verwendet werden, um Z-Dioden bis zu maximal 54 V zu testen. Dank eines 60-V-Step-up-Wandlers kann das Gerät mit den üblichen 5 bis 12 V versorgt werden. Das Prinzip dieses Testers ist einfach. Eine Z-Diode oder ein anderes DUT (device under test, also ein Prüfling, wie z. B. eine LED) wird über eine einstellbare Stromquelle vorgespannt. Die Spannung über dem DUT kann mit einem Multimeter gemessen werden. Die Spannung der meisten (kleinen) Z-Dioden ist bei einem Strom von 5 mA spezifiziert. Je nach Anwendung kann auch die Spannung bei anderen Strömen interessant sein. Deshalb stehen sechs Stromeinstellungen zur Verfügung: 1, 2, 5, 10, 20 und 50 mA. LEDs sind häufig bei einem Strom von 20 mA spezifiziert. Getestet werden kann: Ob eine Z-Diode defekt ist (Kurzschluss oder hochohmig). Ob eine Z-Diode die korrekte Z-Spannung aufweist. Wie sich eine Z-Spannung bei unterschiedlichen Strömen verändert. Welche exakte Spannung an einer integrierten Spannungsreferenz anliegt. Ob sich LEDs in einer Reihenschaltung in ihrer Helligkeit unterscheiden (daher der Strom von 20 mA). Wie hoch die Stromverstärkung bei unterschiedlichen Basisströmen in (Leistungs-)Transistoren ist. Das Kit enthält alle in der Stückliste aufgeführten Teile, einschließlich Platine und Gehäuse. Technische Daten Versorgungsspannung 5…12 V/2 A (USB-C) Versorgungsstrom (Itest = 50 mA) 1,1 A bei 5 V / 412 mA bei 12 V Wählbare Ströme 1, 2, 5, 10, 20 und 50 mA Max. Prüfspannung >54 V bei Itest ≥1 mA Max. Ausgangsspannung 60 V bei Itest = 0 mA Spannungsbegrenzung bei 5 V 4,5 V bei Itest = 1 mA / 5,18 V bei Itest = 50 mA Gehäuseabmessungen 110 x 82 x 44 mm Platinengröße 105,4 x 67,3 mm Anschlüsse 4-mm-Bananenbuchsen für Multimeter 2-mm-Bananenbuchsen für Prüfklemmen USB-C-Buchse für die Spannungsversorgung Lieferumfang Widerstände R1 = 3.3 kΩ, 600 mW, 1% R2 = 0.15 Ω, 1 W, 5%, LS 12.7 mm, ø 3.5 mm R3, R8 = 180 Ω, 600 mW, 1% R4, R6, R16 = 1 kΩ, 600 mW, 1% R5, R19 = 47 kΩ, 600 mW, 1% R7 = 3.9 kΩ, 1 W, 5%, LS 12.7 mm, ø 3.5 mm R9, R10, R12 = 10 kΩ, 600 mW, 1% R11, R13 = 100 Ω, 600 mW 1% R14 = 249 Ω, 600 mW, 1% R15 = 499 Ω, 600 mW, 1% R17 = 2.49 kΩ, 250 mW, 1% R18 = 4.99 kΩ, 250 mW, 1% Kondensatoren C1 = 470 uF / 35 V, 20%, Ir = 1.86 A, ø 12.5 mm, LS 5 mm, ESR = 0.038 Ω (Panasonic EEUTP1V471) C2 = 1 uF / 100 V, 10%, X7R, LS 5 mm C3 = 2.2 nF / 50 V, 10%, X7R, LS 5 mm C4, C7 = 100 nF / 100 V, 10%, X7R, LS 5 mm C5 = 100 uF / 100 V, 20%, ø 14 mm max., LS 5 mm C6 = 1 nF / 100 V, 10%, X7R, LS 5 mm Induktor L1 = 100 uH, Irms = 2.4 A, Isat = 3.5 A, 0.09 Ω, radial, pitch 2.5/5/10 mm, ø 14 mm max. (Kemet SBC8-101-242) Halbleiter D1 = MUR120G, DO-41 D2, D4 = STPS3150RL, DO-201AD D3 = Z-diode, 18 V, 1.3 W (BZX85C18) D5 = Z-diode, 5.1 V, 0.5 W (1N5231B) LED1 = LED in pushbutton S1 LED2 = LED, green, 3 mm IC1 = MC34063, DIP-8 IC2 = LM4040BIZ-5.0/NOPB, TO-92 (TO-226AA-3) IC3 = TL051CP, DIP-8 T1 = BC327.25, TO-92 T2 = STP40NF10L, TO-220 T3 = IRF9510PBF, TO-220 T4 = 2N7000, TO-92 Sonstiges K1, K2, S1, S3 = 2-way screw terminal block, LS 3.5 mm, max. 1.5 mm² connected to K1 = USB-C socket, 30 V/3 A, chassis mounted, wired, 9 x 16 mm connected to K2 = Banana Connector, 2 mm, Socket, 60 VDC, Panel Mount, red (Multicomp 24.102.1) connected to K2 = Banana Connector, 2 mm, Socket, 60 VDC, Panel Mount, black (Multicomp 24.102.2) Test clip, red, 30 VAC/60 VDC (Hirschmann 931467101) Test clip, black, 30 VAC/60 VDC (Hirschmann 931467100) S1 = Pushbutton, panel mount, SPST-NO, 30 DC/100 mA, with red LED S2 = Rotary Switch, 6 position, 2 pole, 30°, 250 V/150 mA S3 = Toggle switch, panel mount, SPDT, solder lugs, 28 VDC T2, T3 = Heat sink, 15°C/W, FK 214 SA-CB Enclosure Hammond 1591XXSSBK, ABS, 110 x 82 x 44 mm Knob for S2, round shaft 6 mm, ø 21 mm, with indicator line (Multicomp CP-LB21-6-6D) 4 x Self-tapping screw #4-1/4", carbon steel, pan head Banana plug, red, 2 mm, 60 VDC (Multicomp 25.205.1) Banana plug, black, 2 mm, 60 VDC (Multicomp 25.205.2) Banana socket, black 4 mm, panel mount Banana socket, red 4 mm, panel mount for LED1, LED2 = Pin header, 1 x 2, vertical, pitch 2.54 mm for LED1, LED2 = Pin socket, 1 x 2, vertical, pitch 2.54 mm for T2, T3 = M3 screw, 10 mm, steel, pan head 2 x M3 washer, plain, steel 4 x M3 nut for IC1, IC3 = DIP-8 socket Wire, black, 0.25 mm² (24 AWG), stranded 14 x 0.15 mm, 1 m Wire, red, 0.25 mm² (24 AWG), stranded 14 x 0.15 mm, 1 m PCB 250772-1 v1.1 Links Artikel Elektor Labs
€ 99,95€ 79,95Bestpreis
-

Elektor Publishing PLC Programming with the Raspberry Pi and the OpenPLC Project
ModbusRTU and ModbusTCP examples with the Arduino Uno and ESP8266 Introduction to PLC programming with OpenPLC, the first fully open source Programmable Logic Controller on the Raspberry Pi, and Modbus examples with Arduino Uno and ESP8266 PLC programming is very common in industry and home automation. This book describes how the Raspberry Pi 4 can be used as a Programmable Logic Controller. Before taking you into the programming, the author starts with the software installation on the Raspberry Pi and the PLC editor on the PC, followed by a description of the hardware. You'll then find interesting examples in the different programming languages complying with the IEC 61131-3 standard. This manual also explains in detail how to use the PLC editor and how to load and execute the programs on the Raspberry Pi. All IEC languages are explained with examples, starting with LD (Ladder Diagram) over ST (Structured Control Language) to SFC (Special Function Chart). All examples can be downloaded from the author's website. Networking gets thorough attention too. The Arduino Uno and the ESP8266 are programmed as ModbusRTU or ModbusTCP modules to get access to external peripherals, reading sensors and switching electrical loads. I/O circuits complying with the 24 V industry standard may also be of interest for the reader. The book ends with an overview of commands for ST and LD. After reading the book, the reader will be able to create his own controllers with the Raspberry Pi.
€ 39,95
Mitglieder: € 35,96
-
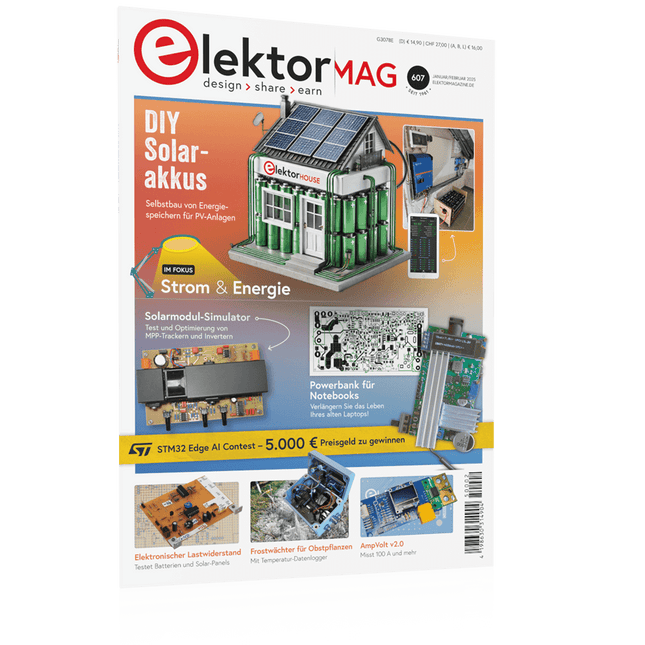
Elektor 01-02/2025 (DE)
Diese Ausgabe steht allen GOLD- und GREEN-Mitgliedern auf der ElektorMagazine-Website zum Download bereit! Sie sind noch kein Mitglied? Hier klicken! DIY-SolarakkusÜber den Selbstbau von Energiespeichern für Solaranlagen Solarmodul-SimulatorFür Test und Optimierung von MPP-Trackern und Invertern Der STM32-Edge-KI-WettbewerbEntdecken Sie den neuen STM32N6 und nehmen Sie am Wettbewerb um 5.000 € teil! Erweiterung der BandlückeWarum gibt es so viel Interesse an SiC und GaN? Power-Bank für NotebooksVerlängern Sie das Leben Ihres alten Laptops! Medizinische RoboterÜberwindung technischer und regulatorischer Hürden Frostwächter für ObstpflanzenMit Temperatur-Datenlogger Das analoge DingDer Arduino des Analog-Computings? Sparsames NetzrelaisMit über 90% Leistungsreduzierung Verbesserung der DC-Last ET5410A+Keep cool and be quiet! electronica 2024 im Rückblick Elektromagnetische VerträglichkeitEMV kurz und bündig! Aller Anfang......muss nicht schwer sein: Aktive Filter Verlustleistung reduzieren mit AbleitkondensatorenEin cleverer Einsatz von kapazitiver Reaktanz Preiswerter 12-Bit-Digital-Analog-Wandler MCP4725Mit EEPROM-Feature für sicheres Einschaltverhalten Fnirsi LCR-ST1, die intelligente LCR-SMD-Pinzette Test- und Messlabor mit Raspberry PiDas Wichtigste zuerst: Der ADC Elektronischer LastwiderstandEin Projekt aus der Kiste 2025: Eine Odyssee in die KIEinige Projekte für das neue Jahr Projekt-Update: Modulares DC-Leistungsmessgerät AmpVolt v2.0100 Ampere und mehr! Projekt 2.0 Ethische Transparenz sichtbar gemachtErgebnisse der Umfrage 2024 von Ethics in Electronics Elektor Audio-DSP FX-Prozessor-BoardTeil 2: Anwendungen erstellen
€ 14,90


