
Suchergebnisse für "linear OR circuit OR design OR handbook"
-
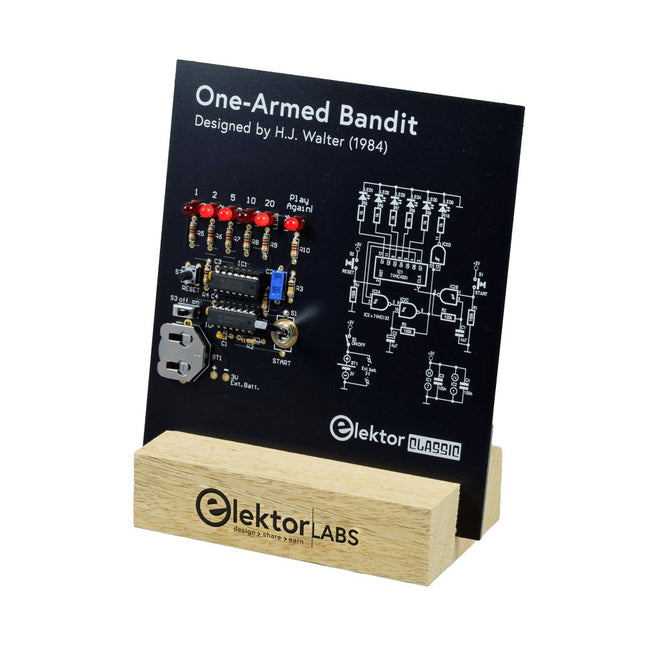
Elektor Labs Elektor Einarmiger Bandit
Ziehen Sie den Hebel nach unten, um die höchste Punktzahl zu erzielen!Dieser Elektor-Schaltungsklassiker aus dem Jahr 1984 zeigt eine spielerische Anwendung von Logik-ICs der CMOS-400x-Serie in Kombination mit LEDs, einer damals sehr beliebten Kombination. Das Projekt imitiert einen Spielautomaten mit rotierenden Ziffern.Das SpielUm das Spiel zu spielen, vereinbaren Sie zunächst die Anzahl der Runden. Spieler 1 betätigt den Schalthebel so lange wie gewünscht und lässt ihn los. Die LEDs zeigen dann die Punktzahl an, die sich aus der Summe der 50-20-10-5 aufleuchtenden Ziffern ergibt. Wenn die Play Again!-LED aufleuchtet, hat Spieler 1 eine weitere, „freie“ Runde. Wenn nicht, ist Spieler 2 am Zug. Die Spieler behalten ihre Punkte im Auge und der Spieler mit der höchsten Punktzahl gewinnt.FeaturesLEDs zeigen den Punktestand anMulti-Player und Play Again!Symbole des Elektor Heritage CircuitGetestet und geprüft von Elektor LabsEdukatives und geekiges ProjektNur Teile mit DurchgangslochLieferumfangPlatineAlle KomponentenHolzständerStücklisteWiderstände (5%, 250 mW)R1,R2,R3,R4 = 100kΩR5,R6,R7,R8,R9,R10 = 1kΩKondensatorenC1 = 4.7nF, 10%, 50V, 5mmC2 = 4.7μF, 10%, 63V, axialC3,C4 = 100nF, 10 %, 50V, Keramik X7R, 5mmHalbleiterLED1-LED6 = rot, 5mm (T1 3/4)IC1 = 74HC4024IC2 = 74HC132SonstigesS1 = Schalter, Kipphebel, 21-mm-Hebel, SPDT, tastendS2 = Schalter, taktil, 24V, 50mA, 6x6mmS3 = Schalter, Schieber, SPDTIC1,IC2 = IC-Sockel, DIP14BT1 = CR2032-Batteriehalteklammer für PlatinenmontageTischständerPCB 230098-1Nicht im Lieferumfang enthalten: BT1 = CR2032-Knopfzellenbatterie
€ 39,95€ 24,95Bestpreis
-

Elektor Digital Kickstart to Arduino Nano (E-book)
Get Cracking with the Arduino Nano V3, Nano Every, and Nano 33 IoT The seven chapters in this book serve as the first step for novices and microcontroller enthusiasts wishing to make a head start in Arduino programming. The first chapter introduces the Arduino platform, ecosystem, and existing varieties of Arduino Nano boards. It also teaches how to install various tools needed to get started with Arduino Programming. The second chapter kicks off with electronic circuit building and programming around your Arduino. The third chapter explores various buses and analog inputs. In the fourth chapter, you get acquainted with the concept of pulse width modulation (PWM) and working with unipolar stepper motors. In the fifth chapter, you are sure to learn about creating beautiful graphics and basic but useful animation with the aid of an external display. The sixth chapter introduces the readers to the concept of I/O devices such as sensors and the piezo buzzer, exploring their methods of interfacing and programming with the Arduino Nano. The last chapter explores another member of Arduino Nano family, Arduino Nano 33 IoT with its highly interesting capabilities. This chapter employs and deepens many concepts learned from previous chapters to create interesting applications for the vast world of the Internet of Things. The entire book follows a step-by-step approach to explain concepts and the operation of things. Each concept is invariably followed by a to-the-point circuit diagram and code examples. Next come detailed explanations of the syntax and the logic used. By closely following the concepts, you will become comfortable with circuit building, Arduino programming, the workings of the code examples, and the circuit diagrams presented. The book also has plenty of references to external resources wherever needed. An archive file (.zip) comprising the software examples and Fritzing-style circuit diagrams discussed in the book may be downloaded free of charge below.
€ 29,95
Mitglieder: € 26,96
-

Elektor Digital Radio Builder's Book (PDF)
From Detector to Software Defined RadioRadio frequency (RF) technology is one of the areas which still allows putting your own ideas into practice. Countless circuit variants with special objectives allow space for meaningful experiments and projects. Many things simply aren’t available off the shelf. Crystal detector radios without their own power source, simple tube receivers with a touch of nostalgia, the first reception attempts at Software Defined Radio, special receivers for amateur radio, all this can be realized with little effort and as a perfect introduction to RF electronics.For a long time, radio construction was the first step into electronics. Meanwhile, there are other ways, especially via computers, microcontrollers, and digital technology. However, the analog roots of electronics are often neglected. Elementary radio technology and easy-to-do experiments are particularly well suited as a learning field for electronics because you can start with the simplest basics here.But the connection to modern digital technology is also obvious, for example, when it comes to modern tuning methods such as PLL and DDS or modern DSP radios.This book aims to give an overview and present a collection of simple RF projects. The author would like to support you to develop your own ideas, to design your own receivers and to test them.
€ 32,95
Mitglieder: € 29,66
-

Elektor Bundles MakePython ESP32 Development Kit (EN)
Learn how to use the ESP32 Microcontroller and MicroPython programming in your future projects! The project book, written by well-known Elektor author Dogan Ibrahim, holds many software- and hardware-based projects especially developed for the MakePython ESP32 Development Kit. The kit comes with several LEDs, sensors, and actuators. The kit will help you acquire the basic knowledge to create IoT projects. The book’s fully evaluated projects feature all the supplied components. Each project includes a block diagram, a circuit diagram, a full program listing, and a complete program description. Included in the kit 1x MakePython ESP32 development board with LCD 1x Ultrasonic ranging module 1x Temperature and humidity sensor 1x Buzzer module 1x DS18B20 module 1x Infrared module 1x Potentiometer 1x WS2812 module 1x Sound sensor 1x Vibration sensor 1x Photosensitive resistance module 1x Pulse sensor 1x Servo motor 1x USB cable 2x Button 2x Breadboard 45x Jumper wire 10x Resistor 330R 10x LED (Red) 10x LED (Green) 1x Project book (206 pages) 46 Projects in the Book LED Projects Blinking LED Flashing SOS Blinking LED – using a timer Alternately flashing LEDs Button control Changing the LED flashing rate using pushbutton interrupts Chasing-LEDs Binary-counting LEDs Christmas lights (random-flashing 8 LEDs) Electronic dice Lucky day of the week Pulsewidth Modulation (PWM) Projects Generate a 1000-Hz PWM waveform with 50% duty cycle LED brightness control Measuring the frequency and duty cycle of a PWM waveform Melody maker Simple electronic organ Servo motor control Servo motor DS18B20 thermometer Analog To Digital Converter (ADC) Projects Voltmeter Plotting the analog input voltage ESP32 internal temperature sensor Ohmmeter Photosensitive resistance module Digital To Analog Converter (DAC) Projects Generating fixed voltages Generating a sawtooth-wave signal Generating a triangular-wave signal Arbitrary periodic waveform Generating a sinewave signal Generating accurate sinewave signal using timer interrupts Using The OLED Display Seconds counter Event counter DS18B20 OLED based digital thermometer ON-OFF temperature controller Measuring the temperature and humidity Ultrasonic distance measurement Height of a person (stadiometer) Heart rate (pulse) measurement Other Sensors Supplied with the Kit Theft alarm Sound-activated light Infrared obstacle avoidance with buzzer WS2812 RGB LED ring Timestamping temperature and humidity readings Network Programming Wi-Fi scanner Remote control from the Internet browser (using a smartphone or PC) – Web Server Storing temperature and humidity data in the Cloud Low-Power Operation Using a timer to wake up the processor
€ 89,95€ 69,95Bestpreis
-

Elektor Digital Elektor Special: Introduction to Electronics with Arduino (PDF)
Although the Arduino isn’t a novelty any longer, there are still many beginners who want to try programming and development with a microcontroller, and to them, it is all new. All beginnings can be difficult, though they should be light and enjoyable. You do not need much or expensive equipment for the examples. The circuits are built on a small breadboard, and, if necessary, connected to an Arduino Uno, which you can program on a Windows PC. You will find clear examples of how to build all circuits, ensuring easy and error-free reproduction. Projects Discussed Current & Voltage – How it all began Arduino Hardware Arduino Programming The Electrical Circuit Measuring with the Multimeter Circuit Diagrams and Breadboards Creating Circuit Diagrams Breadboard Views with Fritzing Online Circuit Simulation Indispensable: Resistors (Part 1) Hands-on with Resistors (Part 2) Variable Resistors Diodes: One-way Street for Current The Transistor Switch Electromagnetism Relays and Motors op-amps: Operational Amplifiers Capacitors The NE555 Timer PWM and Analogue Values with Arduino 7-Segment Temperature Display Introduction to Soldering and LCDs
€ 11,95
Mitglieder: € 10,76
-

Elektor Bundles Arduino Uno R4 WiFi (Bundle)
Buch: Mastering the Arduino Uno R4 Das Arduino Uno R3 Board basiert auf dem kostengünstigen 8-Bit-Prozessor ATmega328P und dürfte sich als das beliebteste Mitglied der Arduino-Familie erweisen. Dieses zuverlässige Board begleitet uns seit vielen Jahren. Elf Jahre später erschien der lang erwartete Nachfolger, das Arduino Uno R4. Es basiert auf einem 48-MHz-32-Bit-Arm-Cortex-M4-Mikrocontroller und bietet deutlich erweiterten SRAM- und Flash-Speicher. Zusätzlich wurden ein hochpräziserer ADC und ein neuer DAC integriert. Das Uno R4 Board unterstützt außerdem den CAN-Bus mit einer entsprechenden Schnittstelle. Das Board ist in zwei Versionen erhältlich: Uno R4 Minima und Uno R4 WiFi. Dieses Buch zeigt, wie man mit diesen neuen Boards und nur wenigen Bauteilen und externen Modulen viele verschiedene und interessante Projekte realisieren kann. Alle im Buch beschriebenen Projekte wurden, je nach Modell, vollständig auf dem Uno R4 Minima oder dem Uno R4 WiFi-Board getestet. Die Projektthemen umfassen das Auslesen, Steuern und Ansteuern zahlreicher Komponenten und Module des Bausatzes sowie des jeweiligen Uno R4-Boards, einschließlich LEDs 7-Segment-Anzeigen (mit Timer-Interrupts) LCDs Sensoren RFID-Leser 4×4-Tastatur Echtzeituhr (RTC) Joystick 8×8 LED-Matrix Motoren DAC (Digital-Analog-Wandler) LED-Matrix WiFi-Konnektivität Serieller UART CAN-Bus Infrarot-Controller und -Empfänger Simulatoren … alles auf kreative und lehrreiche Weise, wobei die Funktionsweise des Projekts und die zugehörige Software sehr detailliert erklärt werden. Arduino Uno R4 WiFi Der Arduino Uno R4 wird vom Renesas RA4M1 32-Bit ARM Cortex-M4 Prozessor angetrieben und bietet dadurch eine deutliche Steigerung der Rechenleistung, des Speichers und der Funktionalität. Die WiFi-Version verfügt zusätzlich zum RA4M1 über ein ESP32-S3 WLAN-Modul und erweitert so die kreativen Möglichkeiten für Maker und Ingenieure. Der Arduino Uno R4 taktet mit 48 MHz und bietet damit eine dreifache Steigerung gegenüber dem beliebten Uno R3. Darüber hinaus wurde der SRAM von 2 kB auf 32 kB und der Flash-Speicher von 32 kB auf 256 kB erweitert, um komplexere Projekte zu unterstützen. Auf Wunsch der Community wurde der USB-Anschluss auf USB-C umgestellt und die maximale Versorgungsspannung dank eines verbesserten Wärmemanagements auf 24 V erhöht. Die Platine verfügt über einen CAN-Bus und einen SPI-Anschluss, wodurch Anwender den Verkabelungsaufwand reduzieren und durch den Anschluss mehrerer Shields parallele Aufgaben ausführen können. Ein 12-Bit-Analog-DAC ist ebenfalls auf der Platine vorhanden. Technische Daten Mikrocontroller Renesas RA4M1 (ARM Cortex-M4) USB USB-C Programmieranschluss Anschlüsse Digitale Ein-/Ausgangsanschlüsse 14 Anschlüsse Analoge Eingangsanschlüsse 6 DAC 1 RTC 1 PWM-Anschlüsse 6 Kommunikation UART 1x I²C 1x SPI 1x Qwiic I²C-Anschluss 1x CAN 1x CAN-Bus Stromversorgung Betriebsspannung 5 V Eingangsspannung (VIN) 6-24 V Gleichstrom pro I/O-Pin 8 mA Taktfrequenz Hauptkern 48 MHz Speicher RA4M1 256 kB Flash, 32 kB RAM LED-Matrix 12 x 8 (96 rote LEDs) Abmessungen 68,9 x 53,4 mm Downloads Datasheet Schematics Dieses Bundle enthält: Buch: Mastering the Arduino Uno R4 (Einzelpreis: 45 €) Arduino Uno R4 WiFi (Einzelpreis: 30 €)
€ 74,95€ 64,95Bestpreis
-

Elektor Digital Elektor Circuit Special 2025 (PDF) NL
Elektor GREEN en GOLD leden kunnen deze uitgave hier downloaden. Nog geen lid? Klik hier om een lidmaatschap af te sluiten. USB-meetadaptertest stroom en signaalkwaliteit van USB-poorten 4...20 mA stroom-uitgang voor Arduino Unobetrouwbare, EMI-ongevoelige current loop-interface Automatische stofzuigerschakelaarhoud uw werkplek schoon DDS-generator met ATtiny Opamp-tester v2nieuwe print – nu ook voor SMD’s 550-mW audio ‘Lamp-Amp’voor die warme buizenklank Zekeringbewakerhoud zekeringen in de gaten met een knipper-LED Hoogwaardige RIAA-voorversterkerhaal het beste uit uw vinylplaten! Kalibratie voor draaitafelsArduino-gebaseerde 100/120Hz-stroboscoop Elektor Classics: Video-versterker Dimmer met IR-afstandsbedieningcomfortabel en elegant staande halogeen- of LED-lampen regelen Het gebruik van switch…case bij strings in C++/Arduino IDE Magneetzoekermet een eenvoudige Hall-effect-sensor Raspberry Pi: slimme aan/uit-knopeen oplossing voor de Raspberry Pi tot aan model 4 Professionele tipsvan makers voor makers Praktische projecten met de 555-timerDC-motorbesturing en snelle reactie-uitdaging Eenvoudige ‘aan-verklikker’spaar energie met een simpele schakeling Powerpacks parallelschakelendrie dagen ononderbroken stroom VFO tot 15 MHzimplementatie met Raspberry Pi Pico Vioolstemmer met ATtiny202 Elektor Classics: Video-ingangsversterker voor zwart/wit-TV Capaciteitsmeter20 pF tot 600 nF Quasi-analoog uurwerk Mk IItwee LED-ringen – voor uren en minuten Niets is onmogelijk(met hulp van het Arduino-ecosysteem) Neon dobbelsteen Elektor Classics: RTTY-afstemhulp Inspirerende hardware-ontwerpen voor uw ESP’s Elektor Classics: 3 A voeding RGB-LED’s met geïntegreerde stuurkringlicht met precisie: ICLED’s zetten de standaard Experiment: een mixed-signal Theremin?moderne time-of-flight sensoren plus de tijdloze analoge XR2206 ESP32 audio-transceiver (deel 1)SD-kaart WAV-speler demo Elektor infographicschakelingen en schakelingontwerp 2025 Kleine audiomixereenvoudig, veelzijdig en schaalbaar Slimme timer voor trapverlichtingbespaar op uw energierekening! Maak uw rolluiken slimmerVelux-hardware besturen met een ESP32 en MQTT Solid-state voetenwarmercomfortabel en energiezuinig Is de M5Stamp Fly-quadcopter de nieuwe Tello? Vergroot het WiFi-bereik van de ESP32-C3 SuperMinieenvoudige en effectieve antennemodificatie ZD-8968 hetelucht-soldeerstationbudgetvriendelijk werkpaard of gebakken lucht? Parkeersensor-testervind defecten in het PDC-systeem van een auto
€ 9,95
-

Elektor Publishing Programming Microcontrollers in C/C++ Using Arduino
With Examples for Arduino UNO, Raspberry Pi Pico and ESP32 Programming small electronic systems has never been more accessible. Tasks that once demanded expensive tools, specialized hardware, and deep electrical engineering expertise can now be tackled with low-cost development boards and approachable software. At the centre of this shift is the Arduino environment, which provides a unified and familiar way to program a wide range of microcontroller platforms—from classic AVR boards like the Arduino UNO to modern ARM-based boards such as the Raspberry Pi Pico, and powerful Wi-Fi-enabled devices like the ESP32. This book introduces embedded programming through the core idea that defines all microcontrollers: reading inputs, processing information, and controlling outputs in a predictable loop. The Arduino environment abstracts much of the hardware complexity, allowing you to focus on behaviour rather than implementation details. With just a few lines of code, you can blink LEDs, read sensors, control motors, and communicate with other devices. While the Arduino UNO, Raspberry Pi Pico, and ESP32 boards differ greatly in performance and features, they share the same fundamental building blocks: digital and analog I/O, timers, serial communication, PWM, interrupts, and power management. Learning these concepts within the Arduino framework builds skills that transfer easily across platforms and scale toward more advanced applications. By exploring multiple boards while maintaining a consistent programming approach, this book helps you progress from simple experiments to confidently produce well-structured designs—showing that embedded development can be both practical and enjoyable.
€ 29,95
Mitglieder: € 26,96
-

Elektor Digital Elektor Novembre/Décembre 2025 (PDF) FR
Le téléchargement intégral de ce numéro est disponible pour nos membres GOLD et GREEN sur le site Elektor Magazine ! Pas encore membre ? Cliquez ici. Relio v1.0 – détection de présence et contrôle à distanceUn contrôleur intelligent pour appareils électriques compatible Matter concevoir de meilleurs circuits imprimésUn guide pratique pour les professionnels et les makers KiCad 9Nouvelles fonctionnalités et mises à jour picoampèremètre de précision (1)Traceur de courbes jusqu’à la gamme des pA ! étoile de Noël 2025Fabriquer votre étoile testeur de continuité 100 mV l’innovation électronique en EuropeLes entreprises à suivre de près productronica 2025 : quoi de neuf dans le développement et la production électroniques l’automatisation face aux défis de la relocalisation, des tarifs et de la pénurie de main-d’œuvre Au-delà de la résilienceLa circularité dans l’électronique composants passifsBobines à faibles pertes pour convertisseurs CC/CC à haut rendement comment les machines de bureau démocratisent la production de circuits imprimés démarrer en électronique......Alimentation sur le vifButton Fever soudage : quoi de neuf en 2025 ?Conseils pratiques en direct depuis l’établi SimulIDEUn outil tout-en-un pour le prototypage de circuits 2025 : une odyssée de l’IADe l’autocomplétion à un véritable collègue Wordy Christmas TreeUn sapin électronique polyglotte pour les fêtes projet 2.0Corrections, mises à jour et courrier des lecteurs Analog Pipeline DistortionUn effet audio original pour guitares et autres instruments carte émetteur-récepteur audio ESP32 (3)Transmission stéréo et double radio
€ 10,95
-

Red Pitaya Red Pitaya STEMlab 125-14 PRO Gen 2 Starter Kit (inkl. Buch)
Dieses Bundle enthält das Red Pitaya STEMlab 125-14 PRO Gen 2 Starter Kit und das neue Buch "Experimenting with Red Pitaya STEMlab Gen 2". Das Red Pitaya STEMlab 125-14 PRO Gen 2 Starter Kit ist eine leistungsstarke und flexible Plattform für Signalverarbeitung, Datenerfassung und elektronische Messanwendungen. Dieses Kit wurde für Ingenieure, Entwickler, Forscher und Dozenten konzipiert und bietet alles, was für den Einstieg in die Entwicklung fortschrittlicher Mess- und Steuerungssysteme erforderlich ist. Das Herzstück des Kits ist das STEMlab 125-14 PRO Gen 2-Board, eine verbesserte und ultraleichte Entwicklungsplatine. Angetrieben vom Xilinx Zynq-7010 SoC mit 512 MB RAM kombiniert es die Programmierbarkeit eines FPGAs mit der Rechenleistung eines ARM-Prozessors, um leistungsstarke Messtechnik und kundenspezifische Signalverarbeitungslösungen zu ermöglichen. Das Board bietet eine 14-Bit-ADC- und DAC-Auflösung, eine Abtastrate von 125 MS/s, einen Eingangsbereich von ±20 V und eine Bandbreite von bis zu 60 MHz. Dank seines verbesserten rauscharmen analogen Frontends, der USB-C-Konnektivität und des kompakten Designs eignet es sich für anspruchsvolle Anwendungen wie HF-Entwicklung, Radarsysteme, Photonikforschung, Software-Defined Radio (SDR) und industrielle Automatisierung. Das Starter Kit enthält alles notwendige Zubehör für den sofortigen Einsatz: eine microSD-Karte mit vorinstalliertem Betriebssystem, ein Netzteil, ein Ethernet-Kabel für den Fernzugriff, zwei 100-MHz-Oszilloskop-Messspitzen sowie SMA-zu-BNC-Adapter für flexible Signalanschlüsse. Das Red Pitaya STEMlab 125-14 PRO Gen 2 Starter Kit ist eine hervorragende Plattform für Rapid Prototyping, FPGA-Entwicklung, Messtechnik und fortgeschrittene Elektronikversuche. Features 14-Bit-ADC- und DAC-Auflösung Abtastrate: 125 MS/s Eingangsspannungsbereich: ±20 V Bandbreite: Bis zu 60 MHz Xilinx Zynq-7010 SoC (FPGA + ARM-Prozessor) 512 MB RAM Rauscharme analoge Front- und Backends Anwendungen HF-Entwicklung und -Test Radar- und drahtlose Systeme Software Defined Radio (SDR) Photonik und optische Forschung Industrielle Automatisierungs- und Steuerungssysteme Signalanalyse und -instrumentierung Schnelles Prototyping elektronischer Bauteile Messsysteme Technische Daten Prozessor Dual-Core ARM Cortex-A9 FPGA AMD Xilinx Zynq-7010 SoC RAM 512 MB (4 Gb) Speicher microSD-Karte (bis zu 32 GB) Betriebssystem Linux-basiertes Red Pitaya OS ADC-Auflösung 14 Bit DAC Auflösung 14 Bit Bandbreite 60 MHz (DC) Abtastrate 125 MS/s Analoge Eingangskanäle 2 Analoge Ausgangskanäle 2 Eingangsspannungsbereich ±1 V (LV) / ±20 V (HV) Eingangsimpedanz 1 MΩ / 10 pF Ausgangsspannungsbereich ±1 V Ethernet 1x Gigabit Ethernet (RJ45) USB 2x USB-C 2.0 (für Stromversorgung und Konsole) Digitale Ein-/Ausgänge 16x GPIO (3,3 V) Kommunikationsschnittstellen I²C, SPI, UART, CAN Stromversorgung 5 V/3 A über USB-C Abmessungen 106,8 x 60,0 x 17,9 mm Lieferumfang 1x Red Pitaya STEMlab 125-14 PRO Gen 2 Board 2x 100-MHz-Oszilloskop-Tastköpfe 2x SMA-zu-BNC-Adapter 1x microSD-Karte mit vorinstalliertem Betriebssystem 1x USB-C-Netzteil 1x Ethernet-Kabel Downloads Documentation Schematics Buch: Experimenting with Red Pitaya STEMlab Gen 2 Mit diesem neuen Buch geht Red Pitaya über ein vielseitiges Board hinaus – es wird zu einem leistungsstarken Laborinstrument für präzise Messungen, Analysen und Steuerungen. Von den Grundlagen der Entwicklung elektronischer Projekte über Überwachung, Regelung und Design bis hin zu Tests führt Sie dieses Buch Schritt für Schritt durch alles, was Sie wissen müssen, um das volle Potenzial der Red Pitaya-Hardware und -Software auszuschöpfen. Das Buch stellt Echtzeitprojekte auf FPGA-Basis vor, die auf einem PC mit der Vivado-Umgebung entwickelt und anschließend zur Ausführung und zum Testen auf die Red Pitaya übertragen werden. Sie lernen mehr über gesteigerte Leistung, erweiterte I/O-Möglichkeiten, verbesserte FPGA-Funktionen sowie fortschrittliche Konnektivitätsoptionen, die neue Möglichkeiten für präzise Messungen, Überwachung und Steuerung in Ihren Embedded-Anwendungen eröffnen. Im Buch entdecken Sie: Einen tiefgehenden Einblick in die Red Pitaya-Architektur und das Hardware-Design Elektronische Experimente mit Red Pitaya für Mess- und Überwachungsanwendungen Praxisnahe Projekte mit der Programmiersprache Python Praktische Anleitungen zur FPGA-Programmierung mit Red Pitaya Red Pitaya FPGA-Projekte mit Verilog HDL in der Vivado IDE Die praxisorientierte Entwicklung elektronischer Projekte inklusive Messung und Tests Schritt-für-Schritt-Beispiele, die Theorie und reale Umsetzung miteinander verbinden Ganz gleich, ob Sie eigene elektronische Schaltungen entwerfen, Werkzeuge zur Signalanalyse entwickeln oder Echtzeit-Steuerungs- und Überwachungssysteme erstellen – dieses Buch vermittelt Ihnen das nötige Wissen und die Sicherheit, um die Red Pitaya-Plattform vollständig zu verstehen und individuell anzupassen.
€ 799,00
Bestpreis
-

Elektor Digital PLC Programming with the Raspberry Pi and the OpenPLC Project (E-book)
ModbusRTU and ModbusTCP examples with the Arduino Uno and ESP8266 Introduction to PLC programming with OpenPLC, the first fully open source Programmable Logic Controller on the Raspberry Pi, and Modbus examples with Arduino Uno and ESP8266 PLC programming is very common in industry and home automation. This book describes how the Raspberry Pi 4 can be used as a Programmable Logic Controller. Before taking you into the programming, the author starts with the software installation on the Raspberry Pi and the PLC editor on the PC, followed by a description of the hardware. You'll then find interesting examples in the different programming languages complying with the IEC 61131-3 standard. This manual also explains in detail how to use the PLC editor and how to load and execute the programs on the Raspberry Pi. All IEC languages are explained with examples, starting with LD (Ladder Diagram) over ST (Structured Control Language) to SFC (Special Function Chart). All examples can be downloaded from the author's website. Networking gets thorough attention too. The Arduino Uno and the ESP8266 are programmed as ModbusRTU or ModbusTCP modules to get access to external peripherals, reading sensors and switching electrical loads. I/O circuits complying with the 24 V industry standard may also be of interest for the reader. The book ends with an overview of commands for ST and LD. After reading the book, the reader will be able to create his own controllers with the Raspberry Pi.
€ 32,95
Mitglieder: € 29,66
-

Elektor Digital FreeRTOS for ESP32-Arduino (E-book)
Practical Multitasking Fundamentals Programming embedded systems is difficult because of resource constraints and limited debugging facilities. Why develop your own Real-Time Operating System (RTOS) as well as your application when the proven FreeRTOS software is freely available? Why not start with a validated foundation? Every software developer knows that you must divide a difficult problem into smaller ones to conquer it. Using separate preemptive tasks and FreeRTOS communication mechanisms, a clean separation of functions is achieved within the entire application. This results in safe and maintainable designs. Practicing engineers and students alike can use this book and the ESP32 Arduino environment to wade into FreeRTOS concepts at a comfortable pace. The well-organized text enables you to master each concept before starting the next chapter. Practical breadboard experiments and schematics are included to bring the lessons home. Experience is the best teacher. Each chapter includes exercises to test your knowledge. The coverage of the FreeRTOS Application Programming Interface (API) is complete for the ESP32 Arduino environment. You can apply what you learn to other FreeRTOS environments, including Espressif’s ESP-IDF. The source code is available from GitHub. All of these resources put you in the driver’s seat when it is time to develop your next uber-cool ESP32 project. What you will learn: How preemptive scheduling works within FreeRTOS The Arduino startup “loopTask” Message queues FreeRTOS timers and the IDLE task The semaphore, mutex, and their differences The mailbox and its application Real-time task priorities and its effect Interrupt interaction and use with FreeRTOS Queue sets Notifying tasks with events Event groups Critical sections Task local storage The gatekeeper task
€ 39,95
Mitglieder: € 35,96


